Introduction
Following on my last blog post, Do We need AI FinOps? I heard a resounding yes! I wanted to continue the story.
Microsoft have been busy releasing the next reason that your AI bills are going to increase: Persistent Agents. These agents are part of the Agent 365 ecosystem with their own personal identity, mailbox, user account and tools.
Unlike existing Copilot Studio agents which are often initiated and tied to a user, these are an extension to the Autopilot concept and allow you to have AI Team mates.
The AI Teammates are hosted on the Github Copilot Harness, so they are billed through usage-based billing UBB and because of their nature, they are going to be harder to control because they are accessible through Microsoft Teams and Outlook, via chat and email respectively and also Microsoft Office via the Word, Excel and PowerPoint comments feature.
So, what does this mean?
Well, it is further proof of the need to get serious with your AI FinOps spend. So let’s discuss the process of setting up the Cost Management features for Microsoft 365 Copilot.
Microsoft, have also been busy. They have added more features, giving you more control in how you can configure these billing profiles and spending policies.
However, the clock is ticking when Microsoft released these usage based billing features they were switched off by default. This is due to change, from 1st December 2026 a default spending policy will be set-up for CSP purchased Microsoft Copilot Business licenses.
More information can be found here.
October 2026 announcements – Partner Center announcements | Microsoft Learn.
https://learn.microsoft.com/en-us/partner-center/announcements/2026-october#4
Where Microsoft Copilot FinOps Controls Live
Microsoft have put the Microsoft Copilot FinOps controls directly in Microsoft 365.
It all starts in the Microsoft Admin Centre (MAC) https://admin.cloud.microsoft.
Browse to the Copilot Node -> Cost Management

Here you can set up a general policy which covers everyone in the business who has access to use these tools. My recommendation is that you work with your CFO to define a monthly spend and then allocate it to all your users. The pricing is based on 0.01p per Copilot Credit, so 1000 credits is £10.00, and 10000 Copilot Credits is £100.
The first step, as mentioned, is to plan out what budgets and policies you are going to apply to the organisation. In my experience, you will have at least two spending policies but most likely more based on the usage/value scenarios.
- General Organisation
- Copilot VIPs / High usage/value users.
Setting up your spending policies
To set up a spending policy, do the following:
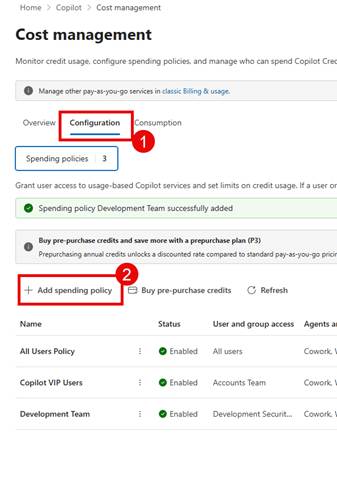
- Click on the Configuration Tab under Copilot->Cost Management
- Click Add Spending Policy
- Here you can choose the services that will be applied to this spending policy. I think the interesting one is the option at the top, “Allow new Agents and services as they become available” which shows that Microsoft have more services that will use this way of billing and here you can choose whether to automatically enable those. I suggest that you switch this off if you want to have control of the onboarding of services.
We have the following services, expanding Microsoft Copilot allows us to choose the sub-Copilot experiences.
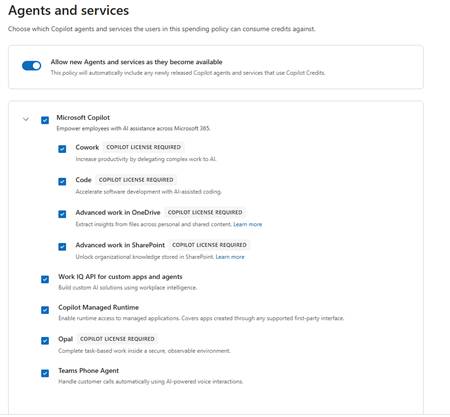
I am glad that they are giving us a way to turn off the services at this level and being able to control who can create Managed Apps with Code vs who can execute those Managed Apps through the “Copilot Managed Runtime”.
A quick summary of the services is shown below
| Service | Description |
| Copilot Cowork | A task-based Copilot experience for carrying out advanced, multi-step work on a user’s behalf; it requires a Microsoft 365 Copilot licence and consumes Copilot Credits for eligible usage. |
| Copilot Code | A software-development experience that uses the GitHub Copilot coding harness to help create and complete coding work. Eligible usage requires a Microsoft 365 Copilot licence and is governed through Copilot Credits and the organisation’s spending policy. |
| Advanced work in SharePoint | Provides advanced AI-assisted work over SharePoint content, helping licensed Copilot users analyse and act on organisational information while its usage is governed through Copilot Credits. |
| Advanced work in OneDrive | Provides advanced AI-assisted work with files stored in OneDrive, enabling licensed Copilot users to analyse and work with their content while usage is charged through Copilot Credits. |
| Work IQ API for custom apps and agents | Allows custom applications and agents to use Microsoft 365 work context and organisational knowledge through Work IQ, with API consumption metered separately in Copilot Credits. |
| Copilot Managed Runtime | A governed hosting and execution environment for internal line-of-business applications, providing Microsoft Entra authentication, connectors, policy enforcement, central inventory and usage monitoring; running eligible apps can consume Copilot Credits. |
| Teams Phone Agent | An AI agent capability for Teams Phone scenarios that supports automated handling of calling-related work, with eligible usage managed through Microsoft 365 Copilot spending policies and Copilot Credits. |
- Click Next once you have selected the services you wish to include in the spending policy.
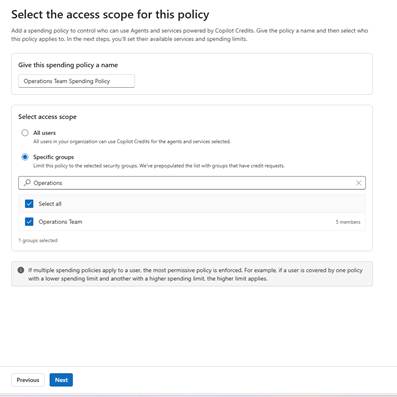
- Now you need to give the spending policy a name.
- Select whether access scope should apply to everyone or a group of people. If you select specific group you can choose either Microsoft 365 Groups or Security Groups.
- Choose your group if you are going down that route.
- Click Next
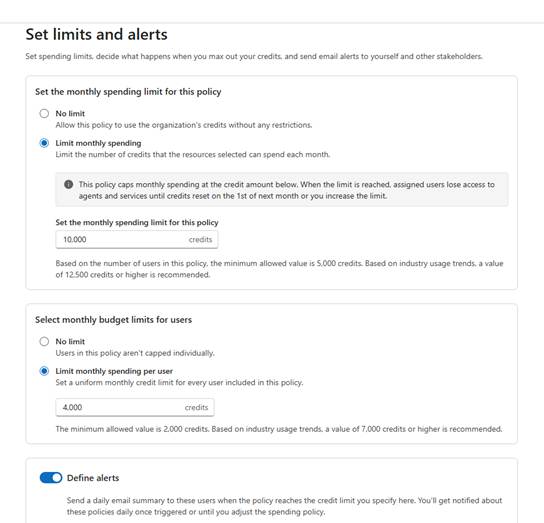
Now you are ready to setup the spending policy limits.
- Choose whether to have no limit or apply a monthly limit, I would advise the later.
- Additionally, we can choose to limit individual users within a plan. If you want to ensure that a particular user does not consume all of the credits then you can add an individual limit. I would suggest doing this in the first instance. If you have a suer that is getting more value from AI then most you can always move them into their own spending policy and manage them individually or group them with other Copilot VIPs!
- Finally, we can define alerts, the user interface will change depending on what options you have enabled.
- You can provide a list of users and then choose the limit as to when people should be notified this can either be based on % consumption or individual credit consumption. Additionally you can be alerted when a user reaches a % of their capacity as well.
- Once setup click Next
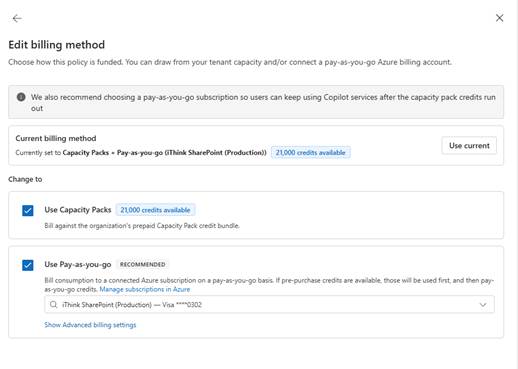
Finally choose how you are going to pay, you can choose to include this spending policy in any pre-purchased payment packs as well as llnk it to your Azure Subscription. You will need to have access to the Azure Subscription to be able to link them to the Spending Policy.
- Click Next
- Review your spending policy settings
- Click Create Spending Policy.
You can always go back and edit the spending policy if you wish by choosing the spending policy and clicking Details.
Reviewing Consumption
Once we have set up our spending policies then we will need to review who is using what every once in a while.
- Clicking the Consumption tab will reveal the different views where we can review at a policy, user, group or service level.
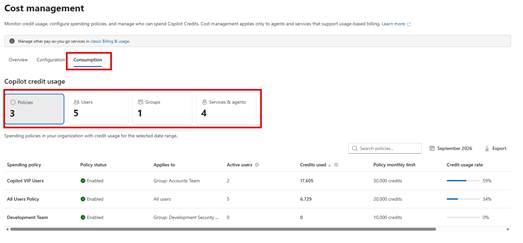
- It is worth highlighting that depending on the view you can change the data that is being viewed. For example at the policy level the top-right filter allows you to view by month, current month and the entire year.
- If you choose the user level, you can also drill into an individual’s consumption level. You can see which spending policy has been applied to them if they are in multiple policies and how their daily usage is working out.
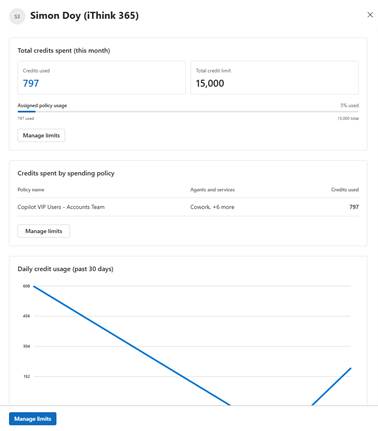
If you want to look into the usage in more detail then there are more options on the overview page.
Usage – Overview Page
The Overview page will allow you to get more detail on the Copilot usage.
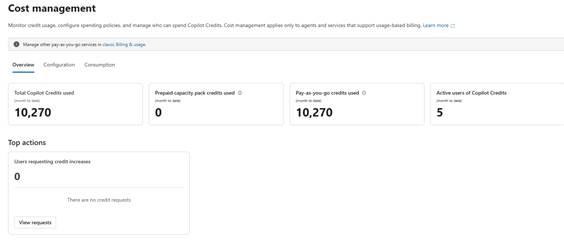
I find the Spending trend particularly useful which can be configured to show a different scope of data.
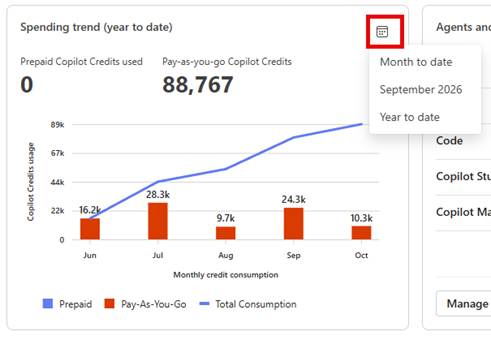
What about Copilot Agents and Copilot Credits?
So, you might be looking at these screens and instructions and say that looks great Simon but what about controlling my Copilot Agents and Copilot Credit consumption.
Unfortunately the controls to Copilot Agent Copilot Credit consumption is not found here which is a bit of a shame but I suspect that is down to keeping those controls under the Power Platform Admin team rather than confusing things within the Microsoft 365 Admin centre.
To setup controls for Copilot Studio Agents you will need to be a Power Platform Administrator and browse to https://admin.powerplatform.microsoft.com
- Click Licensing to be able to see the licensing and billing settings.
- Click Copilot Studio
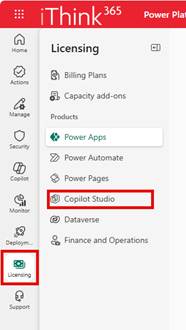
So, with Copilot Studio we pay for Copilot Credits either through Billing plans or by buying Copilot Credit / Message packs.
- Click on Manage Billing Plans to see the list of billing plans.
If you wish to create a new billing plan, make sure you have access to an Azure Subscription as a contributor or owner.
We are using the resource group name copilot-credit-[envtype]-rg for our resource group names.
- Add a new billing plan by clicking “New billing plan”
- Give the billing plan a name, choose the Azure Subscription you wish to link the billing plan to
- Choose the resource group you have setup
- Choose the services that you wish to be billed through the billing plan.
My advice is to select the Copilot Studio and Dataverse and Power Automate and keep the rest separate so you can control the Copilot Studio aspects.
- Choose the region and then you will see the environments in that region.
- Select the Power Platform Environments you wish to support for this billing profile.
- Click Save.
Managing Prepaid Copilot Credit Consumption for your environments
If you have Premium licenses you will have Copilot Credits available which can be allocated to environments or alternatively you can allow an environment to pull the Copilot Credits from the tenant wide available credits.
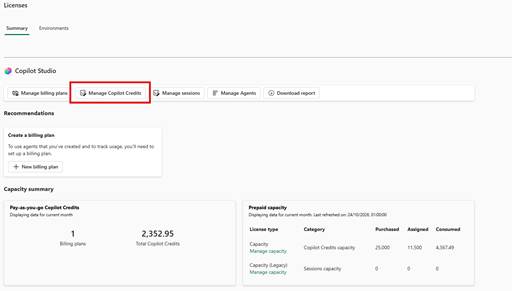
To control this use the “Manage Copilot Credits” button.
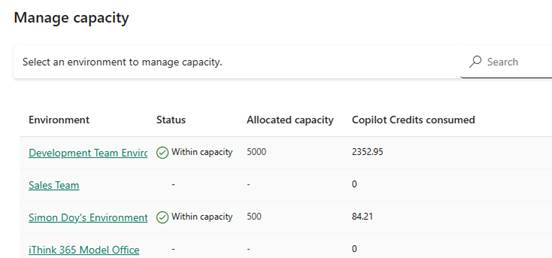
From this view we can see a list of Power Platform environments with columsn for current Copilot Credit Consumption and Allocated capacity. Additionally, you can see if there are any environments which are not within the allocated capacity.
To update the available Copilot Credit capacity
- Click on the environment name
- From here you can control the following
- How many credits are available to the environment.
- Whether the environment can draw from tenant capacity. My screenshot shows it greyed out because it is managed via a managed environment group policy.
- Choose whether to have PAYG enabled as well, I have this switched off for development environments. However, I would suggest enabling this for Production with alerts so that you can ensure that your agents continue to work if they go over Copilot Credit capacity.
- Finally, you can set up alerts.
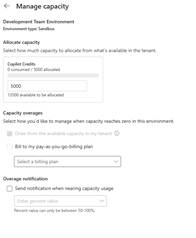
Please ensure you have allocated some credits to cover your consumption otherwise your Copilot Studio agents will be impacted.
- Click Save to complete your setup.
A note on the option “Draw from the available capacity in my tenant.”, I had an issue where this was disabled and I could not set it through the Managed Environment wide setting. I ended up having to switch the option off and back on again at the Managed Environment level to get this option to update. Until I did that, I could not configure Copilot Credit allocation as I kept getting an error.
Copilot Studio Consumption Monitoring
The monitoring of Copilot Credit consumption is possible through the Manage Agents button within the Licensing -> Copilot Studio menu.
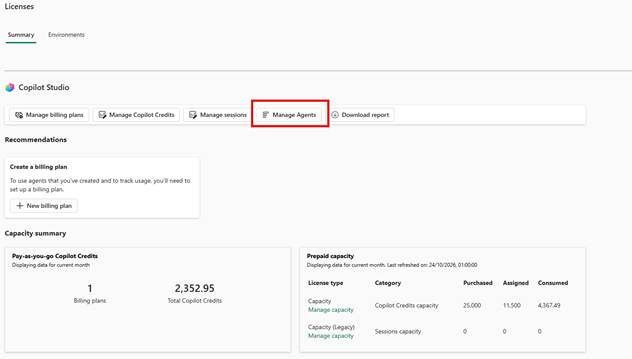
We can now see each of the agents across the Power Platform environments.
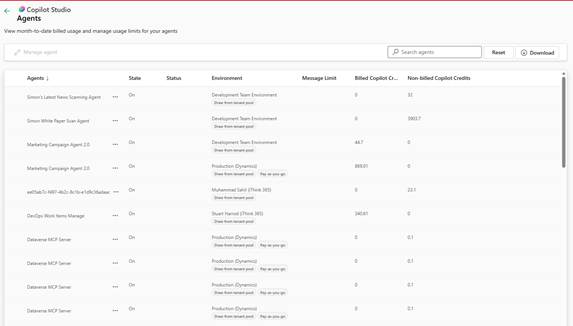
Here we can see consumption of Copilot Credits which have been billed through a spending policy and those that have used pre-paid credits.
If you wish to get more detailed information, click “Download Report” you can choose the number of days history in your report to get more detailed information.
Limiting an individual agents consumption
We can also limit an individuals agent Copilot Credit consumption within this screen by clicking the … next to the agent and choosing “Set Limit”.
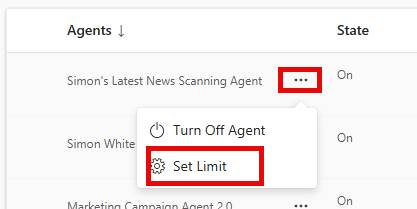
- From here we can allocate a capacity limit for an individual agent.
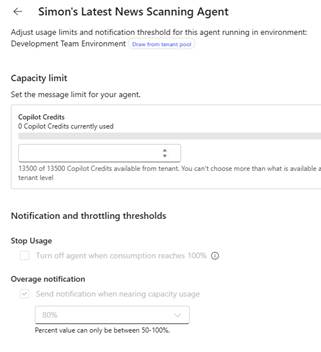
- This is a really useful feature to put some controls around your individual agents!
Copilot Studio Monitoring
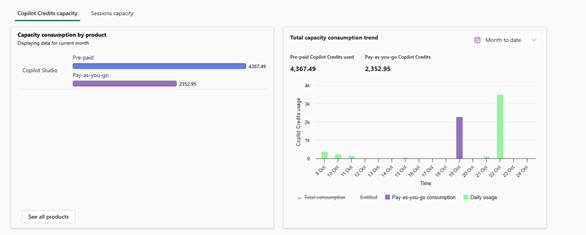
There are a number of different reports and charts which are worth exploring which allow you to see who is using the agents and what their consumption is either at the pre-paid billing of pay as you go billing level.
Additionally, we can see which agents are consuming the most credits which is useful to help us get an idea of what typical credit usage might be for a year.
Conclusion
In this article we showed you some of the features that we can put in place to manage AI consumption, billing and FinOps around Microsoft Copilot and the various billing controls.
There is more coming to this area from Microsoft, in particular expect some more announcements at Ignite 2026.
One of the things that writing these articles helps to do is solidify and find those sometimes hidden options. I had not seen the individual agent credit control before which has been a great find.
I would love to hear your thoughts and what controls you would like to see which are missing.