

Introduction
In this article, we will discuss the topic of building a custom MCP Server which is secured by Microsoft Entra ID.
This post builds on a previous blog post I wrote about setting up an MCP Server consumed by Copilot Studio. I would suggest that you read that post first.
Of course, all the source code for this secure MCP Server is provided, so you can use it to get going quickly.
Now, I will also point out another resource which was shared with the community on Tuesday, and that is Paolo Pialorsi’s Microsoft Community Call from the 26th May 2026, which you can find here: (580) Microsoft 365 & Power Platform weekly call – 26th of May, 2026 – YouTube. You will need to watch from about the 34th minute.
Why?
Firstly, why do we want to do this?
Well, Custom MCP Servers are the new way to extend your Agentic applications’ reach into your business systems or platforms to enable your organisation to do even more with platforms such as Microsoft 365 Copilot, Claude, Copilot Cowork, and more.
However, we need to make sure that these MCP Servers are secured, so that they do not leak organisation information.
Like your APIs or applications, you need to ensure that your MCP Servers are not accessible to everyone, including those who want to get into your organisation.
Often, your APIs and MCP Servers are sitting on public networks and are publicly accessible, and so we need to ensure that only the people that we want to be able to access the MCP Server can.
How?
Firstly, let’s create our MCP Server from the GitHub repository sample.
You can find the secure MCP Server sample on GitHub here:
To use, simply clone the repository to your local machine and then follow these instructions.
Setting up the Infrastructure
Once you have cloned the GitHub repository to your local machine, you will need to do the following.
Firstly, we need to set up two Microsoft Entra ID Applications, one to secure the MCP Server and one to be used as the MCP Client to connect to the MCP Server.
I am using the application name pattern [Organisation Name] [Product/Project] MCP Server ([Environment]).
e.g. iThink 365 Toggl MCP Server (Dev)
e.g. iThink 365 Toggl MCP Client (Dev)
I will assume you know how to create the Microsoft Entra ID Application, but there are some things we need to do to support various features of MCP Client, such as Dynamic Discovery and discovering Authentication requirements.
These are particularly important when using the very popular MCP Client test tool, MCP Inspector.
- Browse to Entra ID (https://entra.microsoft.com)
- Browse to your App Registrations
- Add your application named as above, but don’t configure any of the client secrets, etc., yet. I will take you through that.
Once you have set up your Entra ID Application, let’s configure each one.
Setting up your MCP Server Entra ID Application
Firstly, we need to configure the MCP Server Entra ID application to expose an API.
- From App Registrations
- Open your Entra ID Application
- Click on Expose an API
- Take the default Application ID URL that is provided, which will be something like api://[your client id]
- Add a scope called mcp.tools
- Who can consent (Admin and users)
- Provide names and descriptions for each of the Admin and User sections.
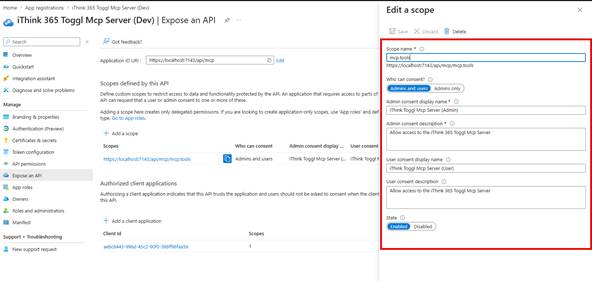
We need to configure the Entra ID application to use a different version of the Access Token. This is because MCP Clients like MCP Inspector expect to be able to use the URL of your MCP server as the Application ID URI.
- Next, click on Manifest
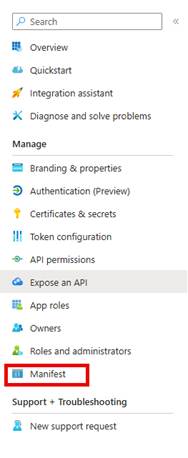
- Find the property “requestedAccessTokenVersion” and change the value to 2
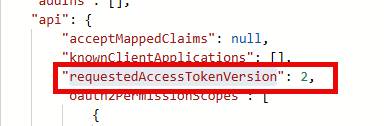
- Save your manifest.
Now, because we have done this, we can change the Application ID Uri to other values. The eagle-eyed among you will have seen that I have got the Application ID URI set to use https://localhost:7143/api/mcp
Why do I have this? Well this will let me test out my secured MCP Server locally using MCP Inspector.
Next, check the API Permissions, and you will see a default Microsoft Graph User.Read permission, which is great.
Let’s add the MCP Server scope as well that we have just created.
- Click Add a permission
- Choose from the top API that my organisation uses
- Find your MCP Server Entra ID application name.
- Grant admin consent.
Finally, we need to configure the redirect URLS for the Entra ID application so that we can use MCP Inspector to test it out.
- Click on Authentication and choose Web
- Add the following URLS to support MCP Inspector.
- Ignore the other URLS for the time being, they are URLs used by VS Code and Postman.
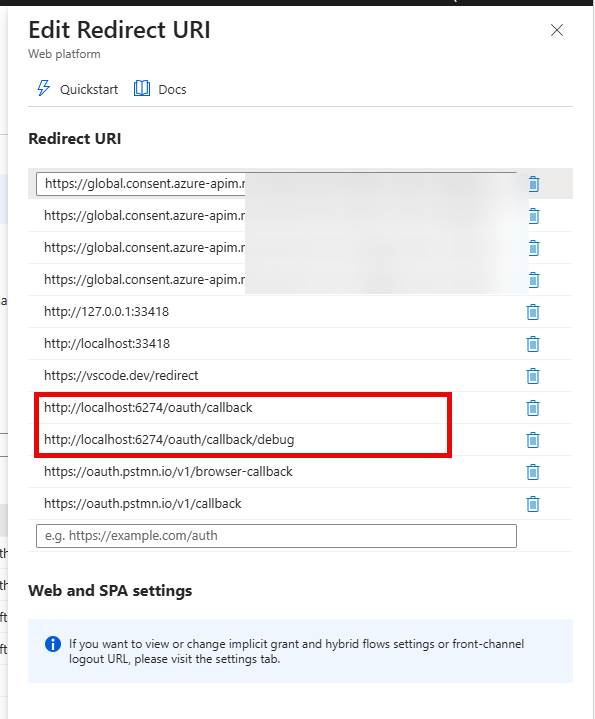
Save your configuration.
Setting up your MCP Client Entra ID Application
Next, we will move to configuring the MCP Client.
- Open the MCP Client that you have created.
- Click on API permissions
- Add the permission to the mcp.tools scope from your MCP Server using the API’s my organisation uses
- Choose the mcp.tools scope
- Finally, Grant Admin Consent to the application if you have permission.
Finally, we need to set up the MCP Client Entra ID application with some redirect URLs
- Click Authentication
- Add Redirect URI
- Use “Single Page Application” this time
- Add the following URLS to support MCP Inspector.
- Click on settings and enable Access tokens (used for implicit flows)
- Save your authentication settings.
Fire up and configure the MCP Server
Now that we have the MCP Server and MCP Client Entra ID applications set up. We can switch back to the code and update the configuration to ensure that our MCP Server uses it.
Open the MCP Server Project, i365.Mcp.EchoMCPServer in Visual Studio or Visual Studio Code. I am using Visual Studio.
- Open applicationsettings.development.json
- Update the AzureAd section with the following configuration
- TenantId: [Your local Microsoft Entra ID tenant ID]
- Audience: [the Client id for your MCP Server Entra ID Application].
- ClientId: “[the Client id for your MCP Server Entra ID Application]”.
- RequiredScope: “mcp.tools”
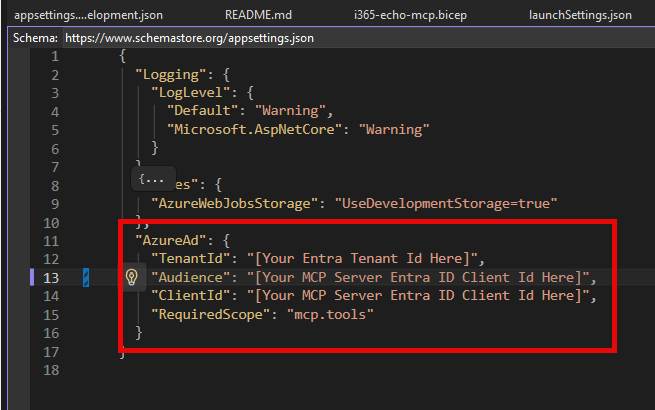
- Now you should be able to compile and start the code with this configuration.
Test your MCP Server with MCP Inspector
With your MCP Server up and running, let’s connect MCP Inspector to it.
- Fire up a terminal / PowerShell whatever you would like, and run
- “npx @modelcontextprotocol/inspector”
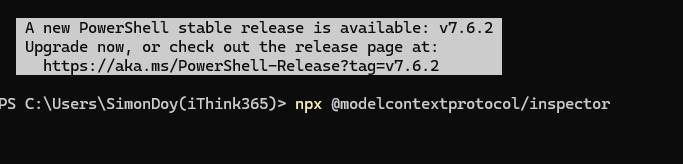
After a minute or so, you’ll see MCP Inspector appear.
Make sure you access the MCP Inspector from a browser that is running against the tenant that contains the two MCP Server and MCP Client Entra ID applications that we have created; otherwise, you will see errors about the application not existing in tenant xxxx.
Update the MCP Inspector to point to your MCP Server running locally,
Use the URL: https://localhost:7143/api/mcp
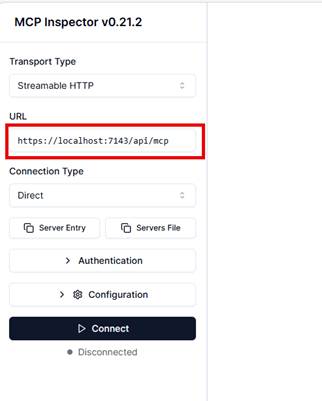
- Configure the Authentication as follows
- Client Id [use the Client Id of your MCP Client]
- Leave Client Secret Blank
- Leave the Redirect as default: http://localhost:6274/oauth/callback
- Finally, provide the scope, which is made up of the URL of your MCP Server with the mcp endpoint plus the scope mcp.tools.
- So, in our example
- https://localhost:7143/api/mcp/mcp.tools
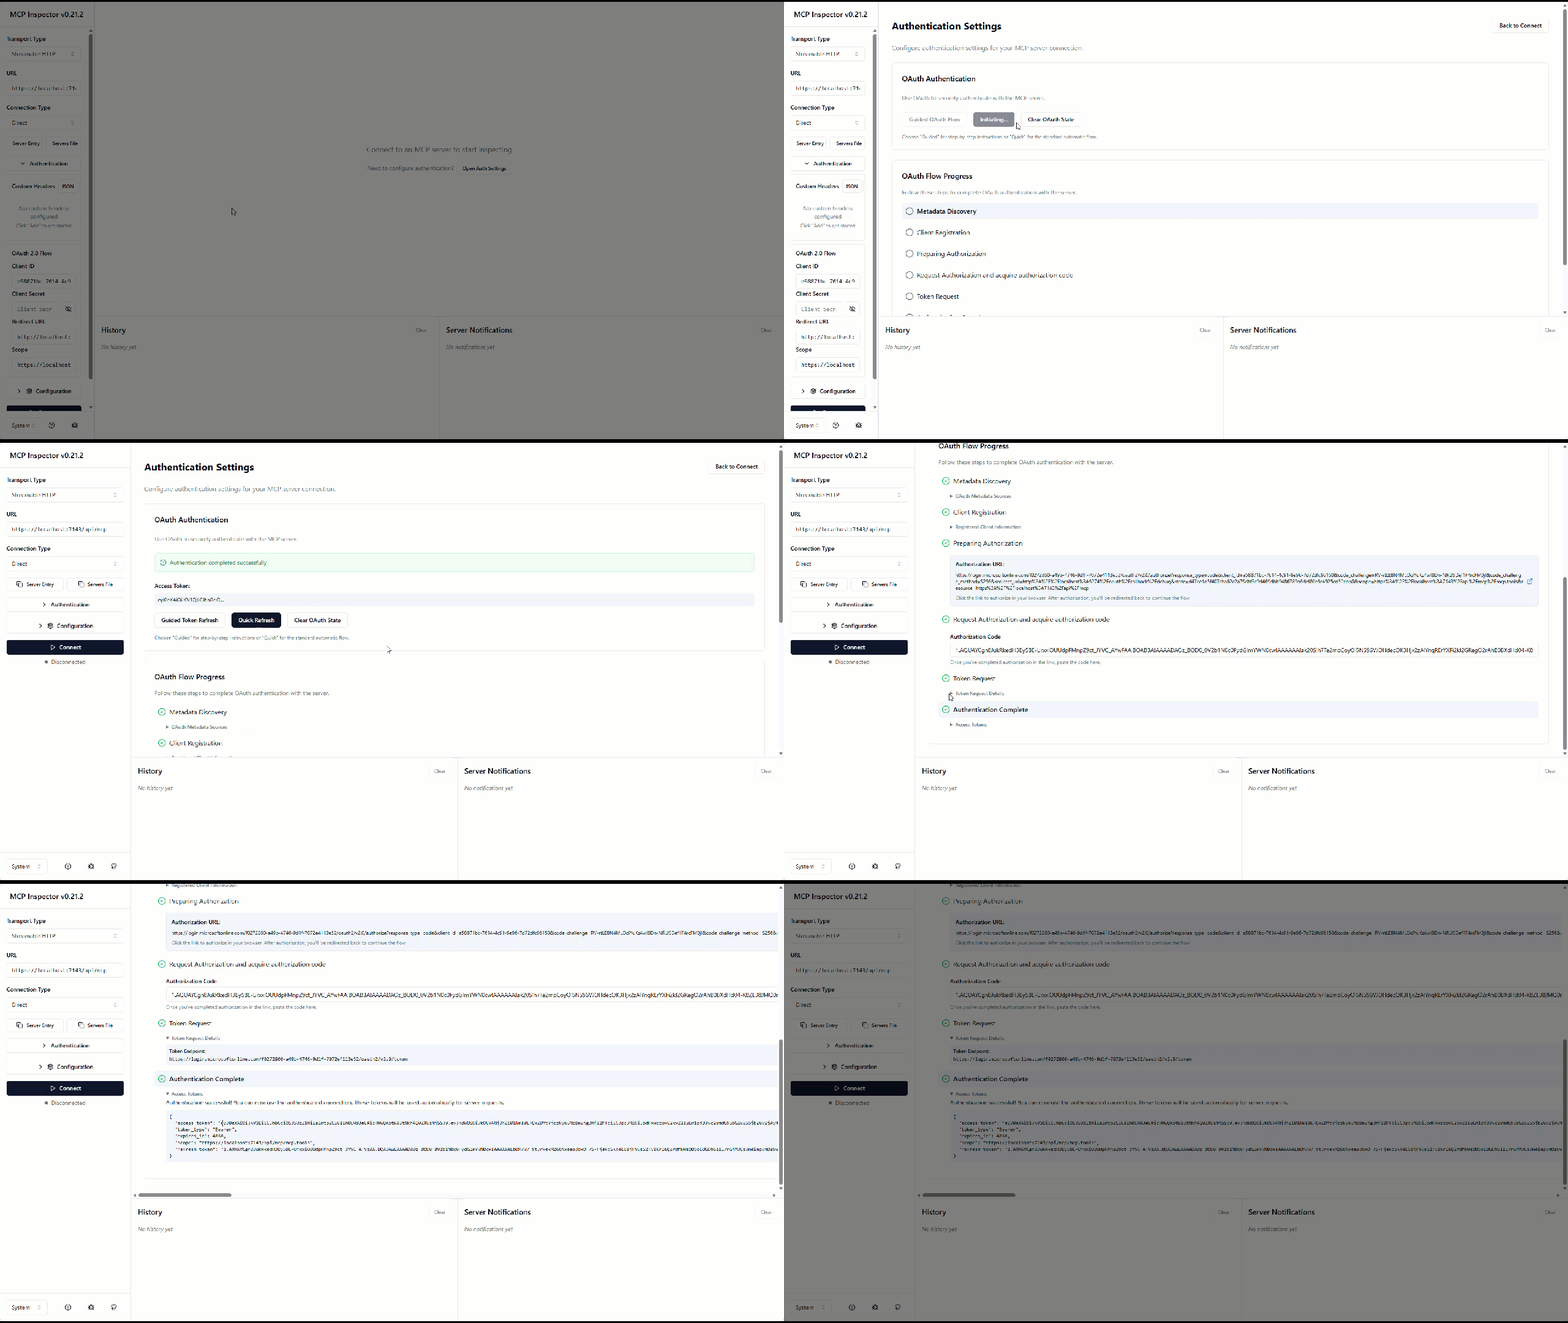
Testing the Authentication Process
Make sure your MCP Server is running on https with port 7143.
- Click on “Open Auth Settings”
- Click on “Quick OAuth Flow”
- You should now see MCP Inspector go through the OAuth Flow Process, discover the metadata required to connect to our Authorisation server, etc.
- You will then be asked to sign in
- Once you sign in, you should see an access token created, and you should be ready to connect.
Connecting to the MCP Server
We are now ready to connect to the MCP server.
Click on the Connect button.
You might need to authenticate again, but you should see the tools appear that are hosted within the MCP Server.
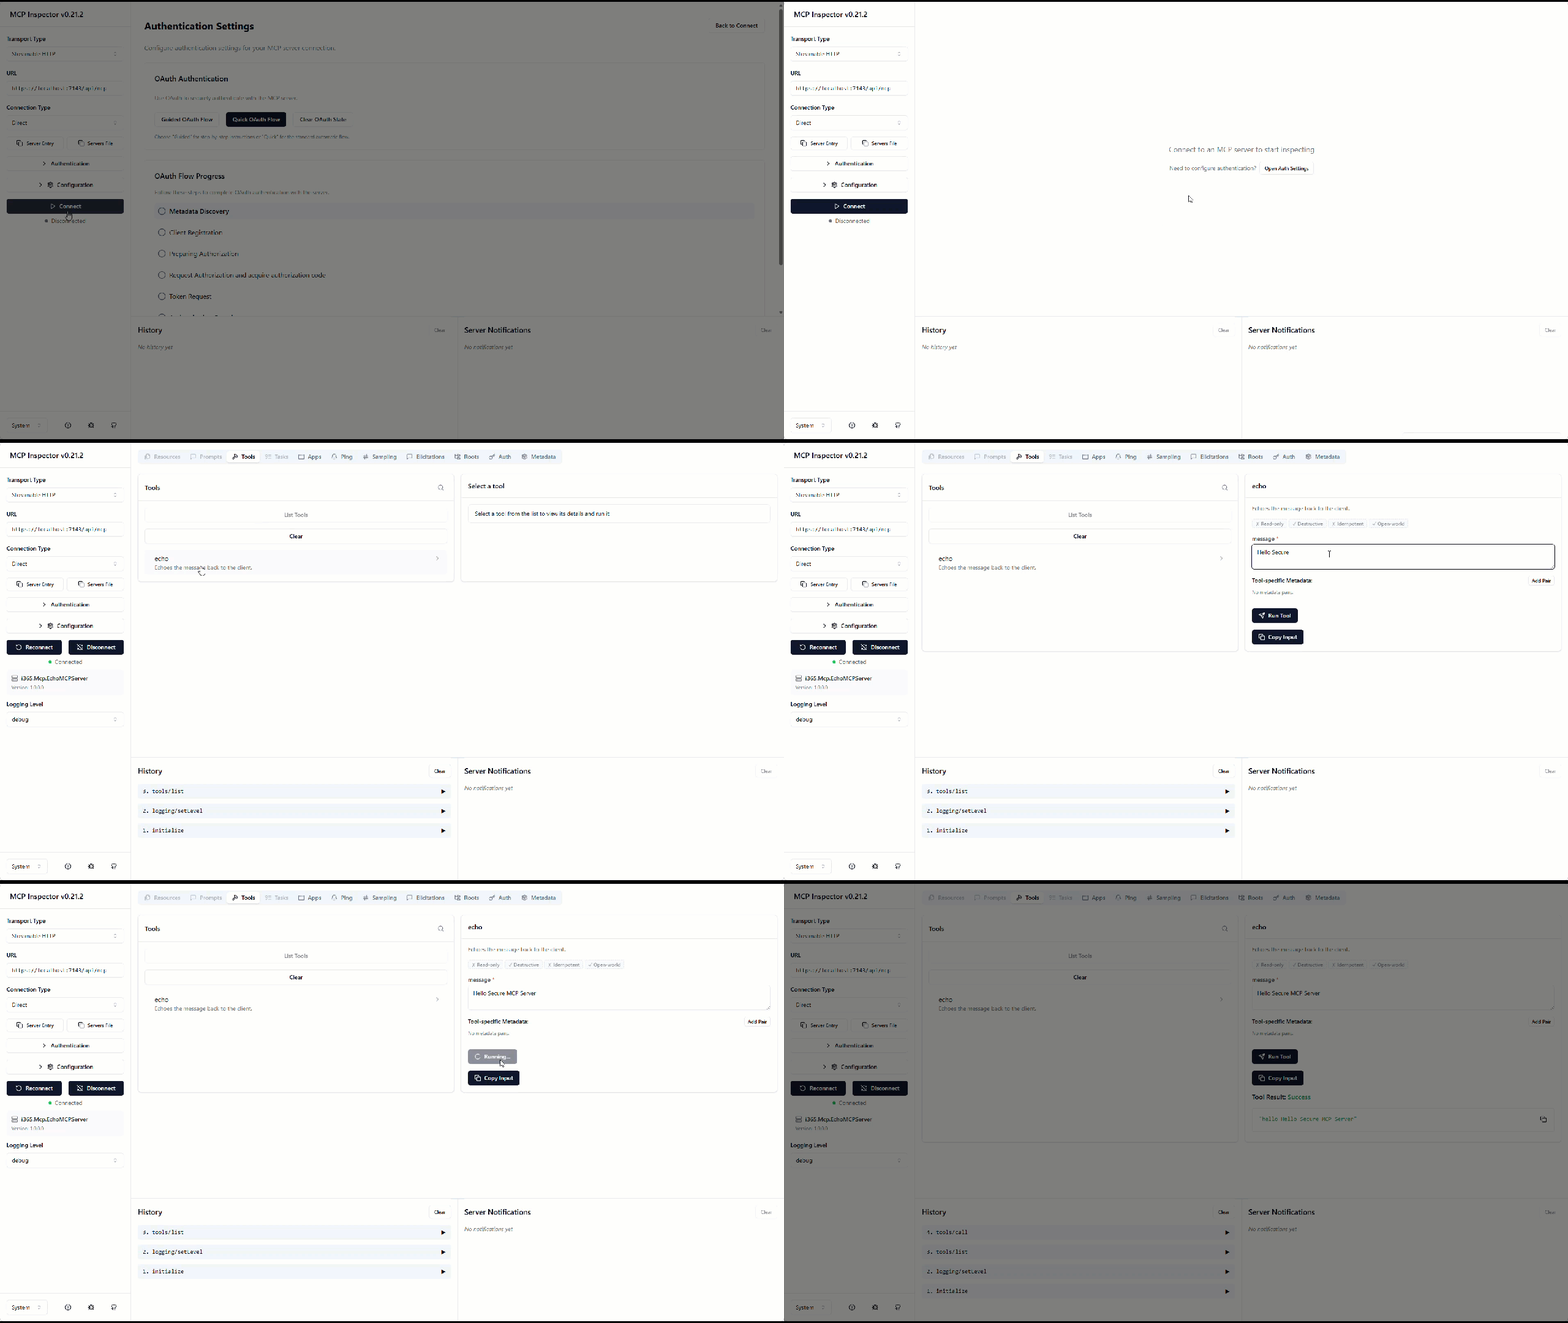
That’s it, you are up and running.
What Next?
Well, now that you have your base MCP Server, you need to get it deployed into Azure, and you will need to start adding tools to your MCP Server.
You can find out the process to get it deployed into Azure using Azure DevOps in this article.
So, how does this all work, and why did you do it the way you did?
So, getting this up and running took me a while as I was trying to reverse engineer what was going on. I looked at loads of examples, and there does seem to be some issues with MCP Servers and Entra ID when you’re trying to get dynamic client registration, etc., working.
However, let’s talk through the code a bit. Firstly, the .NET MCP SDK was used to build this MCP Server, and it does have support for discovering protected metadata resources, but I could not quite get it to produce the endpoint result that I was looking for. I used Microsoft’s Dataverse MCP Server to try to understand how it all fits together.
The discovery of authentication settings is provided in the code by this section, which creates a well-known endpoint, “/.well-known/oauth-protected-resource”.
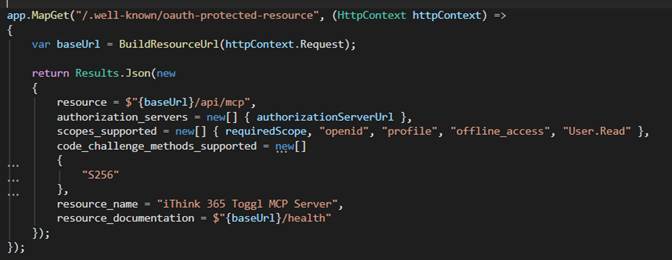
Now you should be able to use the .NET MCP SDK to create this as well, except I was trying to copy the Dataverse MCP Server, which provides the code_challenge_methods_supported parameter as shown above. However, when you use the MCP SDK, it does not allow you to configure this and all you can configure is Bearer header configuration.
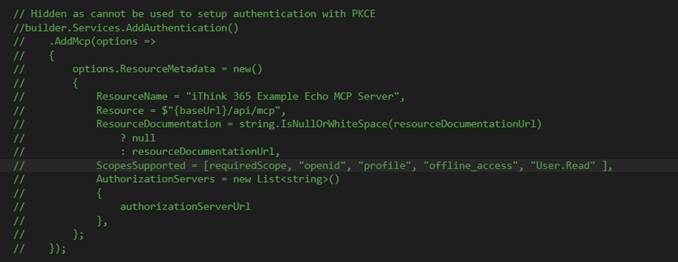
Figure 1 – This is from the .NET MCP SDK, and I could not get the dynamic discovery stuff to work with this.
Also, another part of the puzzle for the dynamic setup was having a .wellknown/oauth-authorization-server endpoint, which is used by the MCP Client to complete all the authentication. You can see the code here
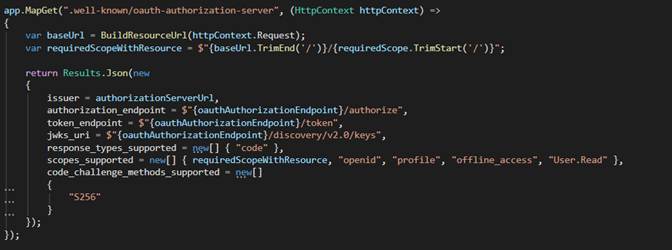
The other things that we have configured is stateless MCP switched to true. I have seen this cause issues with Copilot Studio MCP Clients, however, I really need to work through building a stateful example soon.
The authentication being backed by the mcp.tools scope is again the same pattern that I have seen Microsoft use and so I have copied that. The code that enforces the Authentication Policy to enable access for mcp.tools is shown below.

Anyway, I think this blog post, along with my original one about building MCP Servers for Copilot Studio, should give you plenty of support in understanding the code. But please ask if I have missed out on something that you would like to be included.
Conclusion
So, in this post, we discussed setting up a secured Entra ID MCP Server using a template and making it so that you can test it from MCP Inspector using Entra ID OAuth authentication.
Thanks for reading. My next blog post is to take this template and make it available to Microsoft 365 Copilot Cowork through the new plugin infrastructure. I have a working version, just need to get writing, so watch this space!

