Photorealistic executive boardroom at dusk, floor-to-ceiling glass overlooking a modern city skyline, two senior business leaders standing in front of a massive digital operations wall displaying hundreds of interconnected AI agents spreading across departments, glowing network visualisation showing marketing, sales, finance, HR and operations agents multiplying rapidly across the organisation. On the left side of the screen, innovation metrics, automation workflows and productivity indicators glow in cool blue tones. On the right side, financial dashboards show rising consumption, increasing costs, budget forecasts and resource utilisation in subtle red and amber tones. The executives are studying the display together, one focused on growth and innovation, the other focused on financial sustainability. The giant screen dominates the scene. The atmosphere feels like a critical strategic discussion about the future of AI. Premium enterprise technology aesthetic, Microsoft-inspired design language, cinematic lighting, blue and purple AI glow, ultra realistic corporate photography, shallow depth of field, highly detailed, Fortune 500 boardroom, dramatic but professional, magazine cover quality, visual storytelling, no cartoon style, no empty space, no logos, no watermarks, no stock photo appearance, sophisticated and believable.

Do We Need AI FinOps for Microsoft Copilot?


This article has been written with the aid of Microsoft Copilot.

Over the last couple of years, we’ve been spending a lot of time building agents.

Some are simple. Some are quite sophisticated. Some are internal experiments and some are helping solve real business problems. Like many people working in this space, I’m trying to understand where AI is heading and, more importantly, what organisations need to be thinking about today.

One thing has started to become apparent.

Microsoft are moving from a world of fixed AI licensing to a world of AI consumption.

This is a big change; I think it could become one of the biggest changes organisations need to prepare for over the next few months.

And it has got me thinking more about the rise of AI FinOps and what we can do to help our customers.

We’ve Seen This Before

When cloud computing first became mainstream, many organisations struggled to adapt.

Traditionally, IT was relatively predictable. You bought servers. You bought software. You purchased licences. The costs were generally known upfront.

Cloud services changed this completely. Suddenly, organisations were paying for what they consumed: storage, compute, network traffic and databases.

The technology teams loved the flexibility. Finance teams sometimes had a different perspective when the invoices arrived.

This is where FinOps emerged.

FinOps helped organisations understand what they were consuming, why they were consuming it and whether they were getting value for the money that was being spent.

The goal was never simply to reduce costs. The goal was to maximise value.

I can’t help thinking that AI is about to follow a very similar path.

Why Copilot Changes the Conversation

Historically, most Microsoft 365 discussions have centred around user licensing.

How many users do we need? Who should get a licence? Have we assigned the licences correctly?

These are all sensible questions.

However, AI introduces another layer.

As Microsoft continues to expand the capabilities of Copilot, Copilot Studio, AI-powered development tools and agent experiences, we’re increasingly seeing consumption-based models emerge through Copilot Credits.

That changes the conversation.

The question is no longer simply: How many Copilot licences do we own?

It starts becoming: How much AI are we consuming and what value are we getting from it?

Those are very different questions.

What Is AI FinOps?

I suspect AI FinOps will eventually become a specialised extension of traditional FinOps.

Not because AI is completely different, but because the things we need to measure are different.

Instead of virtual machines and storage accounts, organisations may find themselves tracking things such as:

  • Agent execution
  • AI reasoning
  • Copilot Credit consumption
  • AI-powered processes
  • Usage patterns
  • Business outcomes
  • Value generated by AI workloads

Ultimately, the challenge remains the same.

How do we ensure we’re getting value from the resources we’re consuming?

The Challenge With Agents

One thing I’ve noticed whilst building agents is that we often focus on capability first.

Can the agent do the job? Can it solve the problem? Can it complete the user’s request?

Those are absolutely the right questions when you’re learning and experimenting.

However, once agents move from experimentation into production, another question starts becoming important.

Can the agent solve the problem efficiently?

For example, imagine a user asks an agent to build a solution.

A very capable agent might analyse requirements, design a data model, build an application, create workflows, produce documentation, generate reports and configure automation.

On the surface, this sounds fantastic.

However, what has happened behind the scenes? How many reasoning cycles did it perform? How many searches did it execute? How many tools did it invoke? Did it arrive at the answer directly or explore five different approaches before choosing one?

The user may only see the final result. The organisation may eventually care about the journey taken to get there.

Why Agent Optimisation Matters

This is where things start to get interesting, **well interesting to me**.

Historically, optimisation has been difficult.

A lot of the intelligence in an agent was buried inside prompts and instructions. As agents became more sophisticated, prompts became longer, instructions became more detailed, and workflows became more complex.

One of the challenges was simply giving the AI enough context to make good decisions.

What I’m starting to see from recent updates is a move towards architectures that make optimisation easier.

The latest developments in agents, orchestration and harness capabilities are creating opportunities to shape how agents reason and how they execute tasks.

That might not sound particularly exciting. But from an AI FinOps perspective, it could be hugely important.

A good optimisation strategy isn’t necessarily about using less AI. It’s about using AI more effectively.

An Interesting Example: Work IQ

One capability that I think will become incredibly important is Work IQ. This is Microsoft’s intelligence layer for accessing your work context.

Traditionally, AI spends a lot of effort trying to understand context.

Who should I talk to? What project is this related to? Where is the information? Which document is relevant? Which team owns this?

That investigative work has a cost.

The more effort required to find context, the more effort the AI has to expend before it can begin solving the actual problem.

What I find interesting about Work IQ is that it helps the AI understand the organisational environment more effectively.

If the AI can find the right people, projects, conversations and information more quickly, in a more succinct way, then it will need less effort to reach the correct answer.

Better context means less work.
Less work means lower consumption.
Lower consumption means better results and value.

I suspect this is one of those areas we’ll be talking far more about over the next few months.

From Adoption to Optimisation

A lot of organisations today are still focused on adoption.

How do we build agents? How do we deploy Copilot? How do we train our users? How do we identify use cases?

Those are still the right questions.

However, with the changes to usage-based pricing, the conversation quickly moves to cost optimisation.

We are already seeing this in practice. A couple of organisations have started building agents with the assumption that the activity would effectively be covered, only to discover that costs can appear unexpectedly or be higher than they had imagined.

Cost estimation is hard at the best of times, and Microsoft’s recent move towards more usage-based pricing through Copilot Credits makes this more likely and, unfortunately, somewhat inevitable. The lesson is not to stop building agents, but to treat cost modelling, monitoring and optimisation as part of the adoption journey from the outset.

How do we govern AI consumption? How do we measure value? How do we optimise agent execution? How do we manage Copilot Credits? How do we scale AI responsibly?

I think that shift is coming sooner than many people realise.

Where Do We Start?

My advice now is simple.

Don’t wait for AI FinOps to become a formally recognised discipline before thinking about it.

Start building agents. Start experimenting. Start learning. Understand what works. Understand what doesn’t. Measure outcomes. Pay attention to consumption patterns.

And most importantly, focus on business value rather than technical activity.

However, put in place a budget, what is a reasonable monthly cost?

Make sure you are adding controls around that budget so that you don’t have unexpected costs appearing and have controls in place so that do not become a surprise.

We have a budget at iThink 365, who are a 9-person organisation of around about £250 per user per month with some variance based on the user role.

Microsoft have started putting cost management controls in place, but they need to be better with more granular controls for specific products and instances of those products. For example, being able to allocate a budget for a specific Agent or product within Microsoft 365.

You can start to read up on those controls here:

Microsoft Azure Cost Management

Overview of Cost Management – Microsoft Cost Management | Microsoft Learn

Microsoft 365 Copilot Cost Management

Usage-Based Billing and Cost Management for Copilot Credits | Microsoft Learn

Power Platform Copilot Studio / Copilot Credit Cost Management

Manage Copilot Credits and capacity for Copilot Studio – Power Platform | Microsoft Learn

Summary

Ultimately, organisations won’t be successful because they run the most agents. They’ll be successful because they generate the most value from those agents.

And that’s why I suspect AI FinOps is going to become a very important conversation over the next few months.

At iThink 365, we’re already having these discussions with customers through our improvement packages and soon via our Agent Adoption Service.

Today, the focus is helping organisations to get started with agents. Tomorrow, I think it will increasingly be about helping them optimise, govern and scale them successfully.

It is going to be fascinating to watch how this space evolves.
AI Generated Image of Simon Doy with thumbups and elements related to Azure, Model Context Protocol, AI, Copilot Studio and Containers displayed in the background.

How to: Build a Custom MCP Server with the .NET MCP SDK, host as an Azure Container and connect to Copilot Studio


This blog post is part of a series of blog posts on my experiences building Custom Model Context Protocol Servers.

You can find the first in the blog post series, I would recommend starting there.

Unfortunately, it got a little delayed by my having a heart attack at the end of August. Fortunately, I am very lucky. Did you know that if you have a heart attack outside of a hospital, you have a survival rate of 8/100.

Fortunately, I was at home with my kids, and one of them was with me when I collapsed. They got help from my heroic neighbours, who did CPR and brought me back to life. This, plus the fact that I live in a city which is only 10 minutes away from a hospital, meant I was one of the fortunate ones who was only down for 5-6 minutes, and within 3 hours I had had heart surgery and was in ICU.

What I will say to you, dear reader, is if you have what you think is heartburn, but it only comes on when you do exercise, please go and get checked out by the doctor.

I am still on the road to recovery, but I am very happy to be here and say that I am making good progress, and it’s time to start blogging properly again.

This document describes the trials and tribulations of building an MCP Server for LinkedIn with the .NET MCP SDK Toolkit and then hosting it in Microsoft Azure using the Azure Container Instance Service. This MCP Server is then going to be integrated into a Copilot Studio-built Agent. I will show you how to do this; unfortunately, I cannot share the code for the LinkedIn integration.

So, let’s get started.

High-level Steps

The following high-level steps are required to deliver an MCP Server.

  • Build MCP Server
  • Test Locally
  • Configure Visual Studio to build the container container
  • Set up Azure Container Repository
  • Set up Azure App Service
  • Publish and Deploy Container
  • Test, Debug with MCP Inspector
  • Setup MCP Server
  • Connect MCP with Copilot Studio Agent

Build your MCP Server

So, the first step is to build your MCP Server. It does not really matter what your MCP Server does, but using the details that I provided in my previous post. I built my MCP Server using the following:

  • Fire up Visual Studio 2022
  • Created a new Console Project called i365.LinkedInMcpServer
  • Added the following packages
    • Microsoft.AspNetCore.Authentication.JwtBearer – Version=”9.0.11”
    • Microsoft.Extensions.Hosting – Version=”9.0.11”
    • Microsoft.Identity.Web Version=”4.1.1″
    • ModelContextProtocol Version=”0.5.0-preview.1″
    • ModelContextProtocol.AspNetCore Version=”0.5.0-preview.1″
  • I added a Program.cs file and configured it so that a WebApplicationBuilder class was created and contained the configuration of the WebApplication.
  • You can see the code in the associated GitHub Repo.

I edited the project file and added several configuration items to set up container support for the project. This allows me to create a container which will be used to host the MCP Server. I wanted to be able to test this locally before pushing up to Azure, which is made easier by being able to run the process locally.

 <PropertyGroup>
    <EnableSdkContainerSupport>true</EnableSdkContainerSupport>
    <ContainerRepository>ithink365/ithinkexamplemcp</ContainerRepository>
    <ContainerRegistry>[container-registry-prefix].azurecr.io</ContainerRegistry>
    <ContainerFamily>alpine</ContainerFamily>
    <ContainerRuntimeIdentifiers>linux-x64;linux-arm64</ContainerRuntimeIdentifiers>
    <ContainerBaseImage>mcr.microsoft.com/dotnet/sdk:9.0</ContainerBaseImage>
    <UserSecretsId>[UserSecretId]</UserSecretsId>
  </PropertyGroup>

Next, for the tools that are provided by the MCP Server.

The MCP Server tool that I am showing here is a simple tool which will echo what has been sent to it. My real example was building a set of tools for LinkedIn for my company, but the approach is the same.

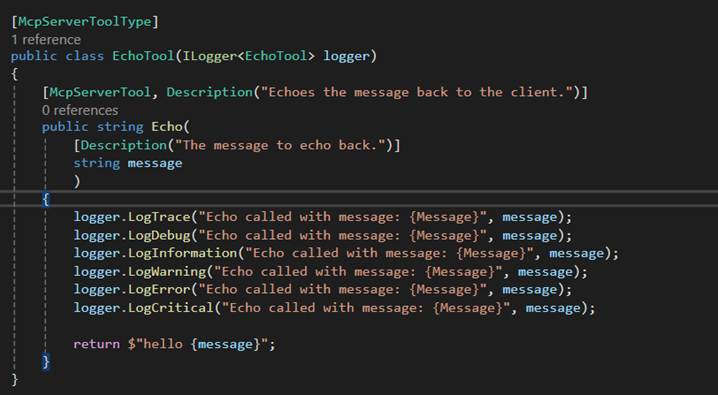
Create a class which will host your MCP Server and decorate it with the following attributes.

  • McpServerToolType attribute is applied to the class.
  • McpServerTool attribute is applied to each function that exposes a tool to the MCP Server.
  • Description attributes are important and allow you to describe to the calling MCP Client what the function does and also what the role is for each parameter that is passed into the function.

Once you have set up your MCP Server Tool and configured the Program.cs you are ready to go.

The first time I fired up the MCP Server in Visual Studio, I hit a couple of issues, which I will cover now so that you don’t have the same problem.

Firstly, I needed to redirect the ports for the MCP Server that it was listening to on this port to allow the MCP Server to listen to the requests.

You can read about how to resolve this in the Port Fun section below.

Debugging and Testing your MCP Server

Currently, the best way to test the MCP Server is by using MCP Inspector. However, I am having some challenges using MCP Inspector when testing MCP Servers that are protected by Microsoft Entra ID. This is due to an issue with how the MCP Protocol is described vs how the OAuth Protocol has been described. The MCP Protocol is stricter than the underlying OAuth protocol, and this is causing an issue because of how Entra ID works with resource parameters.

I have found that using the following to run MCP Inspector from a PowerShell script works well.

  • npx @modelcontextprotocol/inspector dotnet run

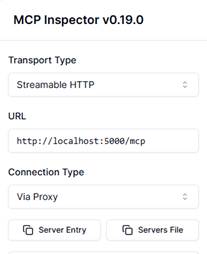
Once you have your MCP Server running in your Visual Studio debugger and your MCP Inspector running, you can test it by connecting your MCP Inspector to the /mcp endpoint provided by your MCP Server when running locally.

To connect MCP Inspector to your MCP Server, simply

  • fill in the URL, ensuring you have added the right port and /mcp on the end.
  • Click Connect
  • Click on Tools in the middle and click List Tools.
  • Your tools should load up after a few seconds, and now you can test each tool.

Deploying to the Cloud

Once you have tested your MCP Server, then you are ready to deploy it to the Cloud. You will need a few bits of Azure Infrastructure including the following:

  • Resource Group
  • Azure Container Registry
  • Azure App Service
  • Storage Account

Setting up the Azure Infrastructure

Create a new resource group in your desired location. Add the Azure Container Registry, Azure App Services and Storage Accounts.

Make note of the Azure Container Registry Connection String.

As you will need that to configure the publishing of your container from within Visual Studio.

Port Fun

It turns out that MCP Servers running on Azure Containers are not happy on the default ports provided, as they run on 8080.

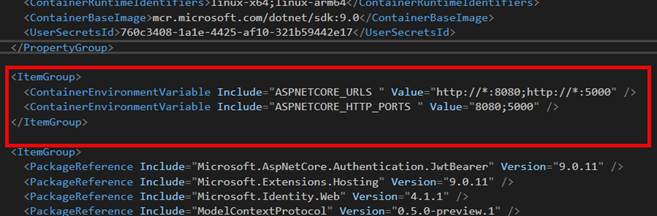
To resolve this, I used the following environment variable to change the container to use a different port. This fixed my problems.

To set up the environment variables, do the following. This can all be done within Visual Studio:

  • Open up your MCP Project file
  • Create the following environment variables in the project file
<ItemGroup>
   <ContainerEnvironmentVariable Include="ASPNETCORE_URLS " Value="http://*:8080;http://*:5000" />
   <ContainerEnvironmentVariable Include="ASPNETCORE_HTTP_PORTS " Value="8080;5000" />
 </ItemGroup>

Fun and Games with SSL and Azure Container Instances.

The original intention was to use an Azure Container Instance and access it directly. I had to come up with another plan because the process of setting up SSL within an Azure Container Instance just seemed too painful.

Change of Plan

The issue with setting up SSL and Azure Container Instances gave me some food for thought.

The challenge is how to ensure that all communication is through an encrypted channel.

When we are running our MCP Server as an Azure Container Instance, it means that we have to have SSL termination happening within the container. Which looked really painful from a couple of different sides, in particular, having to keep updating the SSL certificate when it expired was going to add some admin overhead. So, I looked at different options.

We could implement containers behind Azure API Management as an option.

Additionally, we could use Azure Functions, which was going to be my preferred option. However, at the time of setting this up, I hit an issue where, because we want to integrate MCP with Copilot Studio, we had a mismatch with protocols.

Azure Functions, at the time of writing this blog post, only supported SSE, and Copilot Studio has just deprecated SSE support.

I can see that updates have been made to the MCP Azure Functions SDK, and they now support Streamable HTTP. I am going to take a look at this next.

My other option was to use an Azure App Service to host the container. It turns out that this works well and solves my problem with SSL. At the same time, I can still use the container that I had already built and tested to host the MCP Server. Result!

So, what was involved?

Deploying MCP Server

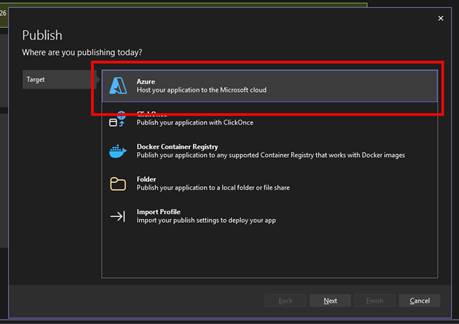
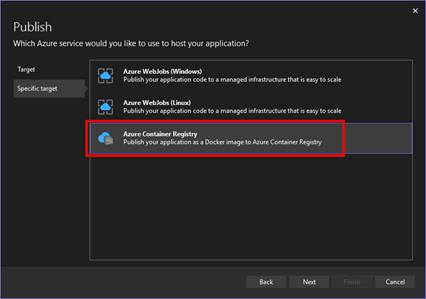
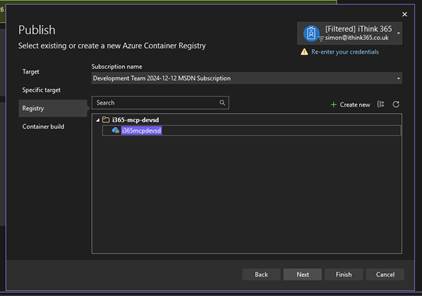
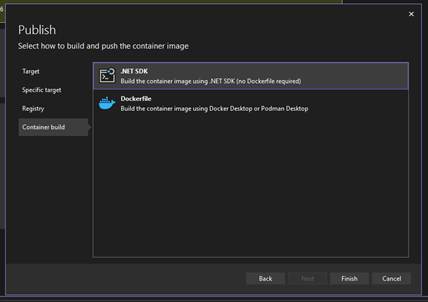
It is possible to deploy the MCP Server from Visual Studio using the publish feature.

To deploy the container into the Azure Container Repository, do the following

  • Ensure that you have set up the Visual Studio Project settings as mentioned above.
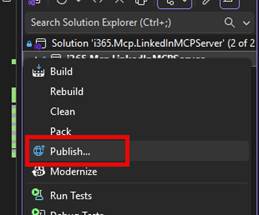
  • Right-click your Project that hosts your MCP Server
  • Choose Publish
  • Click New Profile
  • Choose Azure
  • Click Next
  • Choose Azure Container Registry
  • Click Next
  • Choose the Azure Container Registry by selecting the Azure Subscription.
  • Choose the Azure Container Registry that you have created.
  • Click Next
  • Choose .NET SDK (No Dockerfile required)
  • Click Finish

Now you are ready to publish your Container to the Azure Container Registry.

  • Ensure your Azure Container Registry is selected
  • Click Publish

Wait for the deployment to be completed.

Setting the MCP Server as an App Service

I created an Azure App Service within the same resource group and Azure subscription that the Azure Container Registry had been provisioned within.

To configure the Azure App Service:

  • Click on Deployment -> Deployment Centre
  • Add a Custom Container and configure the container to be loaded from the Azure Container Registry by choosing the Azure Subscription and Image.
  • Set the Port to 8080
  • Click Apply.

This will deploy the Azure Container to the Azure App Service.

Updating your MCP Server

Of course, one of the challenges is updating the MCP server because we are deploying and updating a container; we need to notify the host of the MVP Server, the App Service, that an update has taken place. I really should look at how to automate this. Maybe I will once I have published this.

The steps are to go to the Deployment Centre on the App Service and click the Sync button. Acknowledge the warning that things will be updated and let it take place.

In my experience, this takes a bit longer than you think. After 5 minutes or so, your MCP server will be up to date. I have started to tweak the description of the MCP server so that I can see when it’s updated.

If you use the MCP Inspector, you will start to experience delays in the MCP connecting, and that is the sign that it has been updated.

Updating your MCP Server with Azure DevOps Pipelines

I have found that updating through publishing via Visual Studio is a little unreliable at times. I believe that this is down to authentication issues when authenticating with the Azure Container Registry.

To resolve this, I have built a series of Azure DevOps Pipelines, which are used to build and release the MCP Server to the Azure Container Repository and then deploy to the Azure App Service.

I will document this in a separate blog article.

Linking the MCP Server to Copilot Studio

The process of hooking up and making the MCP server available to Copilot Studio is much easier than I was expecting.

First, we need to create a custom connector which will be targeted at the MCP server.

  • Browse to https://make.powerapps.com
  • Click on Custom Connectors
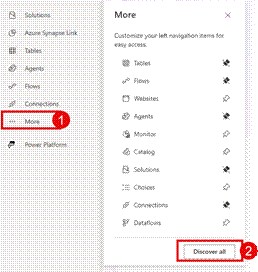
    • If you cannot see Custom Connectors, click More and then Discover All
swagger: '2.0'
info:
  title: Contoso
  description: MCP Test Specification, YAML for streamable MCP support in Copilot Studio
  version: 1.0.0
host: contoso.com
basePath: /
schemes:
  - https
paths:
  /mcp:
    post:
      summary: Contoso Lead Management Server
      x-ms-agentic-protocol: mcp-streamable-1.0
      operationId: InvokeMCP
      responses:
        '200':
          description: Success

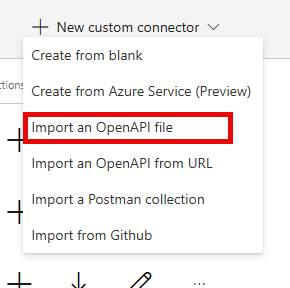
  • Click on New Custom Connector
  • Choose Import an OpenAPI File
  • Choose your mcp-server-openapi-schema.json file
  • Click Continue
  • Ensure your Host URL is correct and the same as your Azure App Service.
  • Ensure Base URL is /
  • Give the MCP Server a suitable name and description.
  • Click Security

For this MCP Server, there is no authentication, but we should have authentication, preferably with Entra ID OAuth 2.0 style authentication.

I will be putting together a guide to enable an MCP Server with authentication in a future post.

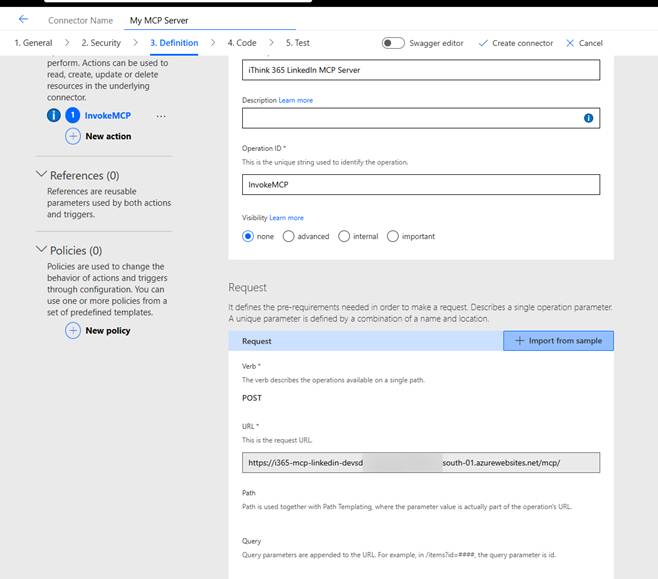
  • Click Definition
  • Update the Summary Name
  • Update the Connector Name
  • Check the URL for the Invoke MCP command

Once happy then

  • Click Create Connector

Once we have created the custom connector, we can consume it through our Copilot Studio Agent. The process of publishing the connector will create a new MCP tool within the Power Platform environment, and then this can be added to your agent.

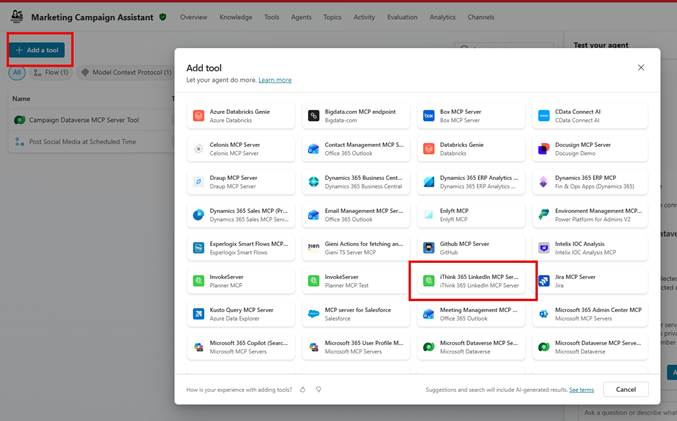
  • Browse to your Agent
  • Click Tools
  • Click “Add a Tool”
  • Choose your MCP Server
  • You will be asked to create a connection to the MCP Server.
  • Click Add and Configure
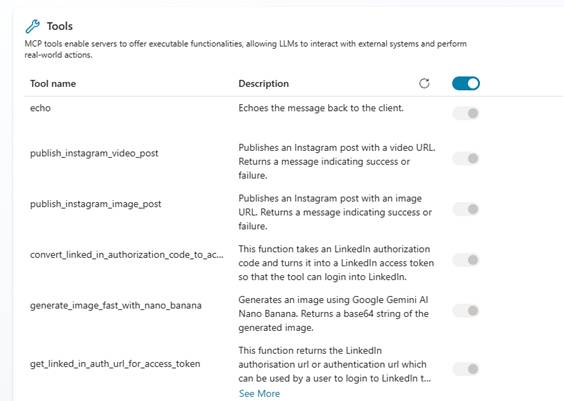
  • After a short period of time you should see a list of tools appear.
  • Now enable/disable the tools that the MCP Server provides.

Recently, there was an update so you can choose which tools are available to your Agent, so enable the ones you want and disable the ones you don’t want.

Now you can publish and test your agent.

Try it out.

Of course, you will need to make sure your agent is enabled to use the MCP tool and has orchestration enabled.

Conclusion

In this blog post, I explained how to set up an MCP server to be hosted in a secure and encrypted environment using Azure App Service. I also explained how to deploy and update the MCP Server, and finally test it and connect it up to Copilot Studio.

I’d love to hear how your MCP Server experiences are going and if you found this useful.

My plans for the next post in this series are to build and deploy an MCP server with Azure Functions, explain how we can deliver Azure Dev Ops pipelines to build and release our MCP Server container, discuss authentication so that you can secure your MCP Servers and finally, I want to look into the recent update to Declarative Agents which now support Model Context Protocol!

Check out the Microsoft Dev Blogs Post.