An image of an MCP Server rack seating behind a firewall

Building a Secure Custom MCP Server secured by Microsoft Entra ID


Introduction 

In this article, we will discuss the topic of building a custom MCP Server which is secured by Microsoft Entra ID.

This post builds on a previous blog post I wrote about setting up an MCP Server consumed by Copilot Studio. I would suggest that you read that post first.

Of course, all the source code for this secure MCP Server is provided, so you can use it to get going quickly.

Now, I will also point out another resource which was shared with the community on Tuesday, and that is Paolo Pialorsi’s Microsoft Community Call from the 26th May 2026, which you can find here: (580) Microsoft 365 & Power Platform weekly call – 26th of May, 2026 – YouTube. You will need to watch from about the 34th minute.

Why?

Firstly, why do we want to do this?

Well, Custom MCP Servers are the new way to extend your Agentic applications’ reach into your business systems or platforms to enable your organisation to do even more with platforms such as Microsoft 365 Copilot, Claude, Copilot Cowork, and more.

However, we need to make sure that these MCP Servers are secured, so that they do not leak organisation information.

Like your APIs or applications, you need to ensure that your MCP Servers are not accessible to everyone, including those who want to get into your organisation.

Often, your APIs and MCP Servers are sitting on public networks and are publicly accessible, and so we need to ensure that only the people that we want to be able to access the MCP Server can.

How?

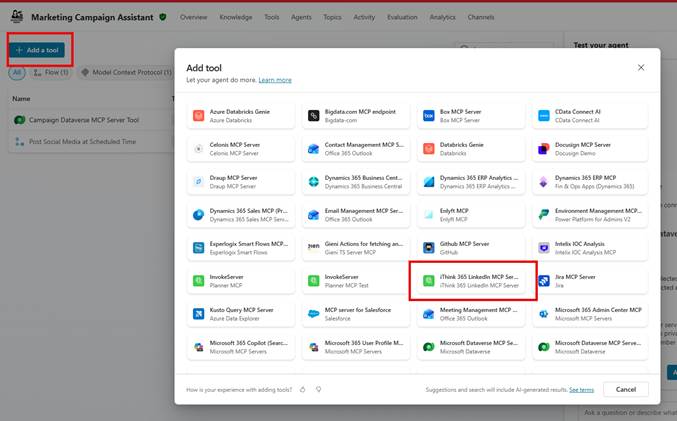
Firstly, let’s create our MCP Server from the GitHub repository sample.

You can find the secure MCP Server sample on GitHub here:

microsoft365-dev-samples/copilot-secure-mcp-azure-containers at main · SimonDoy/microsoft365-dev-samples

To use, simply clone the repository to your local machine and then follow these instructions.

Setting up the Infrastructure

Once you have cloned the GitHub repository to your local machine, you will need to do the following.

Firstly, we need to set up two Microsoft Entra ID Applications, one to secure the MCP Server and one to be used as the MCP Client to connect to the MCP Server.

I am using the application name pattern [Organisation Name] [Product/Project] MCP Server ([Environment]).

e.g. iThink 365 Toggl MCP Server (Dev)

e.g. iThink 365 Toggl MCP Client (Dev)

I will assume you know how to create the Microsoft Entra ID Application, but there are some things we need to do to support various features of MCP Client, such as Dynamic Discovery and discovering Authentication requirements.

These are particularly important when using the very popular MCP Client test tool, MCP Inspector.

  • Browse to Entra ID (https://entra.microsoft.com)
  • Browse to your App Registrations
  • Add your application named as above, but don’t configure any of the client secrets, etc., yet. I will take you through that.

Once you have set up your Entra ID Application, let’s configure each one.

Setting up your MCP Server Entra ID Application

Firstly, we need to configure the MCP Server Entra ID application to expose an API.

  • From App Registrations
  • Open your Entra ID Application
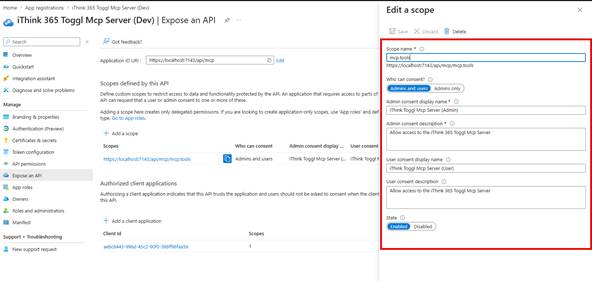
  • Click on Expose an API
  • Take the default Application ID URL that is provided, which will be something like api://[your client id]
  • Add a scope called mcp.tools
  • Who can consent (Admin and users)
  • Provide names and descriptions for each of the Admin and User sections.

We need to configure the Entra ID application to use a different version of the Access Token. This is because MCP Clients like MCP Inspector expect to be able to use the URL of your MCP server as the Application ID URI.

  • Next, click on Manifest
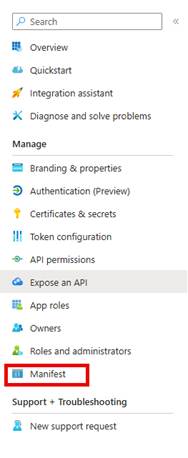
  • Find the property “requestedAccessTokenVersion” and change the value to 2
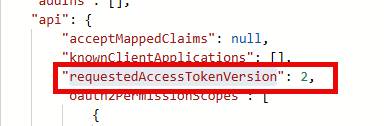
  • Save your manifest.

Now, because we have done this, we can change the Application ID Uri to other values. The eagle-eyed among you will have seen that I have got the Application ID URI set to use https://localhost:7143/api/mcp

Why do I have this? Well this will let me test out my secured MCP Server locally using MCP Inspector.

Next, check the API Permissions, and you will see a default Microsoft Graph User.Read permission, which is great.

Let’s add the MCP Server scope as well that we have just created.

  • Click Add a permission
  • Choose from the top API that my organisation uses
  • Find your MCP Server Entra ID application name.
  • Grant admin consent.

Finally, we need to configure the redirect URLS for the Entra ID application so that we can use MCP Inspector to test it out.

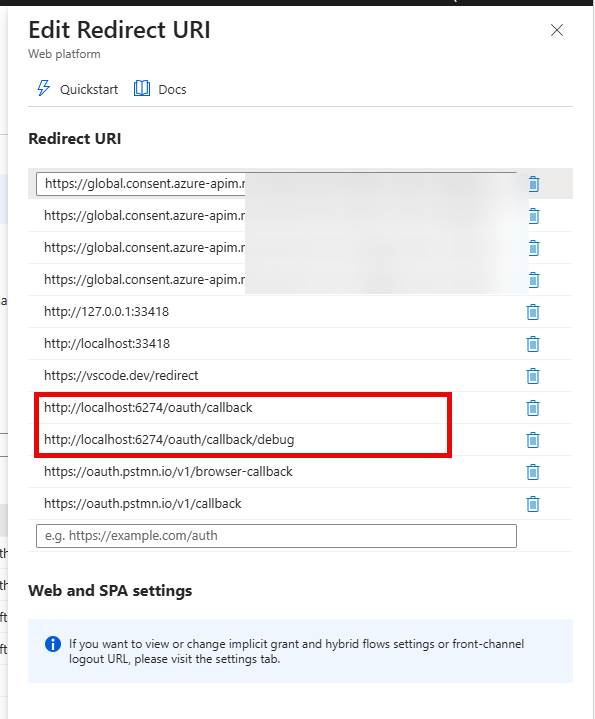
Save your configuration.

Setting up your MCP Client Entra ID Application

Next, we will move to configuring the MCP Client.

  • Open the MCP Client that you have created.
  • Click on API permissions
    • Add the permission to the mcp.tools scope from your MCP Server using the API’s my organisation uses
    • Choose the mcp.tools scope
  • Finally, Grant Admin Consent to the application if you have permission.

Finally, we need to set up the MCP Client Entra ID application with some redirect URLs

Fire up and configure the MCP Server

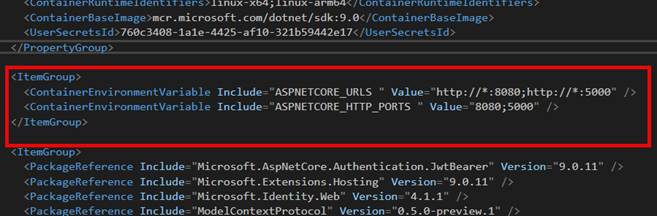
Now that we have the MCP Server and MCP Client Entra ID applications set up. We can switch back to the code and update the configuration to ensure that our MCP Server uses it.

Open the MCP Server Project, i365.Mcp.EchoMCPServer in Visual Studio or Visual Studio Code. I am using Visual Studio.

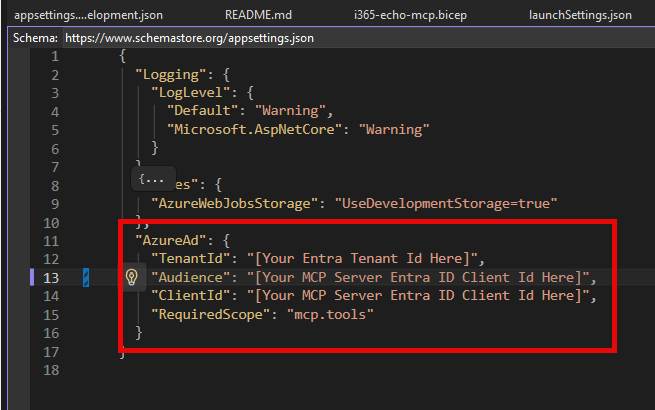
  • Open applicationsettings.development.json
  • Update the AzureAd section with the following configuration
  • TenantId: [Your local Microsoft Entra ID tenant ID]
  • Audience: [the Client id for your MCP Server Entra ID Application].
  • ClientId: “[the Client id for your MCP Server Entra ID Application]”.
  • RequiredScope: “mcp.tools”
  • Now you should be able to compile and start the code with this configuration.

Test your MCP Server with MCP Inspector

With your MCP Server up and running, let’s connect MCP Inspector to it.

  • Fire up a terminal / PowerShell whatever you would like, and run
  • “npx @modelcontextprotocol/inspector”

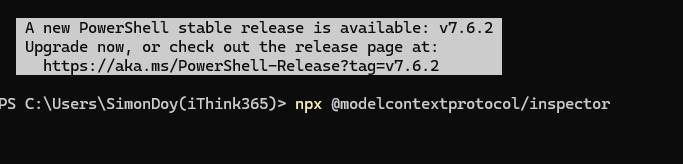
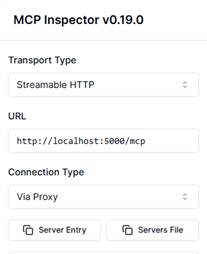
After a minute or so, you’ll see MCP Inspector appear.

Make sure you access the MCP Inspector from a browser that is running against the tenant that contains the two MCP Server and MCP Client Entra ID applications that we have created; otherwise, you will see errors about the application not existing in tenant xxxx.

Update the MCP Inspector to point to your MCP Server running locally,

Use the URL: https://localhost:7143/api/mcp
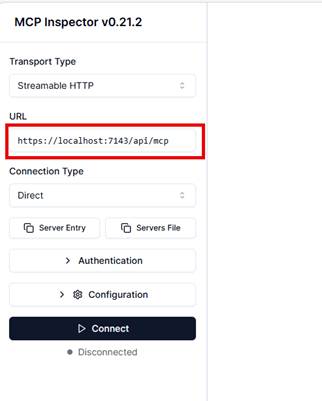
An animated gif showing the process of authenticating MCP Inspector to the Entra ID Backed MCP Server.
The result is an access token which can be used to authenticate with the MCP Serve.r

Testing the Authentication Process

Make sure your MCP Server is running on https with port 7143.

  • Click on “Open Auth Settings”
  • Click on “Quick OAuth Flow”
  • You should now see MCP Inspector go through the OAuth Flow Process, discover the metadata required to connect to our Authorisation server, etc.
  • You will then be asked to sign in
  • Once you sign in, you should see an access token created, and you should be ready to connect.

Connecting to the MCP Server

We are now ready to connect to the MCP server.

Click on the Connect button.

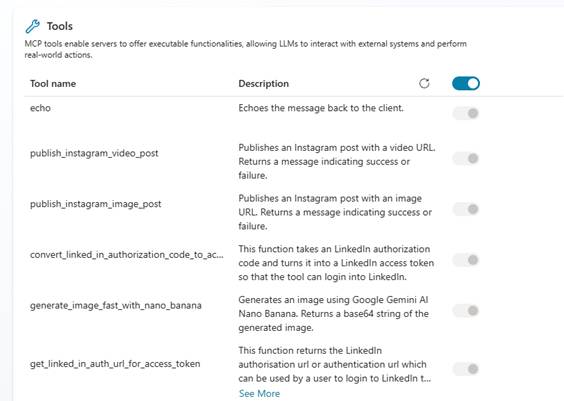
You might need to authenticate again, but you should see the tools appear that are hosted within the MCP Server.

This animated gif shows how the user can now connect to the secure MCP Server and list all the tools. The user accesses the echo tool and say Hello MCP Server. The MCP Server responds back with Hello, Hello MCP Server.

That’s it, you are up and running.

What Next?

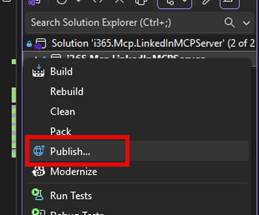
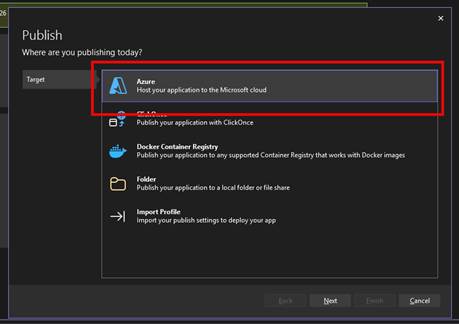
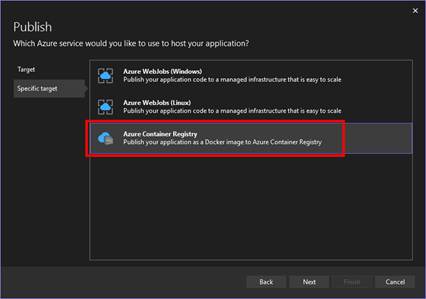
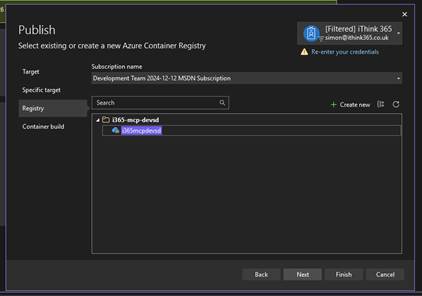
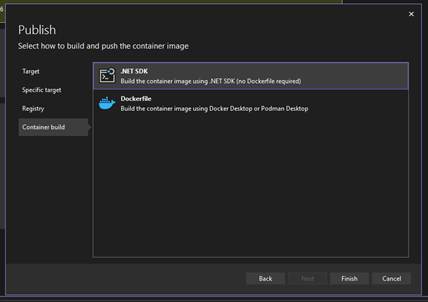
Well, now that you have your base MCP Server, you need to get it deployed into Azure, and you will need to start adding tools to your MCP Server.

You can find out the process to get it deployed into Azure using Azure DevOps in this article.

How to: Build a Custom MCP Server with the .NET MCP SDK, host as an Azure Container and connect to Copilot Studio | Doy’s Microsoft 365 and Azure Dev Blog

So, how does this all work, and why did you do it the way you did?

So, getting this up and running took me a while as I was trying to reverse engineer what was going on. I looked at loads of examples, and there does seem to be some issues with MCP Servers and Entra ID when you’re trying to get dynamic client registration, etc., working.

However, let’s talk through the code a bit. Firstly, the .NET MCP SDK was used to build this MCP Server, and it does have support for discovering protected metadata resources, but I could not quite get it to produce the endpoint result that I was looking for. I used Microsoft’s Dataverse MCP Server to try to understand how it all fits together.

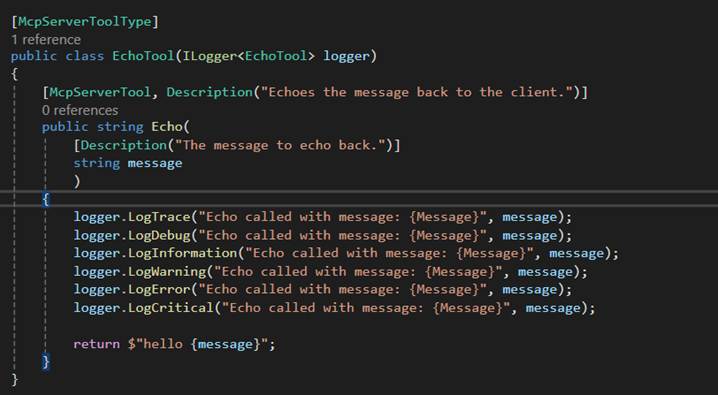
The discovery of authentication settings is provided in the code by this section, which creates a well-known endpoint, “/.well-known/oauth-protected-resource”.

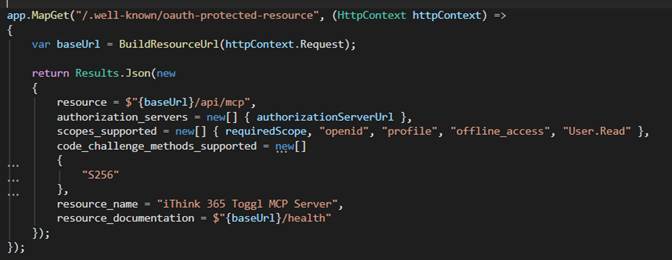
Now you should be able to use the .NET MCP SDK to create this as well, except I was trying to copy the Dataverse MCP Server, which provides the code_challenge_methods_supported parameter as shown above. However, when you use the MCP SDK, it does not allow you to configure this and all you can configure is Bearer header configuration.

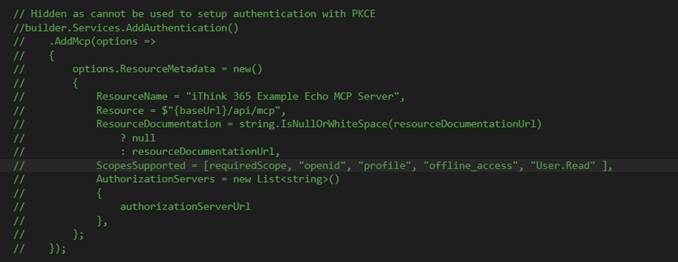
Figure 1 – This is from the .NET MCP SDK, and I could not get the dynamic discovery stuff to work with this.

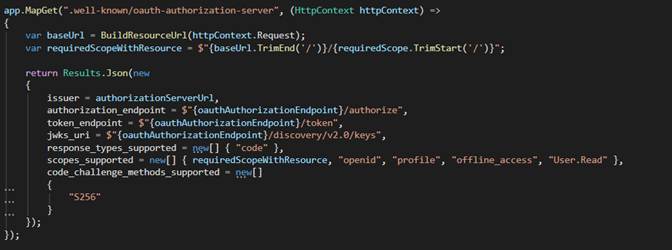
Also, another part of the puzzle for the dynamic setup was having a .wellknown/oauth-authorization-server endpoint, which is used by the MCP Client to complete all the authentication. You can see the code here

The other things that we have configured is stateless MCP switched to true. I have seen this cause issues with Copilot Studio MCP Clients, however, I really need to work through building a stateful example soon.

The authentication being backed by the mcp.tools scope is again the same pattern that I have seen Microsoft use and so I have copied that. The code that enforces the Authentication Policy to enable access for mcp.tools is shown below.

Anyway, I think this blog post, along with my original one about building MCP Servers for Copilot Studio, should give you plenty of support in understanding the code. But please ask if I have missed out on something that you would like to be included.

Conclusion

So, in this post, we discussed setting up a secured Entra ID MCP Server using a template and making it so that you can test it from MCP Inspector using Entra ID OAuth authentication.

Thanks for reading. My next blog post is to take this template and make it available to Microsoft 365 Copilot Cowork through the new plugin infrastructure. I have a working version, just need to get writing, so watch this space!


AI Generated Image of Simon Doy with thumbups and elements related to Azure, Model Context Protocol, AI, Copilot Studio and Containers displayed in the background.

How to: Build a Custom MCP Server with the .NET MCP SDK, host as an Azure Container and connect to Copilot Studio


This blog post is part of a series of blog posts on my experiences building Custom Model Context Protocol Servers.

You can find the first in the blog post series, I would recommend starting there.

Unfortunately, it got a little delayed by my having a heart attack at the end of August. Fortunately, I am very lucky. Did you know that if you have a heart attack outside of a hospital, you have a survival rate of 8/100.

Fortunately, I was at home with my kids, and one of them was with me when I collapsed. They got help from my heroic neighbours, who did CPR and brought me back to life. This, plus the fact that I live in a city which is only 10 minutes away from a hospital, meant I was one of the fortunate ones who was only down for 5-6 minutes, and within 3 hours I had had heart surgery and was in ICU.

What I will say to you, dear reader, is if you have what you think is heartburn, but it only comes on when you do exercise, please go and get checked out by the doctor.

I am still on the road to recovery, but I am very happy to be here and say that I am making good progress, and it’s time to start blogging properly again.

This document describes the trials and tribulations of building an MCP Server for LinkedIn with the .NET MCP SDK Toolkit and then hosting it in Microsoft Azure using the Azure Container Instance Service. This MCP Server is then going to be integrated into a Copilot Studio-built Agent. I will show you how to do this; unfortunately, I cannot share the code for the LinkedIn integration.

So, let’s get started.

High-level Steps

The following high-level steps are required to deliver an MCP Server.

  • Build MCP Server
  • Test Locally
  • Configure Visual Studio to build the container container
  • Set up Azure Container Repository
  • Set up Azure App Service
  • Publish and Deploy Container
  • Test, Debug with MCP Inspector
  • Setup MCP Server
  • Connect MCP with Copilot Studio Agent

Build your MCP Server

So, the first step is to build your MCP Server. It does not really matter what your MCP Server does, but using the details that I provided in my previous post. I built my MCP Server using the following:

  • Fire up Visual Studio 2022
  • Created a new Console Project called i365.LinkedInMcpServer
  • Added the following packages
    • Microsoft.AspNetCore.Authentication.JwtBearer – Version=”9.0.11”
    • Microsoft.Extensions.Hosting – Version=”9.0.11”
    • Microsoft.Identity.Web Version=”4.1.1″
    • ModelContextProtocol Version=”0.5.0-preview.1″
    • ModelContextProtocol.AspNetCore Version=”0.5.0-preview.1″
  • I added a Program.cs file and configured it so that a WebApplicationBuilder class was created and contained the configuration of the WebApplication.
  • You can see the code in the associated GitHub Repo.

I edited the project file and added several configuration items to set up container support for the project. This allows me to create a container which will be used to host the MCP Server. I wanted to be able to test this locally before pushing up to Azure, which is made easier by being able to run the process locally.

 <PropertyGroup>
    <EnableSdkContainerSupport>true</EnableSdkContainerSupport>
    <ContainerRepository>ithink365/ithinkexamplemcp</ContainerRepository>
    <ContainerRegistry>[container-registry-prefix].azurecr.io</ContainerRegistry>
    <ContainerFamily>alpine</ContainerFamily>
    <ContainerRuntimeIdentifiers>linux-x64;linux-arm64</ContainerRuntimeIdentifiers>
    <ContainerBaseImage>mcr.microsoft.com/dotnet/sdk:9.0</ContainerBaseImage>
    <UserSecretsId>[UserSecretId]</UserSecretsId>
  </PropertyGroup>

Next, for the tools that are provided by the MCP Server.

The MCP Server tool that I am showing here is a simple tool which will echo what has been sent to it. My real example was building a set of tools for LinkedIn for my company, but the approach is the same.

Create a class which will host your MCP Server and decorate it with the following attributes.

  • McpServerToolType attribute is applied to the class.
  • McpServerTool attribute is applied to each function that exposes a tool to the MCP Server.
  • Description attributes are important and allow you to describe to the calling MCP Client what the function does and also what the role is for each parameter that is passed into the function.

Once you have set up your MCP Server Tool and configured the Program.cs you are ready to go.

The first time I fired up the MCP Server in Visual Studio, I hit a couple of issues, which I will cover now so that you don’t have the same problem.

Firstly, I needed to redirect the ports for the MCP Server that it was listening to on this port to allow the MCP Server to listen to the requests.

You can read about how to resolve this in the Port Fun section below.

Debugging and Testing your MCP Server

Currently, the best way to test the MCP Server is by using MCP Inspector. However, I am having some challenges using MCP Inspector when testing MCP Servers that are protected by Microsoft Entra ID. This is due to an issue with how the MCP Protocol is described vs how the OAuth Protocol has been described. The MCP Protocol is stricter than the underlying OAuth protocol, and this is causing an issue because of how Entra ID works with resource parameters.

I have found that using the following to run MCP Inspector from a PowerShell script works well.

  • npx @modelcontextprotocol/inspector dotnet run

Once you have your MCP Server running in your Visual Studio debugger and your MCP Inspector running, you can test it by connecting your MCP Inspector to the /mcp endpoint provided by your MCP Server when running locally.

To connect MCP Inspector to your MCP Server, simply

  • fill in the URL, ensuring you have added the right port and /mcp on the end.
  • Click Connect
  • Click on Tools in the middle and click List Tools.
  • Your tools should load up after a few seconds, and now you can test each tool.

Deploying to the Cloud

Once you have tested your MCP Server, then you are ready to deploy it to the Cloud. You will need a few bits of Azure Infrastructure including the following:

  • Resource Group
  • Azure Container Registry
  • Azure App Service
  • Storage Account

Setting up the Azure Infrastructure

Create a new resource group in your desired location. Add the Azure Container Registry, Azure App Services and Storage Accounts.

Make note of the Azure Container Registry Connection String.

As you will need that to configure the publishing of your container from within Visual Studio.

Port Fun

It turns out that MCP Servers running on Azure Containers are not happy on the default ports provided, as they run on 8080.

To resolve this, I used the following environment variable to change the container to use a different port. This fixed my problems.

To set up the environment variables, do the following. This can all be done within Visual Studio:

  • Open up your MCP Project file
  • Create the following environment variables in the project file
<ItemGroup>
   <ContainerEnvironmentVariable Include="ASPNETCORE_URLS " Value="http://*:8080;http://*:5000" />
   <ContainerEnvironmentVariable Include="ASPNETCORE_HTTP_PORTS " Value="8080;5000" />
 </ItemGroup>

Fun and Games with SSL and Azure Container Instances.

The original intention was to use an Azure Container Instance and access it directly. I had to come up with another plan because the process of setting up SSL within an Azure Container Instance just seemed too painful.

Change of Plan

The issue with setting up SSL and Azure Container Instances gave me some food for thought.

The challenge is how to ensure that all communication is through an encrypted channel.

When we are running our MCP Server as an Azure Container Instance, it means that we have to have SSL termination happening within the container. Which looked really painful from a couple of different sides, in particular, having to keep updating the SSL certificate when it expired was going to add some admin overhead. So, I looked at different options.

We could implement containers behind Azure API Management as an option.

Additionally, we could use Azure Functions, which was going to be my preferred option. However, at the time of setting this up, I hit an issue where, because we want to integrate MCP with Copilot Studio, we had a mismatch with protocols.

Azure Functions, at the time of writing this blog post, only supported SSE, and Copilot Studio has just deprecated SSE support.

I can see that updates have been made to the MCP Azure Functions SDK, and they now support Streamable HTTP. I am going to take a look at this next.

My other option was to use an Azure App Service to host the container. It turns out that this works well and solves my problem with SSL. At the same time, I can still use the container that I had already built and tested to host the MCP Server. Result!

So, what was involved?

Deploying MCP Server

It is possible to deploy the MCP Server from Visual Studio using the publish feature.

To deploy the container into the Azure Container Repository, do the following

  • Ensure that you have set up the Visual Studio Project settings as mentioned above.
  • Right-click your Project that hosts your MCP Server
  • Choose Publish
  • Click New Profile
  • Choose Azure
  • Click Next
  • Choose Azure Container Registry
  • Click Next
  • Choose the Azure Container Registry by selecting the Azure Subscription.
  • Choose the Azure Container Registry that you have created.
  • Click Next
  • Choose .NET SDK (No Dockerfile required)
  • Click Finish

Now you are ready to publish your Container to the Azure Container Registry.

  • Ensure your Azure Container Registry is selected
  • Click Publish

Wait for the deployment to be completed.

Setting the MCP Server as an App Service

I created an Azure App Service within the same resource group and Azure subscription that the Azure Container Registry had been provisioned within.

To configure the Azure App Service:

  • Click on Deployment -> Deployment Centre
  • Add a Custom Container and configure the container to be loaded from the Azure Container Registry by choosing the Azure Subscription and Image.
  • Set the Port to 8080
  • Click Apply.

This will deploy the Azure Container to the Azure App Service.

Updating your MCP Server

Of course, one of the challenges is updating the MCP server because we are deploying and updating a container; we need to notify the host of the MVP Server, the App Service, that an update has taken place. I really should look at how to automate this. Maybe I will once I have published this.

The steps are to go to the Deployment Centre on the App Service and click the Sync button. Acknowledge the warning that things will be updated and let it take place.

In my experience, this takes a bit longer than you think. After 5 minutes or so, your MCP server will be up to date. I have started to tweak the description of the MCP server so that I can see when it’s updated.

If you use the MCP Inspector, you will start to experience delays in the MCP connecting, and that is the sign that it has been updated.

Updating your MCP Server with Azure DevOps Pipelines

I have found that updating through publishing via Visual Studio is a little unreliable at times. I believe that this is down to authentication issues when authenticating with the Azure Container Registry.

To resolve this, I have built a series of Azure DevOps Pipelines, which are used to build and release the MCP Server to the Azure Container Repository and then deploy to the Azure App Service.

I will document this in a separate blog article.

Linking the MCP Server to Copilot Studio

The process of hooking up and making the MCP server available to Copilot Studio is much easier than I was expecting.

First, we need to create a custom connector which will be targeted at the MCP server.

  • Browse to https://make.powerapps.com
  • Click on Custom Connectors
    • If you cannot see Custom Connectors, click More and then Discover All
swagger: '2.0'
info:
  title: Contoso
  description: MCP Test Specification, YAML for streamable MCP support in Copilot Studio
  version: 1.0.0
host: contoso.com
basePath: /
schemes:
  - https
paths:
  /mcp:
    post:
      summary: Contoso Lead Management Server
      x-ms-agentic-protocol: mcp-streamable-1.0
      operationId: InvokeMCP
      responses:
        '200':
          description: Success

  • Click on New Custom Connector
  • Choose Import an OpenAPI File
  • Choose your mcp-server-openapi-schema.json file
  • Click Continue
  • Ensure your Host URL is correct and the same as your Azure App Service.
  • Ensure Base URL is /
  • Give the MCP Server a suitable name and description.
  • Click Security

For this MCP Server, there is no authentication, but we should have authentication, preferably with Entra ID OAuth 2.0 style authentication.

I will be putting together a guide to enable an MCP Server with authentication in a future post.

  • Click Definition
  • Update the Summary Name
  • Update the Connector Name
  • Check the URL for the Invoke MCP command

Once happy then

  • Click Create Connector

Once we have created the custom connector, we can consume it through our Copilot Studio Agent. The process of publishing the connector will create a new MCP tool within the Power Platform environment, and then this can be added to your agent.

  • Browse to your Agent
  • Click Tools
  • Click “Add a Tool”
  • Choose your MCP Server
  • You will be asked to create a connection to the MCP Server.
  • Click Add and Configure
  • After a short period of time you should see a list of tools appear.
  • Now enable/disable the tools that the MCP Server provides.

Recently, there was an update so you can choose which tools are available to your Agent, so enable the ones you want and disable the ones you don’t want.

Now you can publish and test your agent.

Try it out.

Of course, you will need to make sure your agent is enabled to use the MCP tool and has orchestration enabled.

Conclusion

In this blog post, I explained how to set up an MCP server to be hosted in a secure and encrypted environment using Azure App Service. I also explained how to deploy and update the MCP Server, and finally test it and connect it up to Copilot Studio.

I’d love to hear how your MCP Server experiences are going and if you found this useful.

My plans for the next post in this series are to build and deploy an MCP server with Azure Functions, explain how we can deliver Azure Dev Ops pipelines to build and release our MCP Server container, discuss authentication so that you can secure your MCP Servers and finally, I want to look into the recent update to Declarative Agents which now support Model Context Protocol!

Check out the Microsoft Dev Blogs Post.