

Introduction
This article discusses my experiences when building Microsoft 365 Copilot Cowork Plugins, which are powered by a secure custom MCP Server.
Why Cowork and Cowork Plugins?
Microsoft 365 Copilot Cowork is an evolution of Anthropic’s Claude Cowork. The tool is very versatile and enables the user to run multiple agent-based tasks at the same time. The backbone of Cowork is its skills framework which gives it the capabilities it needs. These skills allow it do things which can do, including creating and updating Microsoft Word, Excel, PowerPoint content, performing deep research, investigations, and more.
The difference between Copilot Cowork and Claude Cowork is that Copilot Cowork runs in the cloud and is always on, whereas Claude Cowork runs from your machine so is only on when your machine is on.
I have to admit I have not used Claude Cowork, but my understanding is that Claude Cowork can also then drive your machine, which gives it an advantage in terms of Computer Use capabilities.
Cowork can access your Microsoft 365 data as Copilot can with hooks into your Email, Team discussions, SharePoint, Calendar entries and more.
These skills are great, and they allow you to define processes in detailed markdown files. These skills allow an organisation to define how to perform this work is done by Cowork. Up until Plugins, these skills were managed by each individual, and there was no way to share skills or have centralised skills.
This all changed with Cowork plugins, which allow you to deploy skills through a centralised mechanism.
However, all of this is great, but to really help you do more at work, Cowork needs to be able to access your business systems.
This is where Cowork Plugins come in, because as well as defining a skill, you can also tell them about your MCP servers. This enables you to provide a structured way for Cowork to access your business system. Through Cowork Plugins, you can provide a centrally managed set of Plugins which can then be added, updated, versioned and deployed to your teams.
Now we are talking!
Current state of Cowork Plugins
- The current state of Cowork plugins is that they are in preview, and they are a bit rough around the edges. For example, the management of Cowork plugins isn’t quite there. So, for example, you can add them, but until recently, when Stephan Bisser discovered you could use the Integrated Apps page, there was no way to delete them.
Also, upgrading them is possible, but if you have automated the installation and deployment to a user or group of users, then this is broken now.
In this post, I am going to show you how to create a Cowork Plugin, how to build an MCP Server which is secured by Entra ID Authentication and how we can bring that MCP Server into the Cowork plugin, so that Cowork can make use of it.
How to access Cowork and Cowork Plugins
First, at the time of writing, Microsoft 365 Copilot Cowork is only available if your organisation has enabled Frontier access. You can find out how to do this by following this article:
Get Started with Frontier for IT Admins | Microsoft Frontier
Second, you can access your Plugins through Cowork, as shown below.
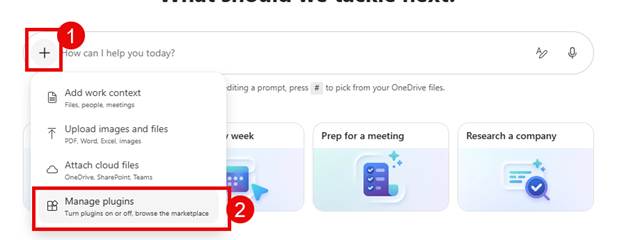
- Fire up Cowork
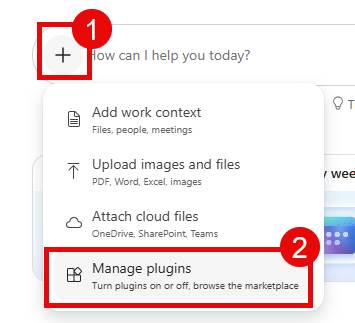
- Click on the + and then Manage plugins.
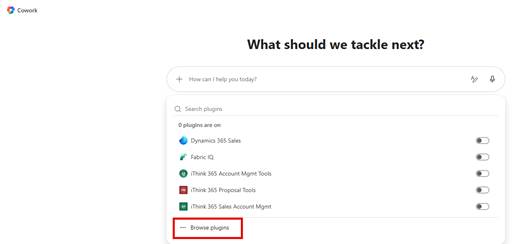
- You will see a list of the Cowork plugins that have been made available to you.
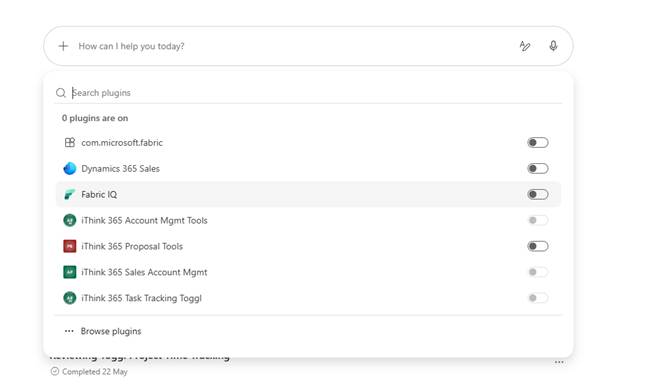
- Click on Browse plugins to allow you to install other plugins.
If you want to ensure that a plugin is available when you are kicking off a task in Cowork, make sure you have switched on the plugin.
How to build a Cowork Plugin
So, let’s get to building our Cowork plugin. In my example, we use a task and time management system called Toggl
Helping with everyone’s favourite job
One of the things that we all love doing is filing in your timesheets, don’t we?!
Well, how about if we could get Cowork to help us with this task?
We could ask it to look at our calendar and then automate the filling out of the user’s Toggl and fill out all the timesheets.
Something like this
Hopefully, the demo shows you the power of Cowork and these plugins. What is nice about it is that because you have the skill to describe how to do the task or tasks, these plugins can do more than one job, but you can guide them on how you want them to work.
For example, it is important that we allocate the right project and it is the right project for the right client. So I have asked Cowork to clarify anything that is unclear with or where there are duplicate project names.
Getting started
The following resources were used as a reference for building Cowork plugins; these are all found on Microsoft Learn.
https://learn.microsoft.com/en-us/microsoft-365/copilot/cowork/cowork-plugin-development
What do you need?
Well, you need an idea for your plugin. In our example, we are going to build a plugin to allow a user to fill out their timesheet.
So, to do this, we need the following:
- A Toggl MCP Server that is secured by Entra ID
- Entra ID Applications for your MCP Server and one for your MCP Client
- Visual Studio Code
- Ability to package up the Cowork Plugin.
- Configuration within Teams Dev Portal.
Let’s get started.
MCP Server Secured by Entra ID
So first, we need an MCP Server that is secured by Entra ID. I have written a blog post called “Building a secure MCP Server with Entra ID”, which contains a template to create your MCP Server from.
You can find this blog post here
Once you have downloaded and set up your secure MCP Server secured by Entra ID, then you can start building out your plugin and skill.
Building your Copilot Cowork Plugin
So, I will be honest, I have been using GitHub Copilot a lot, and generally these days I get GitHub Copilot to scaffold out the plugin and help me write the skill. I will share with you via my GitHub repo the skill that I have for Toggl, so you can see what I have.
Cowork Plugins follow a similar pattern to other Microsoft 365 Apps. This approach Is used by Microsoft Teams Apps, Declarative Agents, etc., in that they are a zip file which contains a manifest, a set of icons and then the resources for the Cowork plugin.
The Microsoft Learn Article, Build Cowork Plugins, has all the details, so you can read this, but I will talk about the key points and the gotchas that I went through.
https://learn.microsoft.com/en-us/microsoft-365/copilot/cowork/cowork-plugin-development
The plugin file structure is something like this (this is taken from the Microsoft Learn article)
my-extension.zip
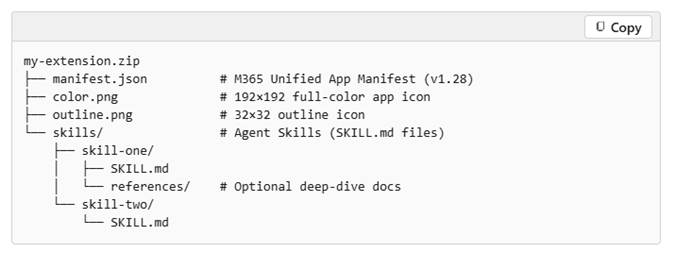
In the article, there is a section which shows you how to build a plugin from scratch
To get going, I opened Visual Studio Code.
- I created a folder for each plugin that I was building, and then created a subfolder called skills and then a subfolder within skills with the name of my plugin.
- Then I added a SKILL.md file which details my skills.
- I then asked GitHub Copilot
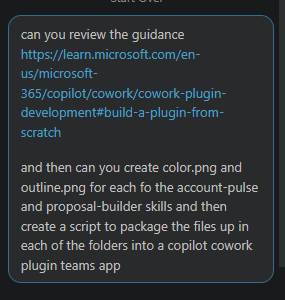
It scaffolded the rest of the structure and created a reusable PowerShell script, which will then package up the plugins into individual zip files.
I have made this all available on GitHub, so take a look. You will be able to access the final result here (minus a couple of URLs).
https://github.com/SimonDoy/microsoft365-dev-samples/tree/main/cowork-toggl-plugin-example
So I would suggest that you clone this repo and use it to get started.
Once you have cloned the repo and downloaded your plugin, you will need to update it for your needs. This is handled by two key files: the manifest.json and the SKILL.md file.
Let’s start with the manifest.json and talk through this.
Firstly, we need to fill out the version number, update the ID and packageName to your specific organisation.
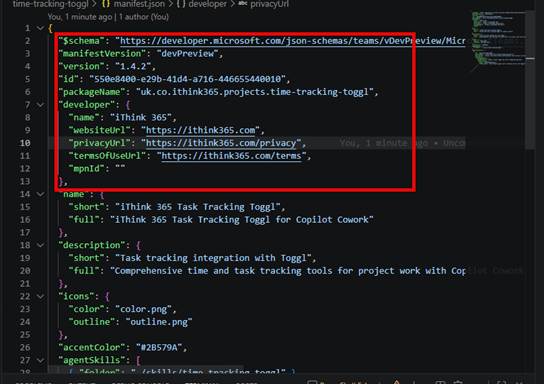
Next, we need to give it a good name and description.
As we get down to the bottom, this is where the exciting stuff lives. There is a section called agentSkills.
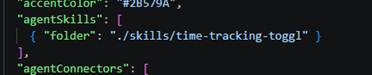
Here is where we point to our folder with our SKILL.md file.
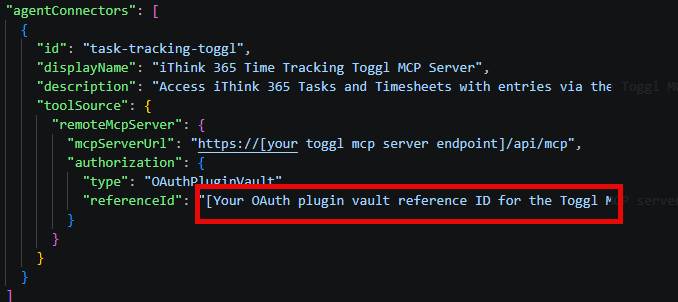
Next is the really exciting bit. The agentConnectors section.
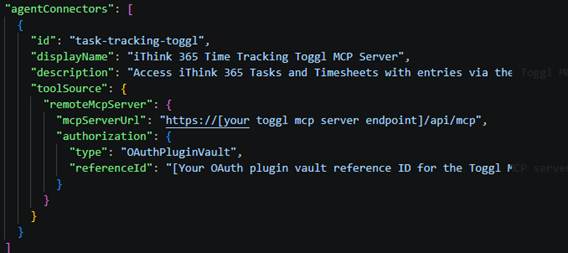
Here we provide an id for our connector, a name and a description of what the connector can do.
Finally, we provide the URL to our MCP Server, which includes the MCP endpoint.
Underneath, we provide authorisation information. Now, when I first read this, I thought the reference ID was just maybe the MCP Client ID we created when we created our secure MCP Server. Please see my blog article on writing a Secure MCP Server to understand what I am saying here.
These Cowork Plugins can support Anonymous Authentication, API Tokens (not tried) and OAuth or Open authentication.
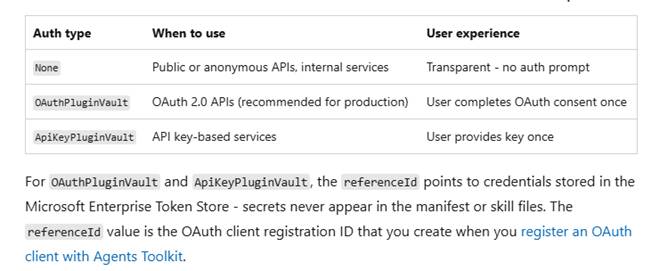
However, this is something completely different and requires you to set up an asset via the Microsoft Teams Developer Portal.
What to do to Get your OAuthPluginVault ReferenceId?
So, to get a reference ID for your plugin, what do you need to do?
Well, you’ll need to go to the Microsoft Teams Developer Portal
https://dev.teams.microsoft.com
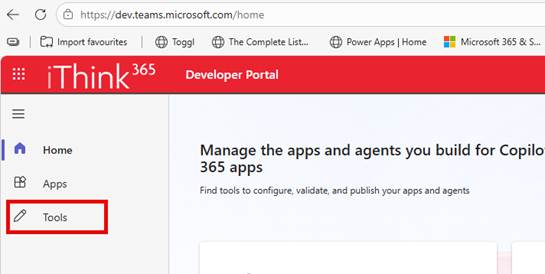
- Click on Tools.
- Click on Microsoft Entra SSO Client ID registration
- From here, click on New client registration
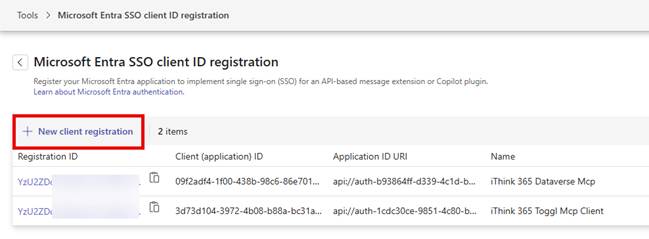
- Fill out the form, providing a name for the registration
- Provide a base URL. I used the URL for the MCP Server
- So, https://mymcpserver.azurewebsites.net/api/mcp
- Choose which organisation can use it; I just set it for my own organisation.
- I restricted it to any Teams app.
- Client ID: I used the MCP Client Entra ID Application ID
- Finally, the scope I used was the full scope for mcp.tools. e.g. https://ithink365.co.uk/mcp-toggl/mcp.tools
Once you have filled this all out, save your entry, and you will get a screen that displays your registration ID.
You need to update your plugins manifest.json and set the reference ID to this value.
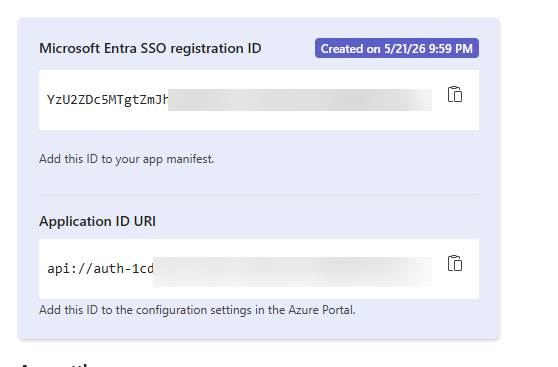
You will also need to go and add this Application ID URI to your MCP Server’s list of Application ID URIs.
This is achieved by editing your manifest file from within the Microsoft Entra ID, App Registrations
- Browse to https://entra.microsoft.com
- Click on App registrations under the Entra ID heading
- Find your MCP Server Entra ID application
- Choose Manifest and find the identifierUris array JSON.

- Add the specified URI to the bottom of the array.
- Save your settings.
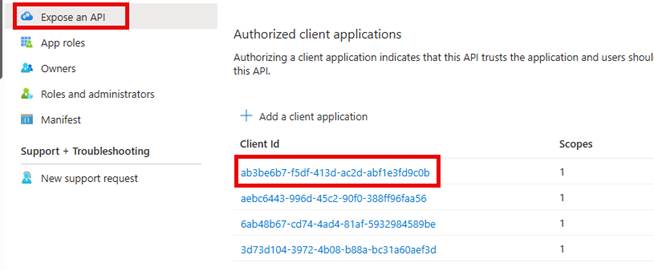
And ensure that the Microsoft Enterprise Token Store App is able to call our MCP Server app.
- Add ab3be6b7-f5df-413d-ac2d-abf1e3fd9c0b
Now, one thing at the time of writing, we need to have our Entra ID applications configured as multi-tenant. I ended up having to set the identifier URIs to be either a valid domain that has been validated against the Microsoft 365 tenant or use the api://[clientid] naming convention.
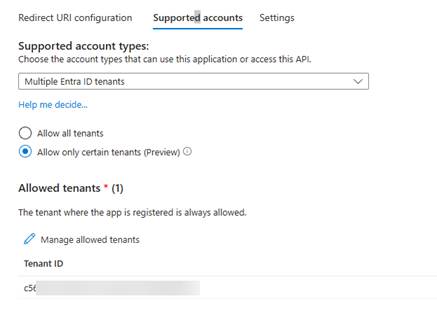
Once this is done, then you can switch your app reg to multi-tenant and secure it against just your tenant by doing the following:
- From your App Registration screen in Microsoft Entra ID
- Click on Authentication, choose Supported accounts
- Change to Multiple Entra ID tenants.
- Choose just your tenant id.
- Click Save
Next, we need to switch focus to our MCP Client that we are using to connect to our MCP Server.
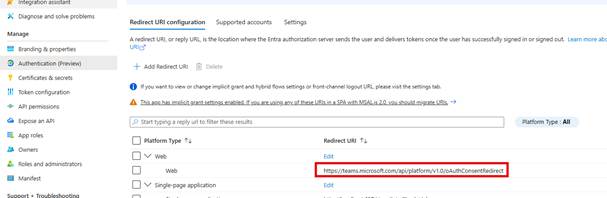
We also need to ensure that the MCP Client is set up for Multiple Entra ID Tenants.
We also need to add a redirect URL for Web Authentication.
This allows the token to be retrieved and stored in the Microsoft Enterprise Token store (probably).
Package your plugin
Now you can save everything and package up your plugin.
- Check your manifest, check your icons. Make sure you color.png is 192x192px in size and your outline is 32px by 32px.
- From a terminal run
- ./package-cowork-plugins.ps1 -PluginsPath “projects”
- This will create a folder called dist and a zip file with the name of the subfolder time-tracking-toggl.zip.
This zip file is your plugin.
Install the Plugin
To install the plugin, we need to go to the Microsoft 365 Admin Centre or (MAC).
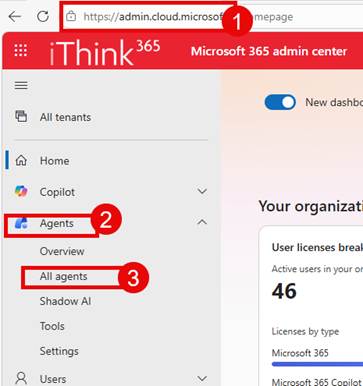
- Browse to https://admin.cloud.microsoft
- Click on Agents -> All agents
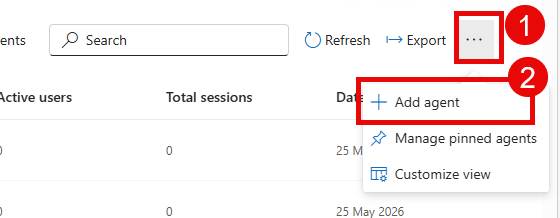
- Choose the … at the top of the list of agents
- Choose Add agent
- Upload your file and click Next
- Choose who can see your Plugin.
- Be careful about auto-deploying the plugin, as I have had issues then upgrading a plugin that has been deployed.
- Follow the wizard until you have successfully installed the Plugin.
You should see a successful screen, but then if you browse the list of agents, you cannot see your plugin anymore. This is just how it is at this time.
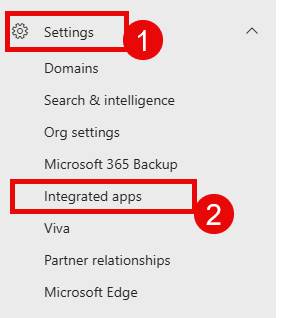
- Now, Stephan Bisser pointed out that you can view your plugins by clicking on Settings->Integrated Apps
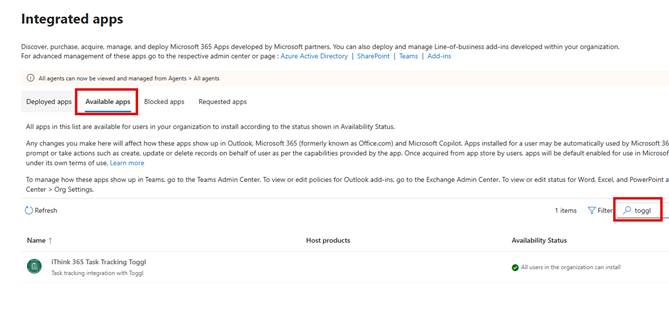
Now I can search from the Available Apps tab.
Enabling your Copilot Cowork Plugin.
Now you are ready to enable your Cowork Plugin.
- Open up your M365 Copilot App or browse to https://m365.cloud.microsoft
- Click on Agents
- Choose Cowork (Frontier)
- Click on the +
- Choose Manage plugins
- Choose Browse plugins
- From Discover, find your Plugin
- Click on the Plugin you want to add.
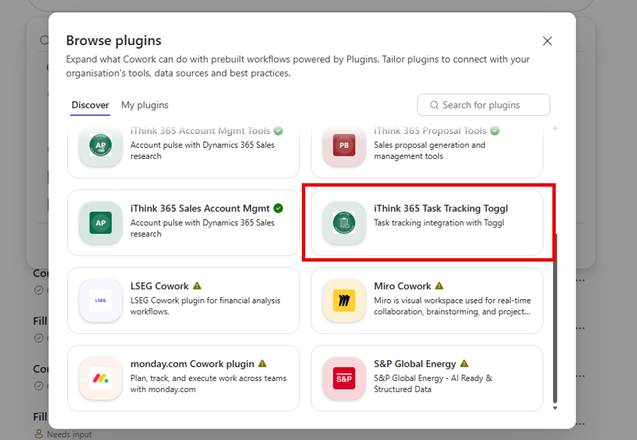
- Click Add
- Because this plugin requires authentication, you will need to connect it by clicking on Connect below.
Now, here you will find out if you have set up everything correctly.
If you click on Connect and nothing happens, then check your configuration on the Development Teams Portal.
Right, we should be ready to try it out.
Try out your Cowork plugin
So, let’s try it out. In the following video, you can see what happens.
- You need to enable your plugin before you kick off the prompt.
- Now I type out this prompt.
“Please add today’s work tasks from my calendar into Toggl”
Cowork will kick off and connect to the Calendar, and look at the appointments. It then connects to the Toggl MCP Server and tries to resolve the tasks in the calendar to projects and entries in my calendar.
It will air on the side of caution and not add projects to the tasks that it is not sure of.
After a few seconds, the Toggl timesheet has been completed based on the tasks from today.
Cowork Plugin Upgrade Gotchas
Before I wrap up this post, there are a couple of gotchas that I want to mention.
- Upgrading the Plugin does not work if you have deployed the plugin to any users. You get an error saying that you have already deployed this version of the plugin.
- Make sure when upgrading the plugin, you update the version number in the manifest and the SKILL.md file.
- I have seen upgrades silently fail when the color.png icon is not 192px by 192px. The upgrade package is updated, but then nothing happens.
- Upgrades to Cowork plugins seem pretty quick, normally within a few minutes.
Conclusion
In this post, we showed you how to create a Cowork plugin with a skill and consume an MCP Server that is secured by Entra ID. We covered the steps needed to set it up correctly, and I hope you try it out with your own MCP server implementations.
There are a few things to say about Microsoft Cowork. We are not sure what the licensing will be, and it is still in public preview, so take the chance to try it out and see how you get on.
As it is still in preview, it’s still a bit rough around the edges, but updates and improvements are happening all the time. As you can see from the demo, it is a really powerful tool, and I am excited to see what people build with it.
Let me know how you get on and what your thoughts are on how you would use it.

