
Introduction
This blog post is part of a series discussing Microsoft Planner’s App-Powered Task feature.
- Post One: Introduction to App-Powered Tasks
- Post Two: How to Build Planner App-Powered Tasks [This Article]
- Post Three: Gotchas, Findings, Thoughts and Bugs.
- Post Four: Features I would like to see in App-Powered Tasks.
In the first blog post, I provided an example of what they are and why you want to use them. 🙂 If you have not read the first post, I invite you to start from there.
In the previous post, we introduced App-Powered Tasks and why you want to use them.
In this post, we will discuss the architecture and process of building an App-Powered Task solution for Microsoft Planner.
An example architecture of an App Powered Task solution looks like the following
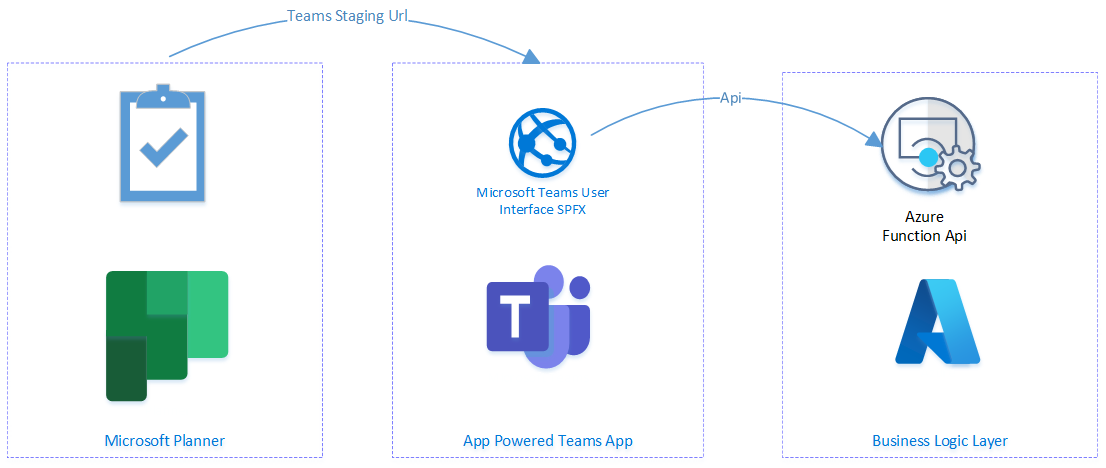
The ingredients for the solution are
- A Microsoft Entra ID Application will be used to create the business scenario plan and manipulate the business scenario planner tasks.
- An API to create, get, update and complete the planner tasks. I am also using this to create the business scenario plan.
- A Microsoft Teams App that will be used to action the task. In my example, I am using a SPFx teams app to achieve this.
- A Planner Plan
- A Team within Microsoft Teams that hosts the Planner Plan.
Anyway, let’s get to work.
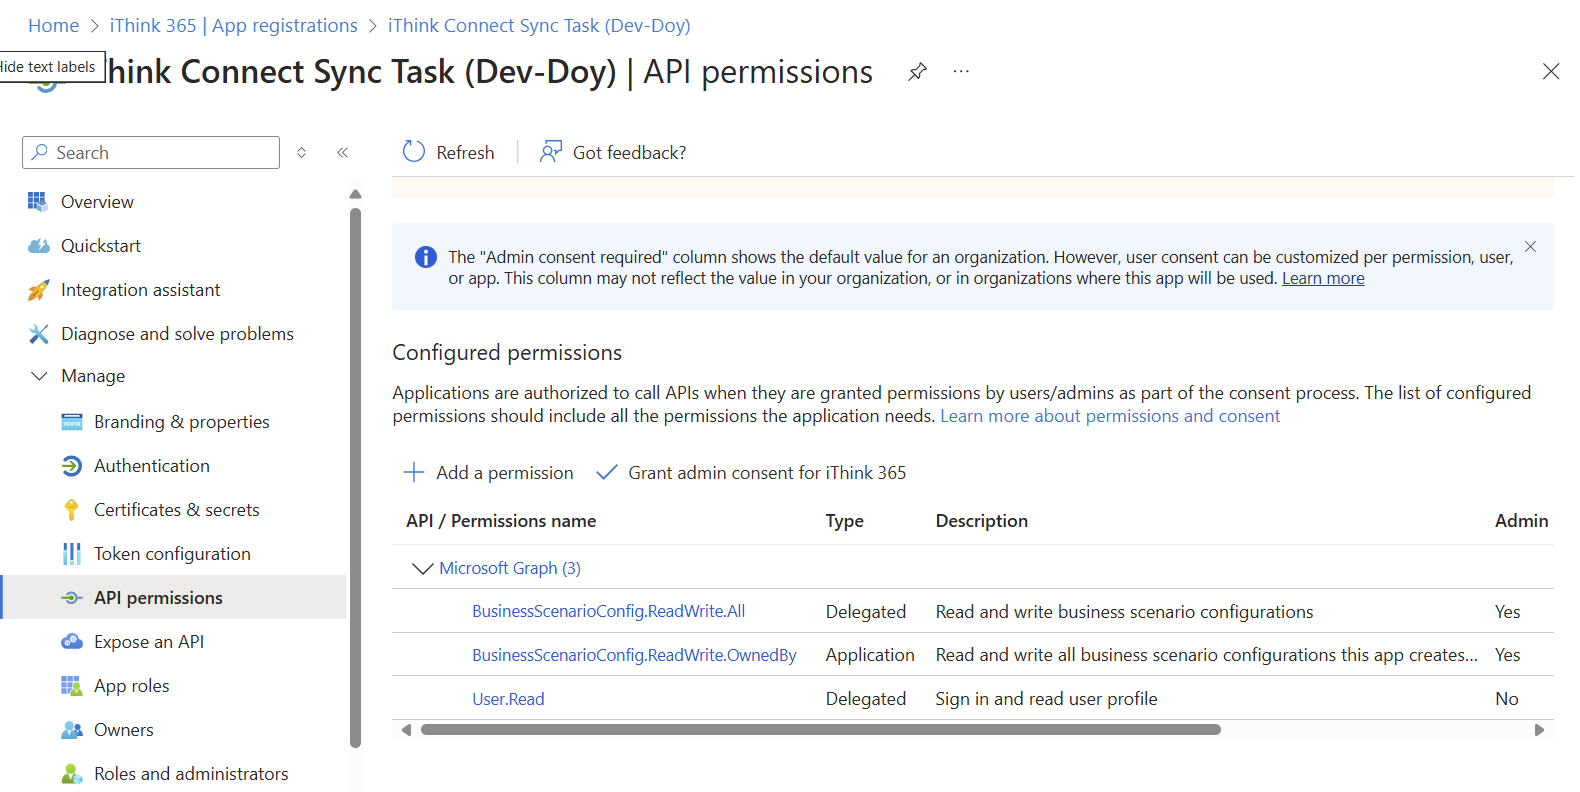
First, create a Microsoft Entra ID application.
- Browse to https://portal.azure.com
- Open the Microsoft Entra ID application.
- Click on App Registrations and create a new Entra ID Application.
- You will need to have at least the Application Developer Entra ID role (check)
- Give it a great name
- For this application, it only needs to exist in a single tenant.
- Ensure that it has the following permissions
- BusinessScenarioConfig.ReadWrite.All (Delegated)
- BusinessScenarioConfig.ReadWrite.OwnedBy (Application)
- Next, create a Client Secret using the Certificates & secrets option.
- Please make sure you save the Client Secret as we will need that shortly.
- Click on Overview and record the Client Id as we will need that too.
Now that we have the Microsoft Entra ID Application, the next step is to set up a Microsoft Team.
If you already have a Microsoft Team setup then use this.
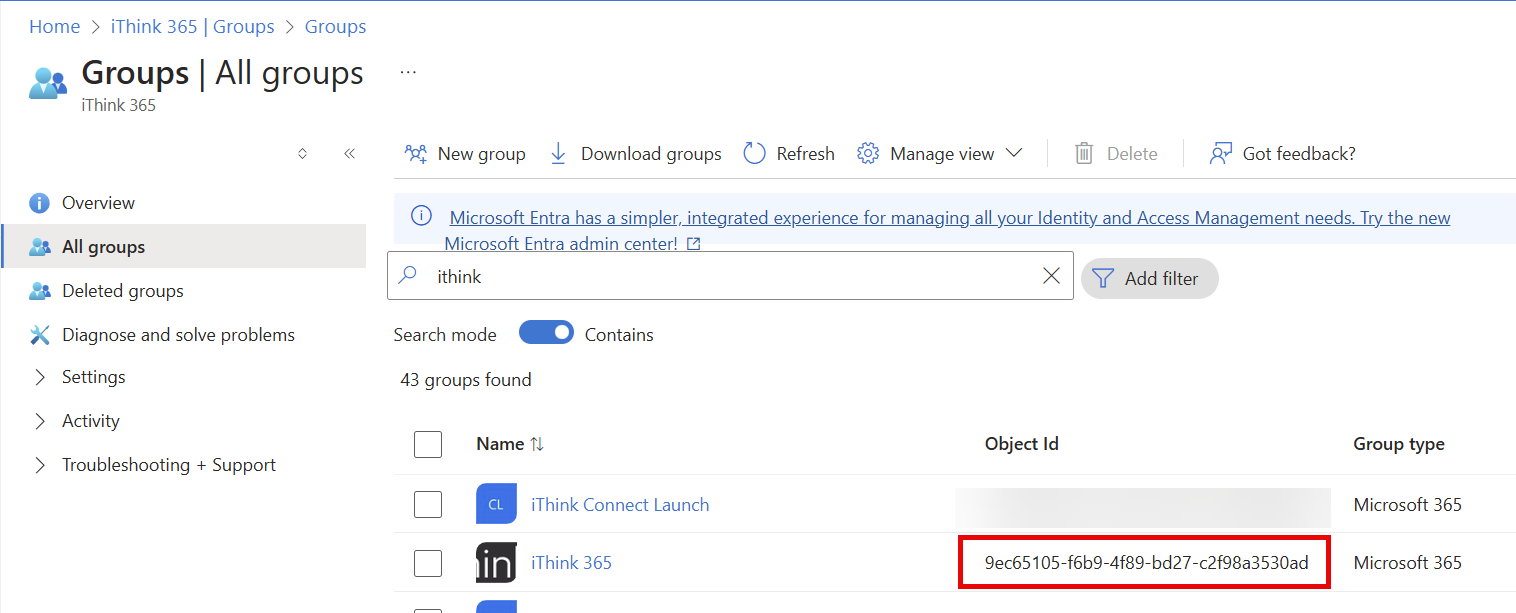
Once we have a Microsoft Team to host the Planner plan, we will need to get the identifier for the group.
You can retrieve the Id of the group using the Microsoft Entra ID blade in the Azure Portal.
- browse to https://portal.azure.com
- Click on Manage -> Groups -> All Groups
- Search for the Group.
- Record the object Id, which is also the Group ID, we will need that again shortly.
Now that we have the Entra ID application and Microsoft 365 Group, next you’ll need the code.
Getting the code
The code can be found in my GitHub repository, there are two parts to the code, which will go into a bit more detail shortly. We have the API which is an Azure Function and the user interface which is a Teams Toolkit created SharePoint Framework webpart. The web part will display the custom task interface for the user.
You can find the GitHub repository here:
Clone the GitHub repository to local your machine.
Get the code running
In this blog post, we are going to run everything locally, so that you can get the code working, debug it, and tweak it so it works for you.
- First, open the Azure Function Project in Visual Studio 2022.
- Second, open the Read Receipt SharePoint Framework webpart in Visual Studio Code.
Read Receipt Azure Function Setup
To setup and get the Azure Function working you will need to configure the Azure Function with the following settings so that it can use the Entra ID application that you setup and Microsoft Team.
Open the local.settings.json file and update the file with the following settings:
- ClientId uses the Client Id for the Microsoft Entra ID application you created.
- ClientSecret uses the Client Secret that you created previously.
- TenantId use the directory Tenant Id that is found in the Azure Portal, Entra ID Application as shown below.
- Next, configure the Group ID using the value you got from the Microsoft Team.
- BusinessScenarioName – the name of the Business Scenario
- PlannerName – the name of the Planner Plan
- SharePointHostName – the prefix of your SharePoint Online URL. e.g acme from acme.sharepoint.com
- TeamsTaskAppId – the Application ID for your Teams App
- InDeveloperMode – set to true
- TestUserPrincipalName – provide your username/email address here for your test user.
In the Repository is a folder called Postman, which contains the Postman Collection that we will use to run the Azure Function functions to set up the Business Scenario Microsoft Planner Plan.
You will need Postman, which can be downloaded from https://www.postman.com/
Once you have downloaded and installed Postman grab the Postman collection that I have created for you. This is found in GitHub, in the Postman folder.
Run the Read Receipt Azure Function To Setup Planner Plan
From Visual Studio 2022.
- Find the Timer Function called CreateConnectSyncPlanFunction.
- Put a breakpoint if you want to follow the code.
- Press F5 to run and debug the Azure Function on your computer.
- This will create a plan using the configuration settings you specified in the local.settings.json
- All being well the plan has been created in your Microsoft Team.
- Please check that it was created ok by going into Planner and looking for the Plan with the name you provided.
Setup the Read Receipt Microsoft Teams App
Now that we have the Plan created, we need to get the user interface setup within Microsoft Teams.
The configuration of the Teams App is using the various env.local, env.dev and env.prod files to manage the app IDs etc. I have left the local and Dev IDs as to the ones that I have been using.
Hopefully, that will be ok, and it will make life a bit easier for you to get the solution up and running.
In order to use these just change the .env.local.txt to .env.local and .env.dev.txt to env.dev. I have removed the tenant Id as you don’t need that and it will get in the way.
The API needs to know these IDs so that when the tasks are created then the right link is provided to the user to take them into our custom user interface.
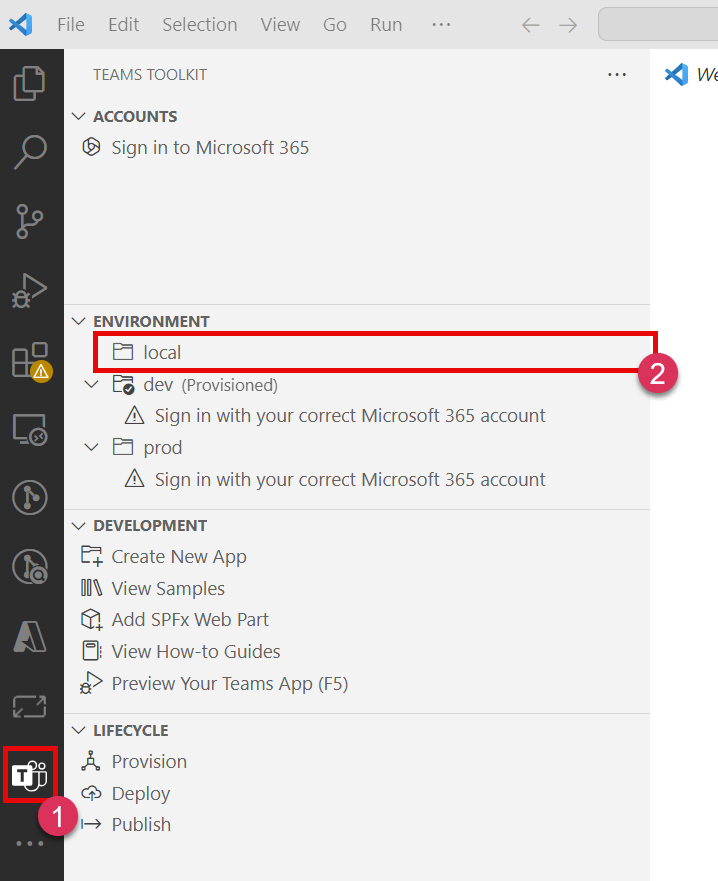
Use Teams Toolkit to get up and running by doing the following:
- From VS Code’s Terminal use npm -i to install all the dependencies.
- Rename the /env/env.local.txt to /env/env.local
- Rename the /env/env.dev.txt to /env/env.dev
- Start local provision of the Teams App by
- From Teams Toolkit Plugin
- Choose to start the local environment with Teams Workbench (local).

If you have not logged in before you’ll be asked to login into your Microsoft 365.
After a few minutes of compiling, you should have a browser fire up, asking you to open the Teams App.
Now you have the Teams App running we are ready to create a task.
Before that let me just talk about deep linking and Microsoft Teams.
A word about Teams Deep Links
I will talk about the problems that I had with Microsoft Teams Deep Links in the next post but let’s go over what we need to set up for the links to work.
The official documentation on deep link URLs within Microsoft Teams is available on learn.microsoft.com.
However, we need to use a stage link which looks like this:
https://teams.microsoft.com/l/stage/{teamsAppId}/0?context={encodedContextObject}
There are two tokens in the link:
- {teamsAppId} – this is the application ID for your Microsoft Teams App and can be retrieved from the env.* file.
- {encodedContextObject} – this is the bit of the Url that does all the work.
Let’s break down the encodedContextObject.
The encodedContextObject is an object that is URI encoded to ensure that there are no invalid characters.
The object looks like this:
{
"appId":"{teamsAppId}",
"entityId":"{teamsTabEntityId}",
"contentUrl":"{teamsAppLinkUrl}",
"name":"{teamsAppTaskTitle}",
"openMode":"modal"
}
The object has the following properties:
- appId – this is the ID for the Teams App that should be opened by the link.
- entityId – this is the ID for the tab that should be opened by the link.
- contentUrl – this is the URL that should be used to render the content and will explain further next.
- name – the name of the dialog to open.
- openMode – how should the link be opened; I am using a dialog modal to keep the user in the context of Planner.
The contentUrl is one of the more important of the parameters and its value is the key to getting the contents of the dialog to render properly. Here is the example from the code:
We have two in the code base, one for when we are developing and the other when the application is being used normally.
Development link
var teamsAppDevelopmentLinkUrl = $"https://[yourtenantname].sharepoint.com/_layouts/15/TeamsWorkBench.aspx?componentId=fac21461-7439-49d1-a2ce-f5ab67b67a91&subEntityId={teamsAppExternalObjectId}&teams&personal&forceLocale=en-gb&loadSPFX=true&debugManifestsFile=https://localhost:4321/temp/manifests.js";
Notice the link which has your SharePoint prefix for example https://acme.sharepoint.com but directs the user to TeamsWorkBench.aspx. This allows you to debug the code. It took me a while to work out this was the URL to use and I took it from the Teams Toolkit configuration file.
Additionally, it has the componentId and subEntityId properties.
- componentId – this is the tab that should be opened by the link.
- subEntityId – I have added this because I want to ensure that I know which task to open. This is the external object ID that is created and associated with the business scenario task.
Now for the normal, non-development link
var teamsAppLinkUrl = $"https://[yourtenantname].sharepoint.com/_layouts/15/teamshostedapp.aspx?componentId=fac21461-7439-49d1-a2ce-f5ab67b67a91&subEntityId={teamsAppExternalObjectId}&teams&personal&forceLocale=en-gb&loadSPFX=true";
This is similar to the development version of the link, except that we do not have the TeamsWorkbench.aspx mentioned but rather the teamshostapp.aspx instead. The properties are still the same, componentId and subEntityId as mentioned above.
Now that you understand the different links then we can bring it all together to create the encoded Context Object with the following code.
var teamsAppDevelopmentLinkUrl = $"https://ithinksharepointltd.sharepoint.com/_layouts/15/TeamsWorkBench.aspx?componentId=fac21461-7439-49d1-a2ce-f5ab67b67a91&subEntityId={teamsAppExternalObjectId}&teams&personal&forceLocale=en-gb&loadSPFX=true&debugManifestsFile=https://localhost:4321/temp/manifests.js";
var teamsAppLinkUrl = $"https://ithinksharepointltd.sharepoint.com/_layouts/15/teamshostedapp.aspx?componentId=fac21461-7439-49d1-a2ce-f5ab67b67a91&subEntityId={teamsAppExternalObjectId}&teams&personal&forceLocale=en-gb&loadSPFX=true";
if (inDevelopmentMode)
{
    teamsAppLinkUrl = teamsAppDevelopmentLinkUrl;
}

var contextObject = $"{{\"appId\":\"{teamsAppId}\",\"entityId\":\"{teamsTabEntityId}\",\"contentUrl\":\"{teamsAppLinkUrl}\",\"name\":\"{teamsAppTaskTitle}\",\"openMode\":\"modal\"}}";

var encodedContextObject = System.Uri.EscapeDataString(contextObject);

// the teams link must use a stage link https://learn.microsoft.com/en-gb/microsoftteams/app-powered-tasks-in-planner#example
var teamsAppTaskLink = $"https://teams.microsoft.com/l/stage/{teamsAppId}/0?context={encodedContextObject}";
var encodedTeamsAppTaskLink = Encode(teamsAppTaskLink);
Finally, we have an Encode function which comes from the Microsoft documentation but removes certain key characters from the link to ensure that when it is created as part of the Business Scenario Task with the Microsoft Graph SDK it is valid.
More information can be found here on the links within the Microsoft Learn App Powered Tasks documentation.
Using the URL to Create Your First Business Scenario Task.
We just need to make some tweaks to the code in our API to make sure it’s sending you to the right place.
To be honest, getting the URL right was one of the hardest parts of getting the solution going! 🙂
However, provided you have setup the local.settings.json correctly with the SharePoint Host Name and Teams App Id, everything should get setup correctly.
Now you understand the structure of the URL, do the following to create your first business scenario task.
- Open Postman
- Find the CreateBusinessScenarioTask request in the Postman Collection
- Click on the Body tab and update the properties to use values which make sense for your environment.
Here is an example from my environment.
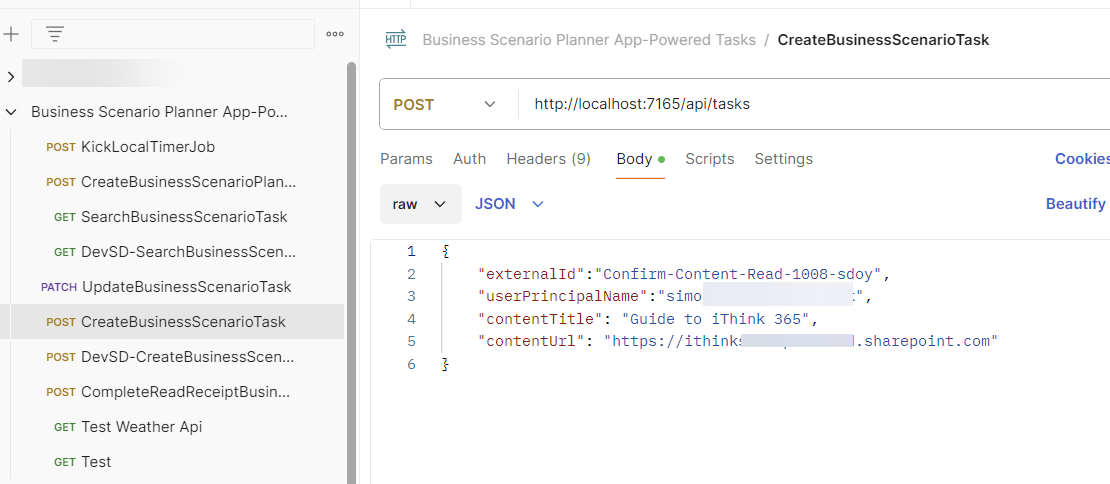
The following parameters are required:
- externalId – The externalId is the unique identifier that is used to find the task. Please be aware that the externalId needs to be unique in your plan.
- userPrincipalName – the user principal name of your test user. bob@domain.com.
- contentTitle – the title of the content that needs to be read.
- contentUrl – the URL to the content that needs to be read.
Click on Send and your Azure Function should be fired and a task returned in the response from Postman.
Additionally, now, you have a Microsoft Planner Plan with an App-Powered Task created. If you browse to the Microsoft Planner Plan using https://planner.cloud.microsoft you’ll see the task in the My Tasks view.
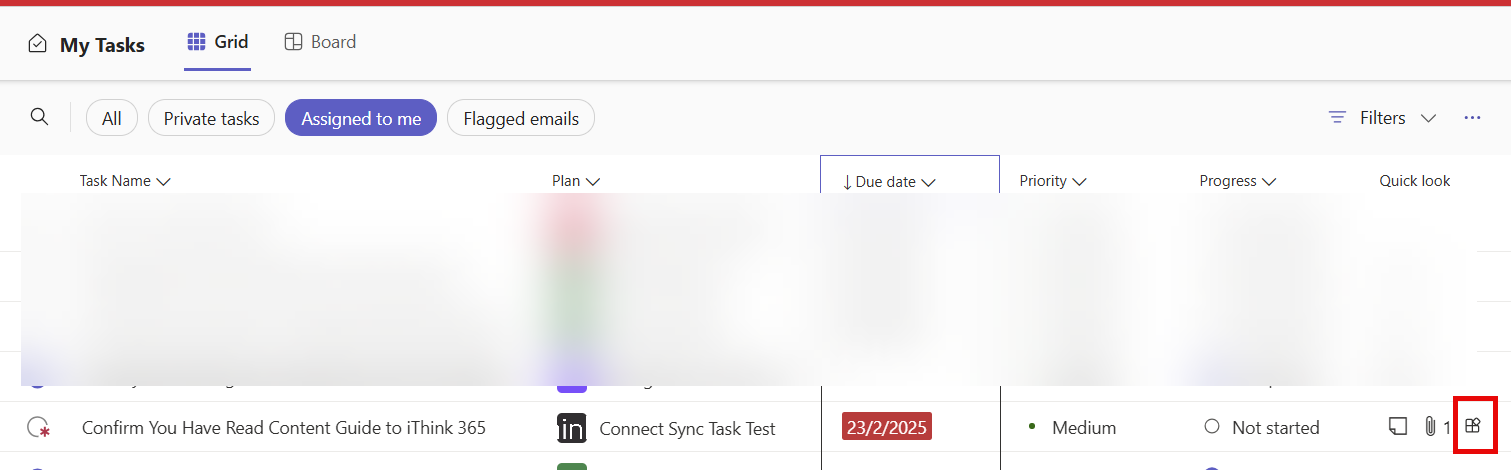
The highlighted part of the screenshot above, is an indicator that the task is an app-powered task.
Try out the task, open it and click “Start task” and see if works, make sure you still have the VS Code debugger running.
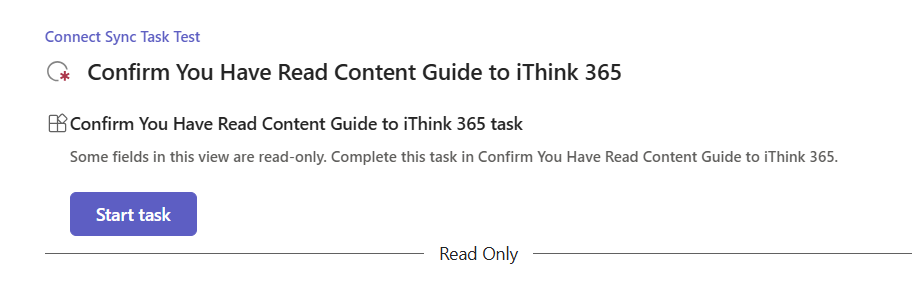
All being well you will see the task open up in your debug browser.
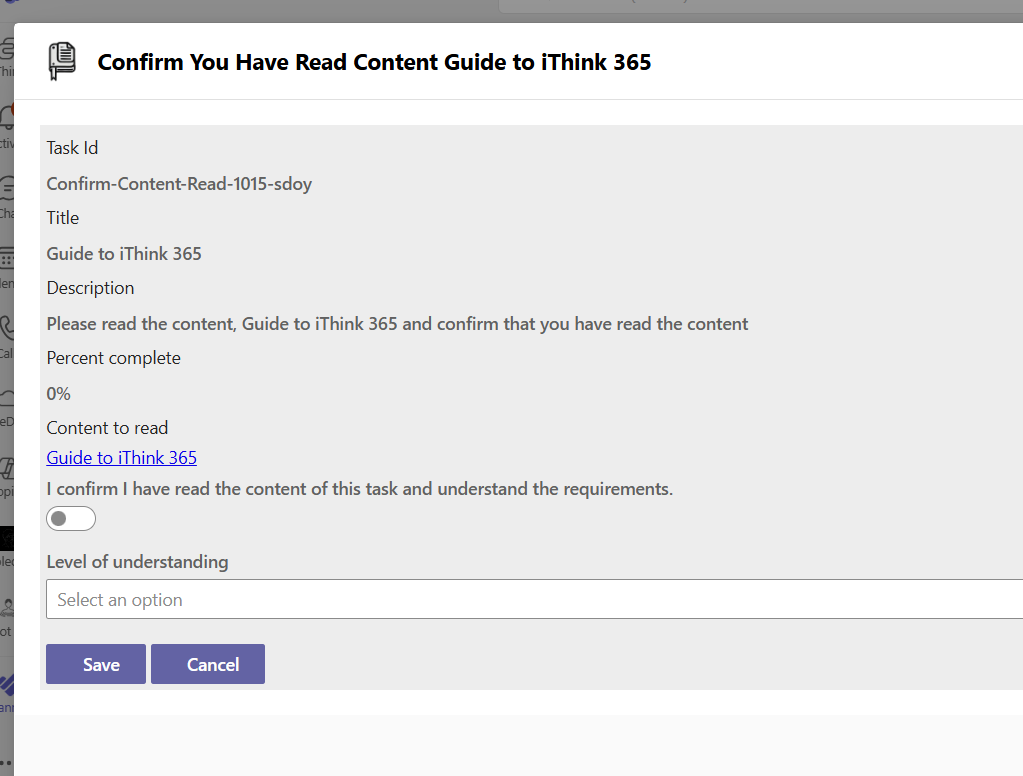
Congratulations you have created your first App Powered Task App!
I wanted to give you a bit more information on the deep link URLs as this took me a while to get going and so wanted to share my findings.
How do we use these deep links?
The links are created and associated with a Business Scenario Task through the References property. The links are a bit odd to set up for the first time but after you have done one you will soon get used to the pattern as the Graph SDK and Planner Api uses a similar pattern in several areas. The pattern provides the API with a lot of flexibility and extension points for future Planner features.
Well the code here does the work. Notice line 6 and 7 which create the container for these PlannerExternalReferences the PlannerExternalReference is created and setup the .Type is important as this is used by Planner to note whether the task is App-Powered. The PlannerExternalReference is added using the encoded Teams link plus the PlannerExternalReference object which is added to the AdditionalData property.
 // the teams link must use a stage link https://learn.microsoft.com/en-gb/microsoftteams/app-powered-tasks-in-planner#example
 var teamsAppTaskLink = $"https://teams.microsoft.com/l/stage/{teamsAppId}/0?context={encodedContextObject}";
 var encodedTeamsAppTaskLink = Encode(teamsAppTaskLink);

 // setup the external references used by the teams powered app task.
 var plannerExternalReferences = new PlannerExternalReferences();
 var plannerExternalReference = new PlannerExternalReference();

 plannerExternalReference.Alias = teamsAppTaskTitle;
 plannerExternalReference.Type = "TeamsHostedApp";
 plannerExternalReference.PreviewPriority = " !";

 plannerExternalReferences.AdditionalData.Add(encodedTeamsAppTaskLink, plannerExternalReference);


 // create a task
 var businessScenarioTask = new BusinessScenarioTask()
 {
     Title = teamsAppTaskTitle,
     PercentComplete = 0,
     StartDateTime = DateTime.Now,
     DueDateTime = DateTime.Now.AddDays(1),
     Target = new BusinessScenarioGroupTarget()
     {
         GroupId = groupId,
         TaskTargetKind = PlannerTaskTargetKind.Group
     },
     BusinessScenarioProperties = new BusinessScenarioProperties
     {
         ExternalObjectId = teamsAppExternalObjectId,
         ExternalBucketId = watchBucketName,
     },
     Details = new PlannerTaskDetails
     {

         Description = $"Please read the content, {readReceiptTaskResponse.ContentTitle} and confirm that you have read the content",
         References = plannerExternalReferences
     },
     Assignments = taskAssignments

 };

 await graphClient.Solutions.BusinessScenarios[theBusinessScenario.Id].Planner.Tasks.PostAsync(businessScenarioTask);
We create the business scenario task (please note I have stripped out the other code to assign the task etc to help readability.
Finally, we add the task to the Business Scenario plan using the PostAsync function.
Conclusion
I hope that you found this article useful and got the code up and running. Please reach out and raise any issues within the GitHub Repository and I will look and get back to you or add any fixes that you might discover.
In this blog post we introduced App Powered Tasks with Planner and using a SharePoint Framework Teams App and Azure Function we were able to create a Business Scenario Plan, and tasks and set up a task to open up a Teams App that will allow you to put a custom user interface around the Business Scenario Task.