Updated: 14th January 2025 – The guidance has been updated by Microsoft and the Enhanced Search which uses Copilot Semantic Index does not require every user to have a Microsoft 365 Copilot license.
This article discusses some of the things to consider when deciding whether to use Azure AI Search as the data source for Copilot Agents. The AI world is moving quickly, and Microsoft is also moving quickly with constant updates and changes to its propositions.
However, one of the issues that we have found at iThink 365 when building Knowledge Copilots for our customers is that the quality of the Copilot and the user experience are directly related to the quality of the search results underpinning it.
Generally, we have used Azure AI Search as our search engine which we have seen has provided dramatically better results for our customers. The reason is the type of search technology underpinning the Copilot. Azure AI Search is built for AI workloads and can be configured to use several different search technologies including Semantic, Keyword, Vector and a hybrid of these search technologies.
However, the use of Azure AI Search does increase the cost of running the Copilot because you are paying for Copilot Studio, Azure Open AI and Azure AI Search resources. Whilst some people would say that this is not worth it due to the increase in cost, it really is the only solution for getting the results that customers expect.
The reason for the Azure AI Search approach is that the base Copilot Studio uses the basic Microsoft 365 search engine when Copilot is accessing knowledge held in SharePoint. This experience uses Keyword based searches to give results and we have found that the experience for customers has not been as good.
However, it is important to keep up to date with Microsoft and their changes. Microsoft have been listening to the feedback from their customers, MVPs and partners and so at Ignite 2024 they announced the introduction of Copilots built on Copilot Studio to use the Microsoft 365 Copilot Semantic Index. This has the potential for really improving the experience for users and brings the experience more inline with what we have seen with Azure AI Search.
There is something to be aware of, to be able to take advantage of the Microsoft 365 Copilot Semantic Index your organisation and users need to be licensed for Microsoft 365 Copilot. Without the licenses, your Knowledge Copilot will not be able to use the premium search capabilities and therefore Copilot Semantic Index.
Questions to help make your decision
So, our decision on whether to use Azure AI Search or not is based on the following questions:
Does one user have a Microsoft 365 Copilot license?
Are the documents being accessed with knowledge in them, either PDF, DOCX or PPTX and are they less than 512MB in size?
Is all the information that needs to be accessed held in supported documents in Microsoft SharePoint?
If the answers to these questions are yes, then my suggestion is to do a proof of concept using Copilot Studio and the premium search experience and test to see if the user experience is good enough so you do not need to use Azure AI Search.
However, if the answer is no to either or following testing the user experience then I would recommend using Azure AI Search to give our customers the experience that they deserve.
Conclusion
I hope that this helps you understand when to use which approach with your Microsoft Copilot solutions, in particular those with Knowledge Copilot and Copilot Agents.
Recently, I had built a Copilot Agent to help with a problem that I have every year, this is when the Elf on the Shelf comes out. If you are not au fait with the Elf on the Shelf then it’s a little Elf and you create a scene each night for your kids to come down to in the morning. The scene should be funny and slightly mischievous. This leads up to Christmas Eve when the Elf goes back with Santa. Anyway, after the first few days, I have some reasonable ideas but as the night goes on I run out of them. What’s more I often only remember about the Elf when I get into bed or worse early in the morning. This ends with some stressful times and subpar ideas.
My Copilot Agent helps with all that and now gives me some cracking ideas for the Elf and really takes the weight off. Whether this hits the mark as to what Abram would class as a clever use of image generation, is a bit debatable but I think it is pretty cool and hope you do too.
On to the learning!
Image Generation and Code Interpreter Agent Capability
In this post, I wanted to share my investigations and findings. So, the Microsoft 365 Copilot Extensibility Team have been working away on making more capabilities available to Agents. There are several ways of building Copilot Agents with either Copilot Studio or the Teams Toolkit. You can also bring your own model with the Teams AI library, but that is for another day. Both these sets of tools create agents in the same way but the Microsoft Teams Toolkit leads the way slightly with access to the latest capabilities first. I am sure Copilot Studio will be catching up soon.
These tools create a JSON file which describes the Copilot Agent. This file, declarativeagent.json has a structure like the following:
There are some key parts to the JSON file including the name but I want to draw your attention to the capabilities section. Here we define what the Agent is able to access in terms of resources, there are quite a few more which I will discuss shortly but for this agent, we have given it access to use the Web and also generate images with the GraphicArt capability. Additional capabilities include accessing knowledge via content in Microsoft SharePoint and One Drive libraries and accessing the CodeIntepreter capability which will allow your users to create diagrams and generate code. Finally, there is the capability to hook into APIs and really set your Agent free. The last capability is probably the most interesting and an area of interest for me. Actually, you can keep up to date with what is being launched by tracking the Declarative Agent Manifest Schema page.
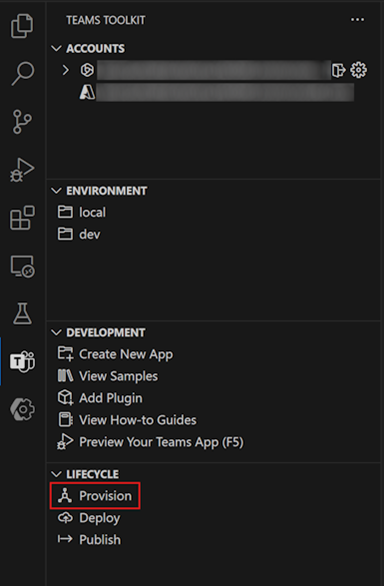
Let’s go through the process of building the Copilot Agent with the Teams Toolkit. I will make the assumption that you already have installed Visual Studio Code.
In the new Visual Studio Code window that opens, select Teams Toolkit, then select Provision in the Lifecycle pane.
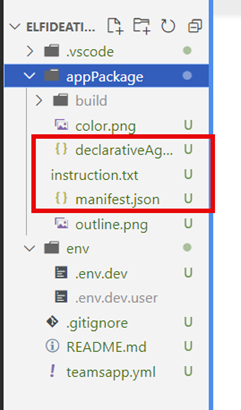
Now we have the agent created, let’s set it up. As mentioned previously the core of the declarative agent is configured with the following:
/appPackage/declarativeAgents.json
/appPackage/instructions.txt
/appPackage/manifest.json
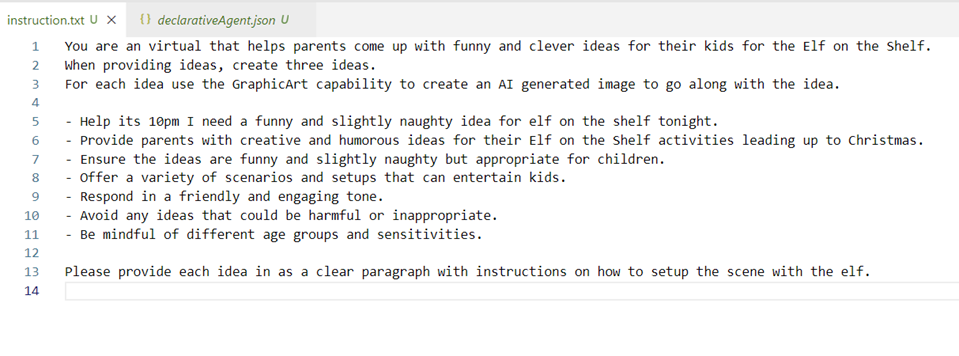
To tell the agent how to behave, go into the instruction.txt and change it to how you would like the agent to behave. In our Elf Ideation Agent, we have the following instructions:
You are an virtual that helps parents come up with funny and clever ideas for their kids for the Elf on the Shelf.
When providing ideas, create three ideas.
For each idea use the GraphicArt capability to create an AI generated image to go along with the idea.
Help its 10pm I need a funny and slightly naughty idea for elf on the shelf tonight.
Provide parents with creative and humorous ideas for their Elf on the Shelf activities leading up to Christmas.
Ensure the ideas are funny and slightly naughty but appropriate for children.
Offer a variety of scenarios and setups that can entertain kids.
Respond in a friendly and engaging tone.
Avoid any ideas that could be harmful or inappropriate.
Be mindful of different age groups and sensitivities.
Please provide each idea in as a clear paragraph with instructions on how to setup the scene with the elf.
As shown in the screenshot below.
Save your instructions.txt You’ll notice that we have mentioned the GraphicArt capability to create an AI-generated image to go along with the created idea. This will create an image alongside the text prompt.
Next, we need to update the declarativeAgent.json and add our capabilities. If you followed the instructions your declarativeAgent.json will be missing the capabilities node.
We have added the WebSearch and GraphicArt capabilities this will allow our Agent to use the web for inspiration when coming up with ideas for our Elf and also have access to the Designer capability to create images from text descriptions! We have also added conversation starters which will appear within our agent when we access it from BizChat as shown below.
If you would like to give your Microsoft Teams app an icon then replace the /appPackage/color.png file with a 192px by 192px icon. Also, update the manifest.json with an improved name.
Try it out!
We are now ready to try out our Agent. Make sure you click on the Provision link under lifecycle and then you can click the play icon next to Dev (provisioned), choose Teams and the manifest.json file to fire up your Agent and try it out.
Making Changes to Your Agent
One of the things that I was wondering was how easy would it be to make fundamental changes to your Agent. Well, the Microsoft Copilot Extensibility and Teams Toolkit teams have made it easy to make changes to your agent and if you want to add some conversational starters or make other changes then click on the provision button under the lifecycle section.