

Introduction
Microsoft’s Agent 365 was one of the key announcements from this year’s Ignite 2025 conference in November. I see it as Microsoft’s first real attempt, where they are providing an AI Agent-first approach. One that provides the control and capabilities CTOs, CIOs, and Delivery Teams are looking for.
The Agent 365 platform has at its core the following capabilities and features:
- Agent Identity and an Agent User.
- Agent Visibility through the Agent Registry
- Agent Management, Governance and Access Control
- Agent Auditability, Observability and Monitoring
- Development features such as the Notifications and Observability APIs
The platform is tightly integrated into Microsoft 365 and Microsoft Entra ID, using Entra ID as the backbone for Agent identity and security. The platform enables these Agentic workloads via Microsoft Foundry, Copilot Studio, and Microsoft 365 Agents SDK platforms. However, there seems to be more capability available in the pro-code platforms at this time. This is particularly apparent around monitoring and observability, but I am sure that will change as Copilot Studio enables tighter integration with Agent 365.
Agent 365 is very much in its infancy, but I wanted to delve into it over the Christmas period. In particular, I was interested in the development story. Since Microsoft 365 Copilot has been announced, one of the key features/capabilities that I have been looking for is how we can integrate these Agents into our daily workflow.
I wear a number of hats as the CEO / CTO / Pre-Sales Consultant at iThink 365.
One of those hats is acting as the pre-sales consultant, and I spend a lot of time writing proposals. I really want an Agent who is an expert on iThink 365 and what we do. In particular, on our approach to delivering customer solutions and help supporting the proposal writing process.
Co-authoring has been a game-changer ever since Microsoft brought out the ability to work with colleagues in Word, Excel and PowerPoint. One of the features that I use a lot when creating proposal is the comments feature. We use comments to ask for support from the various members of my team. However, I really would love to be able to ask an AI Agent for support. Now, with Agent 365, this should be possible.
Please find a video showing you an example of the basic experience when you have integrated an Agent 365 Agent with Microsoft Word.
With this task in mind, I decided to delve into Agent 365. In this post, I will share my findings and hopefully help you not fall into some of the traps that I did when getting up and running. The documentation I have to say is pretty good overall, but there were a couple of times I got stuck.
Let’s get started.
Pre-requisites
- Before you get started, you will need a user account withthe Global Administrator role.
- Your Microsoft 365 tenant needs to be enrolled in the Microsoft Frontier preview program.
- Azure Subscription – you will need access to an Azure Subscription to provision Agent 365.
- You will need PowerShell 7.5+
- Finally, I have been building the Agent using Visual Studio 2022 or 2026
Getting Started with Agent 365
The documentation to get started with Agent 365 can be found here:
Nullpointer’s Agent 365 Blog Post
I wanted to highlight another blogger’s Agent 365 post series from Andreas Adner. I found their blog posts as I was trying to resolve various issues. Definitely worth having a read, and I see that they have written some more since I last looked.
https://nullpointer.se/exploring-agent-365-cli.html
Concepts
There are a few new concepts which come with Agent 365. Which will be discussed next. The first thing to say is that
Agent Blueprint
The first concept to discuss is the Agent Blueprint. An Agent Blueprint is a pattern which defines the definition of an Agent 365 Agent. The Agent Blueprint has an ID and is viewable in the Agent 365 portal. It has an entity in Microsoft Entra ID. It defines how the Agent communicates, for example, through Bot Framework, what permission the agent has to which resources, and it is used to define the identity of the agent.
However, an important point is that the blueprint is not the actual Agent and cannot be accessed by a user. An Agent instance needs to be created from the Blueprint for that to happen.
Agent Instance
An Agent Instance is the visible Agent. You can create one or more Agent Instances from an Agent Blueprint. We will get into this. The Agent Instance and what it has access to are defined by the Agent Blueprint.
Once you have created an Agent Instance, then it has its own identity, and you can treat it like a user and are able to “@ mention” the agent in Microsoft Teams once it has been provisioned.
Tools
The key tools for setting up Agent 365 are the following:
- Azure CLI (az)
- Agent 365 CLI (a365)
- DevTunnels
Azure CLI
The Azure CLI should be installed first and is used to log in and work with Microsoft Azure. The A365 CLI uses Azure to host and scaffold the infrastructure that is going to be used by your Agent 365 Agents.
To install the Azure CLI, use the following instructions.
https://learn.microsoft.com/en-us/cli/azure/install-azure-cli?view=azure-cli-latest
I used the WinGet tool on Windows 11 to get going.
winget install --exact --id Microsoft.AzureCLIA365 CLI
The Agent 365 CLI is the workhorse for working and configuring your Agent 365 components. You use this to initialise, configure and develop your Agent 365 Agents.
To install Agent 365 CLI, use the following instructions.
https://learn.microsoft.com/en-us/microsoft-agent-365/developer/agent-365-cli?tabs=windows
Note: The Installation uses dotnet tool to install and originally, I installed the latest release rather than pre-release. However, I ended up installing the pre-release version of A365 CLI because some of the develop tool command line options were missing. So, I would recommend installing the pre-release version at this time.
dotnet tool install --global Microsoft.Agents.A365.DevTools.Cli –prerelease
Custom A365 Entra ID Application
You will need a Microsoft Entra ID Application created in order to configure Agent 365.
The instructions on how to setup a custom Microsoft Entra ID application can be found here:
https://learn.microsoft.com/en-us/microsoft-agent-365/developer/custom-client-app-registration
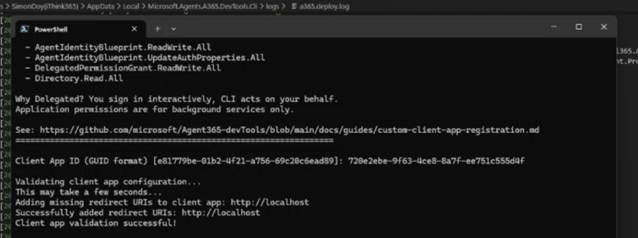
There are two modes of setting up the Entra ID Application. At the time of writing, I used the Microsoft Entra Admin Centre rather than setting up the Beta permissions.
Note: Please note that the permissions which are set up are Delegated permissions and not Application permissions!
The Entra ID Application that I created, I called
iThink 365n Dev Agent 365 Setup
.NET 8
I have recently got a new laptop and so fell foul of missing a couple of components. Most notably, the Agent 365 CLI, a365 needed the.NET 8 runtime components to be installed. These can be found here
https://dotnet.microsoft.com/en-us/download/dotnet/8.0
I installed the following .NET 8 runtime components:
- .NET Desktop Runtime
- ASP.NET Core Runtime
DevTunnels
In order that we can develop and run our Agent code locally, we need to be able to proxy the communication from the Cloud to our local machine.
For that, we are going to use DevTunnels, which is Microsoft’s version of similar tools like ngrok.
To configure DevTunnels, do the following
- Install DevTunnels
winget install Microsoft.devtunnel
Restart your PowerShell command prompt.
Next, configure a devtunnel using the following command
devtunnel create [tunnelname] --allow-anonymous --expiration [days to expire]d
e.g.
devtunnel create i365-propwriter-agent-devsd-tunnel --allow-anonymous --expiration 30d
Next, start the devtunnel using the following
devtunnel port create -p 3978 --protocol http
Next, start hosting the devtunnel using the following
devtunnel host i365-propwriter-agent-devsd-tunnel

Your DevTunnel is now ready, make note of the URL which will use shortly.
Note: You want to use the URL that is labelled Connect via browser.
Agent 365 Source Code
To be able to continue, you will need some sample code to work with!
Currently, the Agent 365 team have the following samples available on GitHub.
https://github.com/microsoft/Agent365-Samples
For my project, I created a new console app project and then imported various settings from the csproj file from the Semantic Kernel .NET sample.
https://github.com/microsoft/Agent365-Samples/tree/main/dotnet/semantic-kernel
However, for simplicity lets clone the repository to our machine.
Once you have downloaded your code downloaded you are set to start configuring Agent 365. I always clone my code into a dev folder on my C: drive, c:\dev. This way, I get around issues with long file names and file paths.
Configuring Agent 365 with A365
Please make sure you have the A365 tool installed, and you have created the Custom Microsoft Entra ID application that will allow you to authenticate with Microsoft Entra ID.
Finally, make sure your account has access to an Azure Subscription.
The first step is to log in to Azure
az login
Select your account to log in with and wait for the authentication process to complete.
Once you have logged into Azure, you will need to select the Azure Subscription that is your default subscription to work with Agent 365.

Next, we need to initialise the Agent 365 CLI configuration
a365 config init
You will be asked to provide the details of the Client ID for the Custom A365 Entra ID Application that you created earlier. This will be used by the A365 CLI to configure your Agent 365 Agent.
If you already have a configuration setup within your user profile, then it will be detected and reused. Interestingly, as you are using the a365 CLI, the output is being logged, along with backups of your configurations. These can be found here in your local user profile:
“c:\users\[YourUserName\AppData\Local\Microsoft.Agents.A365.DevTools.Cli”
start “$Env:USERPROFILE\AppData\Local\Microsoft.Agents.A365.DevTools.Cli”
Anyway, back to the setting up of your Agent 365 Agent.
- Choose a name for your agent.

Next choose the path of your Agent 365 Project path that you cloned from GitHub earlier.
- Mine is
“C:\dev\agent365-test-dev\iThink365ProposalWriterAgent\i365.Agent.ProposalWriter\i365.Agent.ProposalWriter
Next, choose the Resource Group you will use to host the Agent 365 Agent or provide a new resource group name to create and use.

Note: Please make sure you create a resource group in a supported region. I am currently using swedencentral as my preferred location at this time.
Finally, choose whether you are going to be creating a web app.
There is a nuance here that you need to be aware of. We want to be able to debug and run our Agent locally so we should choose not to create a web app.
Why?
Well, when we say no we are given another prompt where we are able to provide a messaging endpoint URL which is used by the Bot to communicate with.

So for the endpoint URL we must use the URL from your DevTunnel configuration that you made earlier.
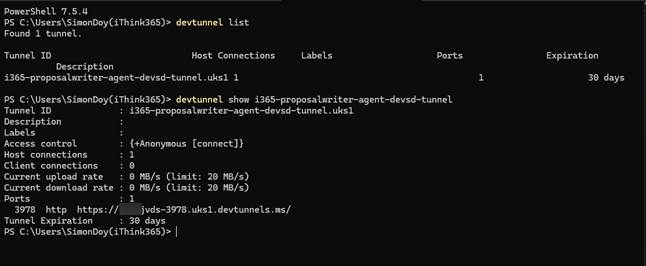
If you cannot remember the URL use the following command to get the URL again.
devtunnel list
devtunnel show [name of your tunnel]

Next, you are asked if you want to customize the generated names. I would recommend that this is done after the configuration is created so you have a bit more time to look through what has been created and whether the entries make sense.
Finally, you will be asked to save the configuration.
Check and Verify the Configuration
Once the configuration file has been created you will see two files
A365.config.json
A365.generated.config.json
To see the configuration that has been created run
A365 config display
Creating the Agent Blueprint
We are now ready to create the Agent Blueprint, I had a couple of issues with this process which was down to the latest version of the Microsoft.Graph.Authentication module.
This shows up in the following way when running the a365 setup commands.
Acquiring Microsoft Graph delegated access token via PowerShell (Device Code: False)
ERROR: Failed to acquire Microsoft Graph access token. Error: Write-Error: InteractiveBrowserCredential authentication failed: A window handle must be configured. See https://aka.ms/msal-net-wam#parent-window-handles
The following link provides the details as resolution.
https://github.com/microsoft/Agent365-devTools/issues/131
This is summarised as the following
Check your current version by running:
Import-Module Microsoft.Graph.Authentication
Get-Module “Microsoft.Graph.Authentication”
If the version is 2.34.0, try to use this to mitigate:
Install-Module -Name Microsoft.Graph.Authentication -Force -RequiredVersion 2.33.0
Exit the current PowerShell instance and start a new one and run:
Uninstall-Module Microsoft.Graph.Authentication -RequiredVersion 2.34.0 -Force
Anyway, on to setting up your Agent Blueprint.
This is something that I don’t like about the a365 tool as it currently stands. Each time you run this process it will create a new Agent Blueprint rather than checking for an existing one and not recreating it.
I will explain some of the subcommands that you can use to update the setup without recreating the agent blueprint.
a365 setup all
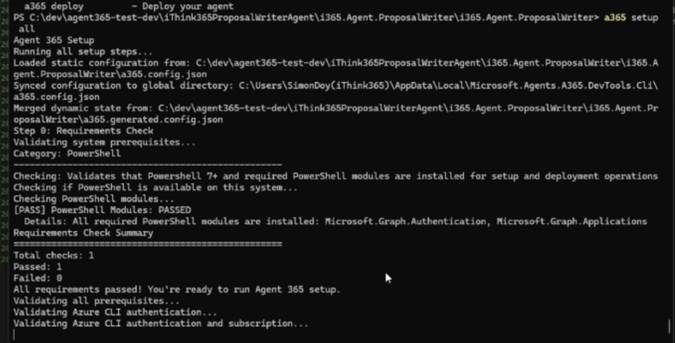
This will start the setup of your Agent Blueprint which includes the following:
- Infrastructure if required,
- Agent Blueprint
- Configuration of Agent Permissions
- Configuration of Agent MCP Permissions
- Bot with configured Messaging endpoint
Something to be aware of, you cannot configure the Bot through traditional tooling it seems that this is all managed by Microsoft. One of the important aspects of the Bot configuration is the messaging endpoint. Depending on whether you choose to deploy Azure Infrastructure or not you will get a slightly different setup in your a365.config.json file.
If you are using Azure Infrastructure you will see these entries.
“needDeployment”: true
If you choose not to deploy Azure Infrastructure you will see these two entries
“messagingEndpoint”: “https://%5Bendpointurl%5D.devtunnels.ms/api/messages”,
“needDeployment”: false
We want to be able to run the Agent locally, so choose to not deploy the Azure Infrastructure.
Use the URL from your DevTunnel configuration that you made earlier for example
If you cannot remember use the following command to get the URL again.
devtunnel list
devtunnel show [name of your tunnel]
When you setup your infrastructure this will configure the messaging endpoint which when you are not using Azure infrastructure you can control and configure. This is important when you are looking to debug and run your Agent locally.
Anyway, back to the running of A365 Setup All.
The process will start a number of browser windows which you will need to authenticate in.
Hopefully, everything will work beautifully and you will be able to move on to the next step which is to review the Agent Blueprint configuration.
However, I did hit some issues which I mention below.
A365 Setup Issue: Message Endpoint Configuration
I did have some fun here with setting up the messaging endpoint and it errors out. The reason being that I had created the resource group in UK South which is not a supported region.
To resolve this, I did the following:
- Updated the a365.config.json so that the location was changed from uksouth to swedencentral.

- Tidied up the Azure Resources using
a365 cleanup azure
- Reprovisioned the Bot Message Endpoint using
a365 setup blueprint –endpoint-only

Review Agent Blueprint
If you check Microsoft Entra ID and the Microsoft Admin Portal you will find entries that have been created for your Agent.
Browsing to https://admin.cloud.microsoft
- Choosing Agents and All Agents will display the following
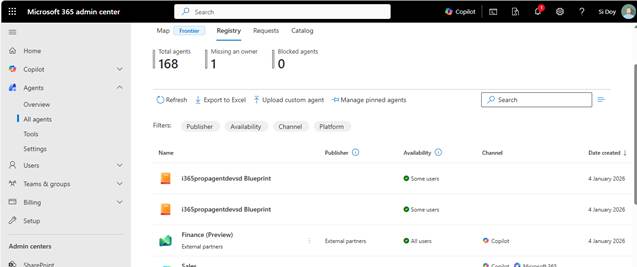
- You can see that I have a couple of Agent Blueprints since the first time I ran “a365 setup all” it didn’t work correctly.
- You will probably want to tidy up these duplicate Agent Blueprints which you need to do through the Microsoft Teams Development Portal. I’ll show you this next.
However, clicking on one of the Agent Blueprints will take you into Microsoft Entra ID and show you more details.
I think the Blueprint’s access is an interesting screen as you can see which permissions have been granted including in our example access to the various Microsoft 365 MCP Servers. I am assuming that we will be able to add our own MCP Servers and configure access to those through the same mechanism. However, I haven’t investigated that yet.
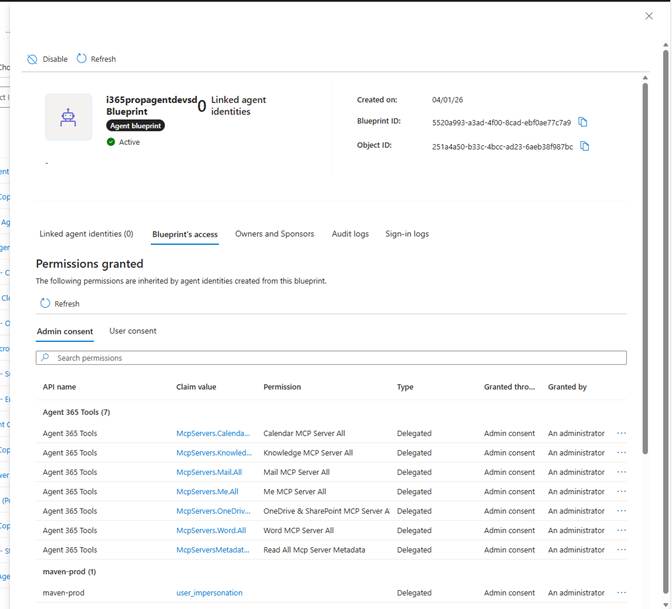
Anyway, have a look about, there are screens for Audit Logs which will display changes made to the Agent Blueprint along with sign-in logs as well. This is where Agent 365 starts to give your admin teams more visibility on what is happening with these Agents.
Tidying up Agent Blueprints
Over the course of running the a365 setup all tool. I created a couple of duplicate Blueprints. This is one of the areas that I would like an improvement with the a365 tool as it does not detect previous Agent Blueprints and will create a new one each time a365 setup all is run.
To tidy up these duplicate Agent Blueprints do the following
- First find your current Agent Blueprint that is in use by looking in your a365.generated.config.json file.

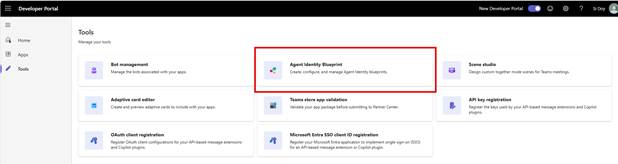
- Next, browse to the Microsoft Teams Development Portal https://dev.team.microsoft.com
- Click on Tools and choose Agent Identity Blueprint
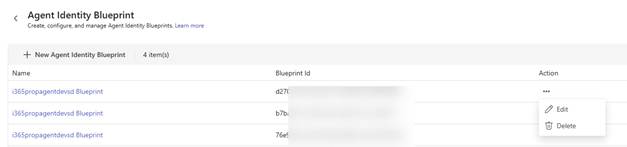
- Taking note of the Blueprint Id you are using, delete all the other agent blueprints using Action -> Delete
Ready to Publish your Agent
We are now ready to publish the agent, which will create our Microsoft 365 App Package for Microsoft 365 Copilot / Teams etc.
Run the following command to publish your Agent
a365 publish
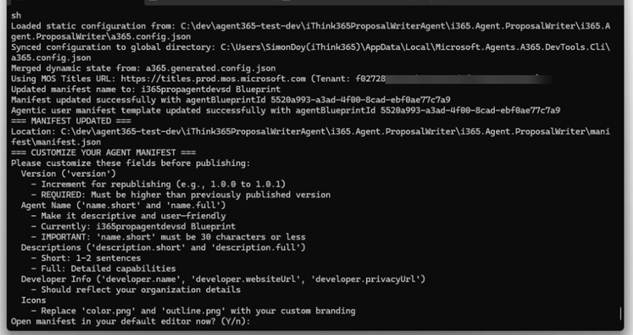
You will be asked to modify your Agents manifest.json file which you can configure your Published Agent Blueprint. Please note that your Agent’s short name needs to be less than 30 characters. If you don’t get this right, then it will fai,l and you will need to republish again.
Anyway, hopefully it has all executed correctly, and you will have your Agent’s Published Blueprint visible in the Microsoft 365 Admin Portal
- Browse to https://admin.cloud.microsoft
- Click on Agents -> All Agents

I must admit I am a bit confused about what to call this. Currently, I am going with published Agent Blueprint but I am going to have to have a think about that. The published Agent Blueprint is not an Agent that you can use yet. To be able to refer to the agent, we need to create an instance.
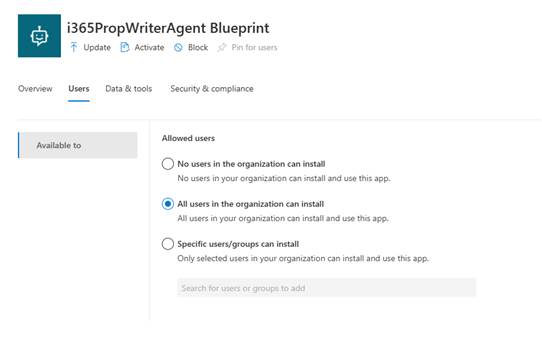
What is great from an administration perspective is that you still have full control over who can create an instance of an Agent from one of these published Agents by configuring the Users tab.
Anyway, we need to create an instance.
Let’s do that next.
Activating your Published Agent Blueprint
To create an instance of an agent from a Blueprint, the Blueprint needs to be activated first. This is done by doing the following.
- Activate the Agent Blueprint by clicking on the Activate button
- This will start a wizard where you can configure who can create instances of an agent.
- Next, we need to apply the policy template that will be used.
- Finally, click Finish to activate your Blueprint
Now, we can create an instance of an agent.
However, before we do that, we should really get our agent running locally.
Running your Agent locally
You remember that we created the DevTunnel a few steps previously.
Well, now that we are about to have the agent instance up and running, we need to get our code running locally.
You will need to set up and configure an Azure Open AI instance and model deployment.
- Browse to https://portal.azure.com
- Click on Resource Groups
- Choose the resource group that was created to host the Agent within.
- Create an instance of Microsoft Foundry
- Once provisioned, then open Microsoft Foundry,
- Create a deployment instance of an Open AI model, I am going to choose gpt-5.2-chat
You can now update your appsettings.json file for your project with your Azure Open AI settings.
- AIServices:AzureOpenAi:DeploymentName – this is the deployment name for your model.
- AIServices:AzureOpenAi:Endpoint – this is the URL to your Microsoft Foundry API found here
- Currently I get this from the old Microsoft Foundry Portal by clicking on the Azure OpenAI library and copying the endpoint.
- AIServices:AzureOpenAi:ApiKey – this is the API Key found here
- Copy from the Homepage.
- AIServices:UseAzureOpenAI – set to true.

You will also need to configure the following appsettings.json settings.
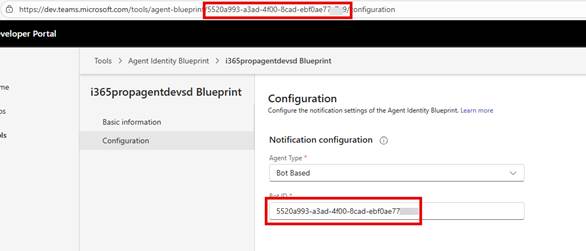
Finally, we need to configure the Agent Blueprint to use our Bot to communicate.
- Browse to https://dev.teams.microsoft.com
- Click on Tools
- Click on Agent Identity Blueprint
- Choose your Blueprint
- Click Configuration
- Change Agent Type to Bot-Based
- Use the Agent Identity Blueprint ID as the Bot ID
- Save your changes.
e.g.
Once you have these setups, fire up your project so that it is ready to receive communications when you create your Agent instance.
Firing up a local instance of your Agent
Now that we have everything configured, we can fire up and test our agent locally.
You can find the official documentation here:
https://learn.microsoft.com/en-us/microsoft-agent-365/developer/testing?tabs=dotnet
Install Agents Playground
Install the Agents Playground
For Windows
winget install agentsplayground
Then run the agentsplayground by running from PowerShell
agentsplayground
Set up Permissions to MCP Servers and Get Bearer Token
In order to be able to test things locally, we need to ensure that our agent has access to the MCP servers and then obtain a Bearer Token oran access token.
Run
a365 develop add-permissions
I found that I had to have the latest pre-release version of a365, otherwise the add-permissions command was missing.
Followed by running
a365 develop get-token
This will ask you to log in to obtain the access token.
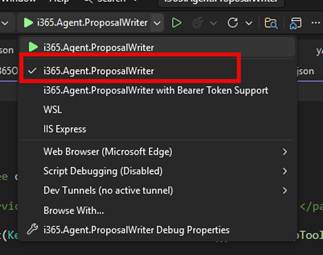
Fire up your Visual Studio instance.
Fire up your Visual Studio instance and ensure you have the project debugger with Bearer Token Support enabled.
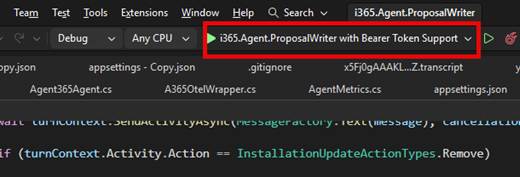
Run Agents Playground if it is not already running and switch to it.
Ask the agent what it can do as shown in the screenshot below.
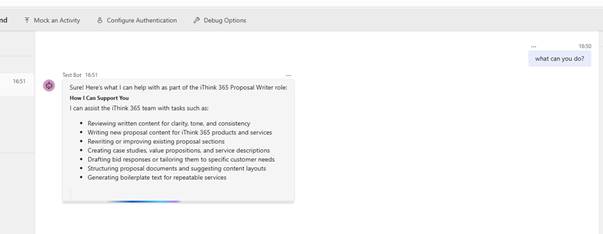
Your agent is up and running.
If we want to do anything more interesting, for example, have our agent respond to notifications and respond to emails, or comments in Office documents, we need to create an instance of our agent.
So, let’s do that next.
Creating an instance of an Agent
Finally, we are creating an instance of our agent that we can communicate with from the Microsoft 365 platform.
We do that from Microsoft Teams.
- Browse to https://teams.microsoft.com
- Click on Apps
- Click on Agents for your team
- Choose the Agent Blueprint that we created
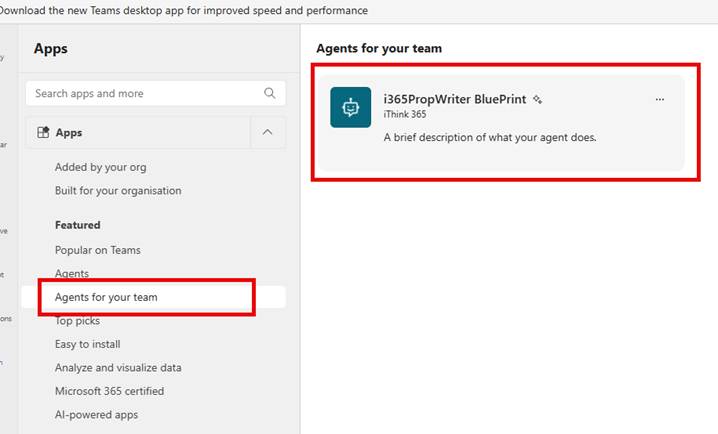
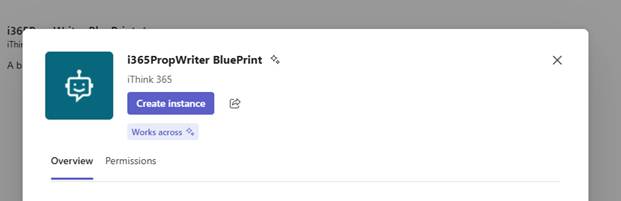
- Click on Create Instance
- Provide a name for the agent so that this is really the agent now, and the name will be used to at mention the agent.
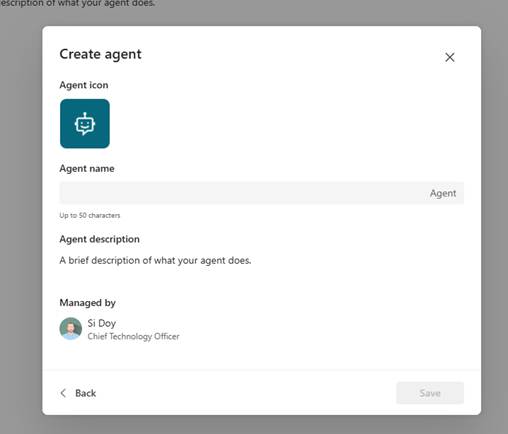
- I am going to use Sales Proposal Writer for the name.
- Note: Agent is always added at the end of the name!
- Click Save
One of the questions that I have is, why would we want to have multiple instances of one agent?
Well, I am not entirely sure at this time but thinking about it, I can imagine that if we were building agents that we needed to behave the same but work in different parts of the busines,s then we might have an agent for each business area, department or team. A good example would be to have a project administration agent where an instance is created for each project. A little bit like the Microsoft Team Channel Agent.
I can see that would make sense for this example; however, I suspect that there will be a lot of single instance Agents created. I guess we shall see how that plays out.
Testing your Agent Instance
Now that we have our Agent Instance created, we can test some of the more interesting features, such as responding to emails or picking up tasks that have been assigned in Microsoft Office documents.
The process for testing your Agent instance and being able to debug the Agent and its response to external events is slightly different.
Firstly, from Visual Studio, make sure you have switched your project profile to the non-bearer token profile.
Now you are ready start your Visual Studio project and launch the debugger.
- So, start your project and start debugging.
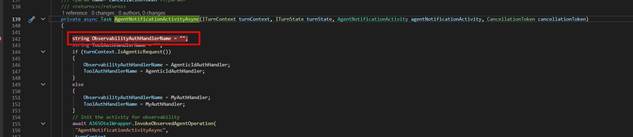
- Add a breakpoint in your MyAgent class within the AgentNotificationActivityAsync function
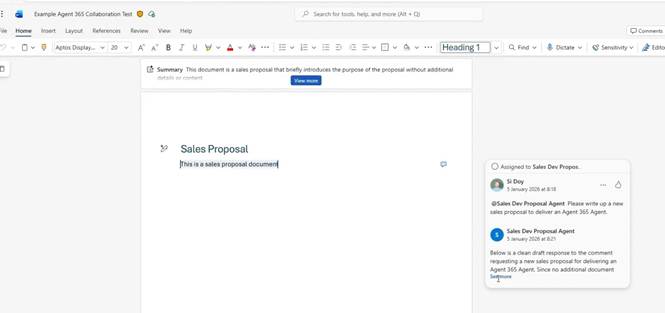
To test the agent, we will test out the Notification system of Agent 365, and we will use Microsoft Word. S,o create a document with some content in it.
Next, we need to create a comment and @ mention our agent in the comment.

Now submit your comment and wait a few moments.
Your break point should be hit. If it is not, then please check the URL that you have configured for your messaging endpoint, as if this is incorrect, then the messages that the platform is trying to send to your Agent will not hit your HTTP endpoint.
As you can see in the video and screenshot below. Our Agent has responded to our request and replied to the comment.
Voila!
You now have an Agent 365 Agent that you can communicate with in your flow of work. There are some really exciting opportunities here, and I look forward to spending more time with the Agent 365 platform to delve into it further.
As you can see, the proposal agent is very simple and not really doing what we need it to do. However, I see such potential here. If use start to use the power of the Microsoft 365 MCP servers and a bit more tooling, I believe we can have an Agent that really helps provide a lot of value to an organisation and help support the consultants to deliver proposals whilst all being in the flow of work. Exciting Stuff!
Conclusion
In this blog post, we delved into getting an Agent 365-enabled Agent setup and running. We walked through the process of getting the Agent 365 components setup with the result being a basic Agent that we can bring into our daily work through the Notification APIs.
The potential of Agents is huge, and with Agent 365 having administration, governance, compliance and development capabilities, it is an exciting focus where we can bring Agents and start to realise their benefits in a way that they can interact with us and also allow us to observe how they are working and the decisions they are making.
My focus following this blog post is to continue looking at this Proposal Writing Agent and see how we can have it review proposals, creating Microsoft Word content in a well-thought-out and structured way. As is often the case, it’s only when you start delving into agents and how you want to be able to work with them that the ideas start flowing.
When creating these blog posts, often things do not work as smoothly as you wantthe first time. I found a few issues which I have documented here, and so I hope that it helps you not hit those same issues. However, if there is something that you cannot get working, please leave a commen,t and I will do my best to come back to you.
Finally, I hope you found this blog post useful, and it starts you on your own Agent 365 journey.
Let me know how you get on!
