Introduction
In the last episode, Dev Diary S01E03, we added our first Angular page and hooked up the application landing page with a view. This view then displayed some data.
Now I wanted to add a new page which allows me to add an invoice to the list of invoices. Also I think we need some navigation so you can get easily Add an Invoice.
Adding Invoice Feature
Add Invoice Page
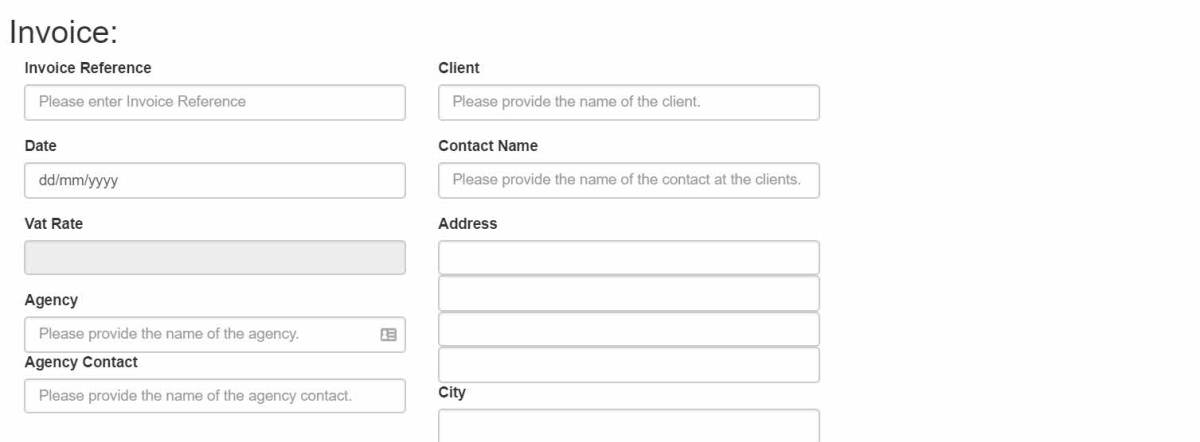
So I added a new page called /app/views/add-invoice.html to my VS Code project.
This look as below
| <div class="container"> | |
| <div class="row"> | |
| <div class="col-md-4 col-sd-12"> | |
| <button class="btn btn-default" type="button" title="Save" ng-click="saveInvoice()">Save</button> | |
| | |
| <button class="btn" type="button" title="Cancel" ng-click="cancel()">Cancel</button> | |
| </div> | |
| <div class="col-md-8 col-sd-12"> | |
| <span ng-show="status !== ''">{{status}}</span> | |
| <span ng-show="error !== ''">{{error}}</span> | |
| </div> | |
| </div> | |
| <form> | |
| <div id="invoiceDiv" class="row"> | |
| <h2>Invoice: {{invoice.reference}}</h2> | |
| <div class="col-md-4 col-sd-12"> | |
| <div class="form-group"> | |
| <input type="hidden" ng-model="invoice.id"" id="invoiceid" /> | |
| <label for="invoiceReference">Invoice Reference</label> | |
| <input type="text" ng-model="invoice.reference" class="form-control" id="invoiceReference" placeholder="Please enter Invoice Reference"> | |
| </div> | |
| <div class="form-group"> | |
| <label for="invoiceDate">Date</label> | |
| <input type="date" ng-model="invoice.invoiceDate" class="form-control" id="invoiceDate" placeholder="Please enter Invoice Date"> | |
| </div> | |
| <div class="form-group"> | |
| <label for="vatRate">Vat Rate</label> | |
| <input type="number" ng-disabled="true" ng-model="config.vatRate" class="form-control" id="vatRate"> | |
| </div> | |
| <div class="form-group"> | |
| <label for="clientName">Agency</label> | |
| <input type="text" ng-model="invoice.agencyName" class="form-control" id="companyName" placeholder="Please provide the name of the agency."> | |
| <label for="clientName">Agency Contact</label> | |
| <input type="text" ng-model="invoice.agencyContact" class="form-control" id="companyName" placeholder="Please provide the name of the agency contact."> | |
| </div> | |
| </div> | |
| <div class="col-md-4 col-sd-12"> | |
| <div class="form-group"> | |
| <label for="clientName">Client</label> | |
| <input type="text" ng-model="invoice.companyName" class="form-control" id="companyName" placeholder="Please provide the name of the client."> | |
| </div> | |
| <div class="form-group"> | |
| <label for="clientContact">Contact Name</label> | |
| <input type="text" ng-model="invoice.contact" class="form-control" id="clientContact" placeholder="Please provide the name of the contact at the clients."> | |
| </div> | |
| <div class="form-group"> | |
| <label for="addressLine1">Address</label> | |
| <input type="text" ng-model="invoice.addressLine1" class="form-control" id="addressLine1"> | |
| <input type="text" ng-model="invoice.addressLine2" class="form-control" id="addressLine2"> | |
| <input type="text" ng-model="invoice.addressLine3" class="form-control" id="addressLine3"> | |
| <input type="text" ng-model="invoice.addressLine4" class="form-control" id="addressLine4"> | |
| <label for="addressCity">City</label> | |
| <input type="text" ng-model="invoice.addressCity" class="form-control" id="addressCity" /> | |
| <label for="addressPostCode">Postcode</label> | |
| <input type="text" ng-model="invoice.addressPostCode" class="form-control" id="addressPostCode"> | |
| <label for="addressCountry">Country</label> | |
| <input type="text" ng-model="invoice.addressCountry" class="form-control" id="addressCountry"> | |
| </div> | |
| </div> | |
| </div> | |
| <div class="well"> | |
| <button ng-click="addInvoiceLine()" title="Add new line">Add line to Invoice</button> | |
| <table class="table table-striped"> | |
| <tr> | |
| <th> | |
| Description | |
| </th> | |
| <th> | |
| Unit Type | |
| </th> | |
| <th> | |
| Quantity | |
| </th> | |
| <th> | |
| Amount | |
| </th> | |
| <th> | |
| Line Total | |
| </th> | |
| </tr> | |
| <tbody> | |
| <tr ng-repeat="invoiceLine in invoice.invoiceLines"> | |
| <td> | |
| <input class="form-control" type="text" ng-model="invoiceLine.description" placeholder="Provide description"> | |
| </td> | |
| <td> | |
| <select class="form-control"ng-model="invoiceLine.unitType" id="invoiceUnit"> | |
| <option ng-repeat="unitOption in config.unitTypes" value="{{unitOption.name}}">{{unitOption.name}}</option> | |
| </select> | |
| </td> | |
| <td> | |
| <input class="form-control" type="number" ng-model="invoiceLine.unitQuantity"> | |
| </td> | |
| <td> | |
| <input class="form-control" type="number" ng-model="invoiceLine.unitValue" ng-change="invoiceLine.updateLineTotal()"> | |
| </td> | |
| <td> | |
| <p class="form-control-static">{{invoiceLine.lineTotal}</p> | |
| </td> | |
| </tr> | |
| </tbody> | |
| <tfoot align="right"> | |
| <tr> | |
| <td> | |
| <span class="form-control-static">Total: {{invoice.invoiceTotal}}</p> | |
| </td> | |
| </tr> | |
| <tr> | |
| <td> | |
| <span class="form-control-static">VAT: {{invoice.vatAmount}}</p> | |
| </td> | |
| </tr> | |
| <tr> | |
| <td> | |
| <span class="form-control-static">Total including VAT: {{invoice.invoiceTotalWithVat}}</p> | |
| </td> | |
| </tr> | |
| </tfoot> | |
| </table> | |
| </div> | |
| </form> | |
| </div> |
The page is used to create new Invoices. There are a few things to point out on this page.
We are going to have to tell Angular how to bind the view model to the various input form controls. This will allow Angular to pick up the values that the user puts into text boxes, date picker controls and applying those values to the model.
So how does this work, well there is the Angular directive ng-model. This will bind the value of the control to the value inside the ng-model directive.
For example, line 22 we have the html :
| <input type="text" ng-model="invoice.reference" required class="form-control" id="invoiceReference" placeholder="Please enter Invoice Reference"> |
The <input> control has ng-model=”invoice.reference” this will bind the value of invoice.reference to the text box control and also update the view model as the textbox changes. We will see later where that value coming from but this will be taken from our $scope.invoice.reference object found in the view model.
The other directive to mention is ng-click which binds the button’s click event is bound to an action or function found in the view model. In this case it will be bound the controllers, $scope.saveInvoice() function.
Another lovely feature of Angular is the ng-repeat directive which is used in the next code snippet to populate a drop-down list.
| <select class="form-control"ng-model="invoiceLine.unitType" id="invoiceUnit"> | |
| <option ng-repeat="unitOption in config.unitTypes" value="{{unitOption.name}}">{{unitOption.name}}</option> | |
| </select> |
This will populate the drop-down list with a list of options for the types of units.
Now that we have the view created, I had to create the data model service, controller to manage the view and then setup routing.
$injector, $provide and Provider, Factory and Services
Before we move on to creating the Data Model Service. We need to talk about $provide. I had to create my first instance of a service and started by creating a factory.
I could not get it to work how I wanted with the factory method and then after some further reading, I read about providers and service functions. This led me into looking into the various different methods that the $provide object implementation.
The Angular documentation on $provide gives some good information on this, but after reading I was a little confused about what the difference was between a factory and a service in Angular.
I found this wiki article, Understanding Dependency Injection, within the Angular GitHub project. It really was good explaining the concepts, under the hood mechanics and reasoning behind the approach in more detail.
The $provide methods are helpfully made as part of the Angular module object and you have the following types:-
- provider – registers a service provider for the Angular $injector object. This is used to create and initialise a service.
- service – registers the service, which is created by the service provider function. When a service is created there is also an associated service provider created with the name of ‘servicename’ + ‘Provider. e.g. DataModelService will have a provider called DateModelServiceProvider.
- factory – this registers a factory function, which is called by the service provider.
- constant – these are created as constants which allows them to be available as object which cannot be changed and are available for the lifetime of the application. I have not used these yet, but will get to use them shortly.
- value – constants and values are very similar. The only difference is that constants can be used in service provider functions as part of the $provide.provider() flow. This wiki article on Understanding Dependency Injection talks about this further.
Anyway so what is the difference between a factory and a service? They are very similar and under the hood call the same $provide.provider function when created. The difference as I see it, is that a service can be initialised by a provider under the hood to return a singleton object for the service.
Whereas a factory is initialised by data which you pass into it. So a factory is great when you know that you will have the data to initialise it but you may not know what that is or have reference to it. This makes sense for a factory as that is what the factory pattern does, create me something based on an argument that I pass into it.
The service pattern create me an instance of a service but I don’t need to know the ins and outs of how to create that service. The service is initialised by the service provider function.
I hope that helps clear it up, I am sure that I will need to explain that again to myself.
Anyway, now that we have an understanding of the difference, lets create the Data Model Service.
Data Model Service
Firstly, let’s explain what the Data Model Service is. I am looking to create invoices. So I thought it would be nice to have a place or a service which I can use to create the objects that my application needs. So that is what the Data Model Service does, it allows me to create instances of my Data Model. This will include being able to create instances of the Invoice entity object and an Invoice has multiple Invoice Lines so I will need to be able to create InvoiceLines to add to the Invoice.
So let’s get started!
The data model service is implemented as a new module via a new file created at /app/services/dataModelService.js.
A new module was created called the dataServiceModule. The module creates an object and we use that object to create the provider and the service. Here is the implementation of dataModelService.js
| 'use strict' | |
| var dataModelService = angular.module('dataModelService', []); | |
| dataModelService.service('dataModelService', [dataModelServiceFactory]); | |
| dataModelService.provider('dataModelService', function dataModelServiceProvider(){ | |
| this.$get = [function initDataModelService(){ | |
| var service=new dataModelServiceFactory(); | |
| return service; | |
| }]; | |
| }); | |
| function dataModelServiceFactory() | |
| { | |
| var factory={}; | |
| factory.Invoice = function invoiceConstructor() { | |
| var invoiceObject={ | |
| reference: '', | |
| companyName: '', | |
| invoiceDate: '', | |
| contact:'', | |
| addressLine1:'', | |
| addressLine2:'', | |
| addressLine3:'', | |
| addressLine4:'', | |
| addressCity:'', | |
| addressCounty:'', | |
| addressPostCode:'', | |
| addressCountry:'', | |
| agencyName:'', | |
| agencyContact: '', | |
| invoiceLines: [ | |
| new factory.InvoiceLine() | |
| ], | |
| invoiceTotal:0, | |
| currencyType:'£', | |
| vatRate:0, | |
| vatAmount:0, | |
| invoiceTotalWithVat:0, | |
| status:'', | |
| createdBy:'', | |
| modifiedBy:'', | |
| created:'', | |
| modified:'' | |
| }; | |
| return invoiceObject; | |
| }; | |
| factory.InvoiceLine = function invoiceLineConstructor() { | |
| var invoiceLine = { | |
| description: '', unitQuantity: 0, unitType:'', unitValue:0, lineTotal:0, updateLineTotal: function() { | |
| this.lineTotal=this.unitValue*this.unitQuantity; | |
| return true; | |
| } | |
| }; | |
| return invoiceLine; | |
| } | |
| return factory; | |
| }; |
A service in Angular has two parts, the service and the provider service. The service represents all the operations that can be perfomed by the service. The provider service is used to initialize the service.
Currently, in my DataModelService I have two functions
- Invoice()
- InvoiceLine()
Next, we will go through how I can then implement this service and make it available in the “Add Invoice Controller” which we will create next.
The Invoice Controller
So now we have a way to create our Invoice objects which is centralised. Next we can create the controller for using in the add-invoice.html view.
So our controller starts by creating the controller in file, /app/controllers/invoicecontrollers.js
The controller “addInvoiceController”, looks like this:
| invoiceControllersModule.controller('addInvoiceController', ['$scope', 'dataModelService', '$location', function($scope, dataModelService, $location){ | |
| $scope.invoice=new dataModelService.Invoice(); | |
| $scope.addInvoiceLine = function addInvoiceLine() { | |
| var newInvoiceLine=new dataModelService.InvoiceLine(); | |
| $scope.invoice.invoiceLines.push(newInvoiceLine); | |
| } | |
| $scope.cancel = function cancelStub(){ | |
| $location.path('/'); | |
| } | |
| $scope.status = ""; | |
| $scope.error=""; | |
| $scope.saveInvoice = function saveInvoiceStub(){ | |
| $scope.status="Successfully Saved Invoice"; | |
| $location.path("#"); | |
| return true; | |
| }; | |
| }]); |
The other thing we must do is make sure that Angular is aware of our new module, so we need to add a reference to the JS file in index.html. Also we need to update the app.js so that the module, ‘itspInvoiceFormApp’ requires the module ‘dataModelService’.
| 'use strict'; | |
| var invoiceFormApp = angular.module('itspInvoiceFormApp', | |
| [ | |
| 'ngRoute', 'invoiceControllersModule', 'dataModelService' | |
| ]); |
With out this configuration, I was seeing the following error in the Chrome developer tool when trying to go to the add-invoice.html page.

Adding a new Invoice Line
We need to be able to add a new line to our invoice, we will probably need to remove them too but one step at a time.
The approach to adding these, is that we will create a button which will add a new invoice line. The button will call a function on our controller’s $scope object called addInvoiceLine().
This function will grab the $scope.invoice object and then will get an instance of a new InvoiceLine from our DataModelService. This object is then added to $scope.invoice.invoiceLines.
One of the great things is that Angular will pick up this change and will immediately update the UI to reflect the underlying objects, that is pretty cool.
Saving the Invoice
Currently the add invoice controller, does not do anything to actually save the invoice but rather pretends that it has been successful and then redirects the user to the homepage.
This is achieved by the controllers, $scope.saveInvoice().
The redirection is performed by the $location object. Pages are referenced within Angular, using “#” which represents the start homepage for Angular.
So we call $location.path(‘#’); to return back to the homepage.
We are now done with our Add Invoice Controller, next I had to provide a way for users to get to the new page!
Adding the route
To handle directing the user to the add invoice page, add-invoice.html when the user goes to /invoices/add.
The following was added to app.js so that I had the following:
| 'use strict'; | |
| var invoiceFormApp = angular.module('itspInvoiceFormApp', | |
| [ | |
| 'ngRoute', 'invoiceControllersModule' | |
| ]); | |
| var appStart = function($routeProvider) { | |
| $routeProvider.when('/invoices/add', { | |
| templateUrl:'/app/views/add-invoices.html', | |
| controller: 'addInvoiceController' | |
| }).when('/invoices', { | |
| templateUrl:'/app/views/list-invoices.html', | |
| controller: 'listInvoicesController' | |
| }).otherwise({ | |
| redirectTo: '/invoices' | |
| }); | |
| }; | |
| invoiceFormApp.config(['$routeProvider', appStart]); |
Now we need to provide a way to add an invoice, time for some navigation.
Adding Navigation
So, it is about time we have some navigation in our application. This will be added to the index.html page.
We will add to links, one for the add invoice link and another to take you back to the homepage.
| <!doctype html> | |
| <html lang="en" ng-app="itspInvoiceFormApp"> | |
| <head> | |
| <meta name="viewport" content="width=device-width, initial-scale=1"> | |
| <title>iThink SharePoint Invoice System</title> | |
| <link rel="stylesheet" type="text/css" href="/bower_components/bootstrap/dist/css/bootstrap.css" /> | |
| <link rel="stylesheet" type="text/css" href="/app/css/invoiceformapp.css" /> | |
| </head> | |
| <body> | |
| <div> | |
| <nav class="navbar navbar-default"> | |
| <div class="container-fluid"> | |
| <ul class="nav navbar-nav"> | |
| <li><a class="btn primary" href="#">Home</a></li> | |
| <li><a class="btn primary" href="#/invoices/add" title="Create Invoice">New Invoice</a></li> | |
| </ul> | |
| </div> | |
| </nav> | |
| </div> | |
| <div ng-view></div> | |
| </body> | |
| <script src="/bower_components/angular/angular.js"></script> | |
| <script src="/bower_components/angular-route/angular-route.js"></script> | |
| <script src="/bower_components/angular-resource/angular-resource.js"></script> | |
| <script src="/bower_components/jquery/dist/jquery.js"></script> | |
| <script src="/bower_components/bootstrap/dist/js/bootstrap.js"></script> | |
| <script src="/app/controllers/invoiceControllers.js"></script> | |
| <script src="/app/app.js"></script> | |
| </html> |
Using an <a> link tag to get to another page, is achieved using the <a href> element and using the special character # which represents the Angular home page. To go to the add invoice page we used, ‘’#/invoices/add”.
This gives us the following updated index.html page.

Github
You can find the code here, this commit represents the updates made to the repository for this post
Next Episode
So we now have a way of adding Invoices to the page. It is about time that we start actually calling into our WebAPI hosted in Azure.
So next episode, I will explain what I did to create the Azure Application and then start to organise how we authenticate via ADAL JS.
As always please let me know what you think and if you have any feedback, let me know via the comments.