Introduction
In my previous post, we discussed how to implement Adal.JS into your Angular application. This allows us to use Azure Active Directory as our authentication mechanism.
In this post I am going to go through and create the MVC Web API which we will then start to call from our Angular client to manipulate the Invoices.
Creating the MVC Web API Project
Right then, so first of all we need to create an MVC Web API Project. There are lots of guides out there such as this one on the ASP.NET site.
Anyway, I fired up Visual Studio 2015.
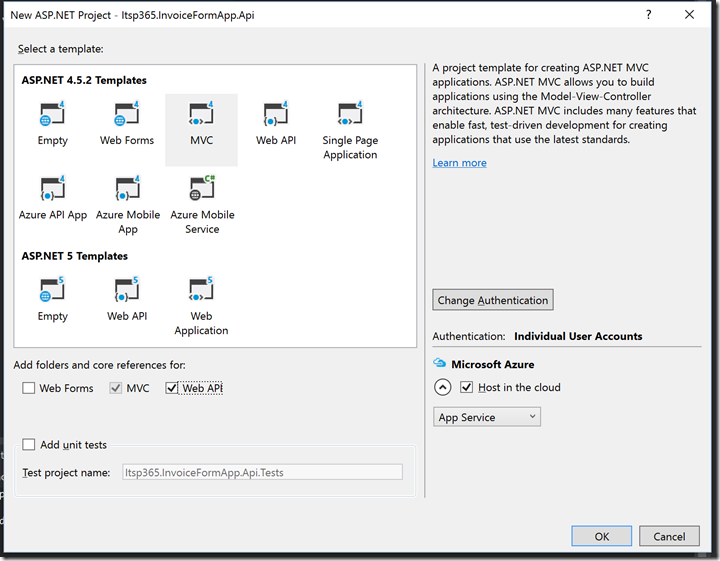
- File->New Project
- Chose the Visual C# ASP.NET Web Application template
- Created an MVC 4.5.2 template Web Application
- Selected the folders and core reference for MVC and Web API
- Selected to “Host in the cloud”
- Then clicked Change Authentication
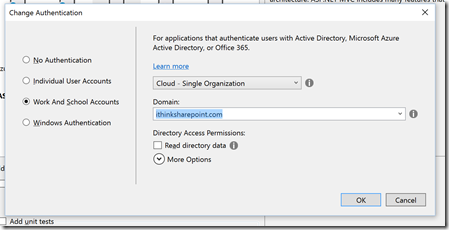
- Clicked on Word and School Accounts
- Choose Single organisation and selected my domain ithinksharepoint.com
- Also selected Read Directory data option
- Now click Ok
- Clicked Ok to start creating the project
Next, you are presented with a screen to start configuring your App Service.
So I setup an appropriate name for the Web App
- appropriate Web App Name
- Choose my subscription
- Chose Resource Group
- Chose App Service Plan
- Clicked Create
Visual Studio then worked its magic and created the Project with all the Azure services behind the scenes.
Then it setup the Organizational Account and App Insights. Once this was all completed we have a working Azure Web Application and are ready to start adding the Web API components.
Configuring Azure AD Authentication for the WebAPI Application
To be honest I was a bit surprised that I had to do this next step but when I was trying to find the application in Azure AD, I could not find anything. Also I could not find anything in the project either related to Azure AD.
So to configure Azure AD Authentication for the WebAPI application I had to do the following:
- Right-click on the project
- Choose “Configure Azure AD Authentication”
This fires up the Azure AD Authentication wizard
- Click Next
- Under Single-Sign-On
- Choose your domain
- Provide an appropriate App ID Uri.
- Choose create a new Azure AD Application
- Click Next
- Under Directory Access Permission
- Select Read Directory Access is not already enabled
- Click Finish
This will start a wizard which will set everything up. The end result is visible in https://manage.windowsazure.com
Adding the WebAPI Components
We have a .NET MVC WebAPI project with very little in it.
Let me explain what I did next, so I would like to have two services for the first phase.
- Configuration Controller – used to get the system and user configuration for the application.
- Invoice Controller – used to add, edit, remove and list the invoices found in the application.
What we will do is create the Configuration service with a simple stub, firstly with no authentication so that we make sure it works and then we will make changes to the WebAPI layer so that it requires authentication.
I created the Configuration Controller. This was achieved by the following![]()
- Browsed to the Controllers folder
- right-clicked Add->Web->Web API->Web API 2.1
- ConfigurationController.cs
- Modified the initial code so that it looked like this
| using System; | |
| using System.Collections.Generic; | |
| using System.Linq; | |
| using System.Net; | |
| using System.Net.Http; | |
| using System.Web.Http; | |
| namespace Itsp365.InvoiceFormApp.Api.Api.Controllers | |
| { | |
| public class ConfigurationController : ApiController | |
| { | |
| public IDictionary<string,string> Get() | |
| { | |
| var configuration = new Dictionary<string, string>(); | |
| configuration.Add("SharePointUrl", "https://ithinksharepointltd.sharepoint.com/sites/dev"); | |
| return configuration; | |
| } | |
| } | |
| } |
Next, we need to deploy this code to Azure and try it out.
I published the project to Azure by doing the following:
- Right-click on the project –> Publish
- Next choose Publish from the wizard
This will start the publishing process and push the code up into Azure.
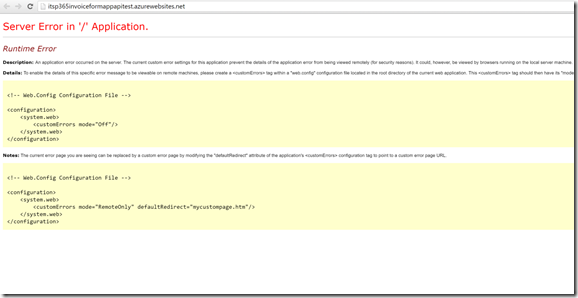
Oh dear, this did not go so well and I received the following screen:
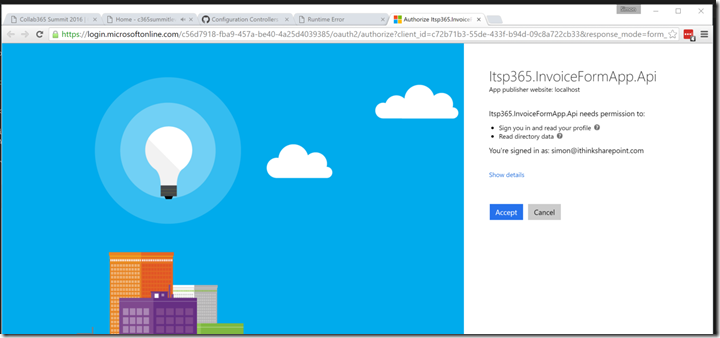
I ended up having to switch on customErrors as recommended by the error message. It turned out that there was a reference to the System.Spacial.dll. The project did not need this and removed it from the project references. The site was published and then ended up with the following screen.
I accepted the request for permissions and then was redirected to http://localhost which failed to work as I was not debugging the application.
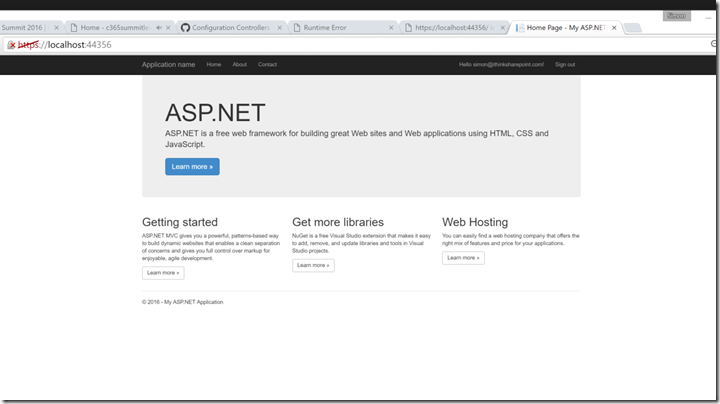
Third time lucky, this time I ran the project using F5 and it all worked nicely, redirecting to http://localhost.
Just in case you do not believe me, I took the screenshot below:
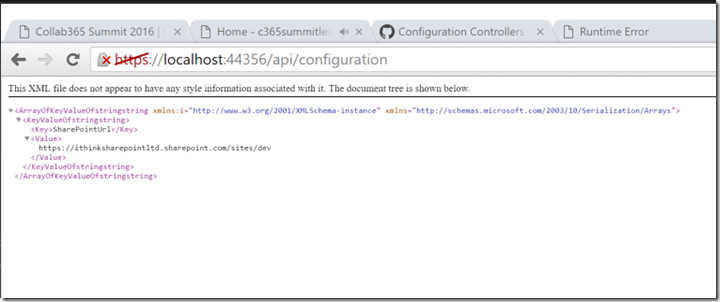
We can also see that our API is working by browsing to https://localhost:44356/api/configuration and we receive a block of Xml as shown below.
Ok, now that we have the service up in the cloud, lets update Angular to consume it.
Update Angular client application to consume WebApi
So I thought I would update the Angular application, add a new page for settings. Firstly, the page would just load in the configuration but eventually this page will allow users to setup and configure the settings for the application.
In order to be able to consume the configuration api endpoint, I needed to do a couple of things to the application.
- create a new view called settings.html
- create a new service called configurationService.js
- create a new controller called settingsController.js
- configure the app.js to load these new modules
- configure the index.html to load the scripts
So lets go through each of the components, starting with the settings.html page
| <section> | |
| <h1> Settings </h1> | |
| <h2> Login Information </h2> | |
| <p class="form-control"> | |
| Username: {{userInfo.userName}} | |
| </p> | |
| <p class="form-control"> | |
| Profile: <br/> | |
| <ul> | |
| <li ng-repeat="profileItem in userInfo.profile">{{profileItem}}</li> | |
| </ul> | |
| </p> | |
| </section> | |
| <section> | |
| <h2>Api Settings</h2> | |
| <p> | |
| {{apiConfig}} | |
| </p> | |
| </section> | |
| <section> | |
| <h2>Application Information</h2> | |
| <p> | |
| {{applicationInformation}} | |
| </p> | |
| </section> | |
| <section> | |
| <h2>Additional Settings</h2> | |
| </section> | |
| <section> | |
| <h2>Installation Information</h2> | |
| <a class="btn" href="#/installation" title="Show Installation Information">Installation Status</a> | |
| </section> |
Next, we have the settingsController.js
| 'use strict'; | |
| var settingsControllerModule = angular.module('settingsController', ['configurationServiceModule']); | |
| settingsControllerModule.controller('settingsController', ['$scope','$http','$routeParams','configurationService','adalAuthenticationService', function ($scope, $http, $routeParams, configurationService, adalService) { | |
| $scope.userInfo = adalService.userInfo; | |
| $scope.apiConfig={}; | |
| $http({ | |
| method:'GET', | |
| url: configurationService.settings.apiUrl + "/configuration" | |
| }).then(function processConfigurationResponse(response){ | |
| $scope.apiConfig=response.data; | |
| }, function processError(response){ | |
| alert(response); | |
| }); | |
| }]); |
Lastly, we have the configurationService
| 'use strict' | |
| var configurationService = angular.module('configurationServiceModule', []); | |
| configurationService.constant('applicationConstants', { | |
| 'clientId':'7c27b6a6-{4 digits}-{4 digits}-9b92-2eee2264cc71', | |
| 'tenantName':'{domain}.com', | |
| 'instance':'https://login.microsoftonline.com/', | |
| 'endPoints': {}, | |
| 'apiUrl':'https://{url}.azurewebsites.net' | |
| }); | |
| configurationService.service('configurationService',[]); | |
| configurationService.provider('configurationService', function configurationServiceProvider(){ | |
| this.endPoints=null; | |
| this.clientId=null; | |
| this.apiUrl=null; | |
| this.tenantName=null; | |
| this.hasInternetConnection=function(){ | |
| return true; | |
| } | |
| this.init=function(apiUrl, tenantName, clientId, endPoints) | |
| { | |
| this.apiUrl=apiUrl; | |
| this.tenantName=tenantName; | |
| this.clientId=clientId | |
| this.endPoints=endPoints; | |
| } | |
| this.load=function(){ | |
| var promise = $q.defer(); | |
| }; | |
| this.$get = [function initialiseConfigurationService(){ | |
| var configurationServiceInstance=new configurationSettings(); | |
| configurationServiceInstance.settings.apiUrl=this.apiUrl; | |
| configurationServiceInstance.settings.adalSettings.clientId=this.clientId; | |
| configurationServiceInstance.settings.adalSettings.tenant=this.tenantName; | |
| configurationServiceInstance.settings.adalSettings.endPoints=this.endPoints; | |
| return configurationServiceInstance; | |
| }]; | |
| }); | |
| function configurationSettings() | |
| { | |
| this.settings={}; | |
| this.settings.siteUrl=""; | |
| this.settings.apiUrl=""; | |
| this.settings.logoUrl="https://blog.ithinksharepoint.com/logo.png"; | |
| this.settings.adalSettings={}; | |
| this.settings.adalSettings.instance=""; | |
| this.settings.adalSettings.tenant=""; | |
| this.settings.adalSettings.clientId=""; | |
| this.settings.adalSettings.applicationId=""; | |
| this.settings.adalSettings.endPoints=""; | |
| this.vatRate=20; | |
| this.currency="£"; | |
| this.unitTypes = [ | |
| {name: 'once'}, | |
| {name: 'hour'}, | |
| {name: 'day'} | |
| ]; | |
| }; | |
We have the guts of the changes required, of course we need to link these pages into the application.
So the app.js needs to be updated with the new route for the settings page. Also we need to setup the configurationService.
| 'use strict'; | |
| var invoiceFormApp = angular.module('itspInvoiceFormApp', | |
| [ | |
| 'ngRoute', 'invoiceControllersModule', 'dataModelService', 'AdalAngular', 'configurationServiceModule', 'settingsController' | |
| ]); | |
| var appStart = function($routeProvider, $httpProvider, adalProvider, applicationConstants, configurationServiceProvider) { | |
| $routeProvider.when('/invoices/add', { | |
| templateUrl:'/app/views/add-invoice.html', | |
| controller: 'addInvoiceController', | |
| requireADLogin: true | |
| }).when('/invoices', { | |
| templateUrl:'/app/views/list-invoices.html', | |
| controller: 'listInvoicesController', | |
| requireADLogin: false | |
| }).when('/settings', { | |
| templateUrl:'/app/views/settings.html', | |
| controller: 'settingsController', | |
| requireADLogin: true | |
| }).otherwise({ | |
| redirectTo: '/invoices' | |
| }); | |
| var instance=applicationConstants.instance; | |
| var clientId=applicationConstants.clientId; | |
| var tenantName=applicationConstants.tenantName; | |
| var endPoints=applicationConstants.endPoints; | |
| var apiUrl = applicationConstants.apiUrl; | |
| configurationServiceProvider.init(apiUrl, tenantName, clientId, endPoints); | |
| adalProvider.init({ | |
| instance: instance, | |
| tenant: tenantName, | |
| clientId: clientId, | |
| endPoints: endPoints, | |
| anonymousEndpoints:{}, | |
| extraQueryParameter: 'nux=1', | |
| cacheLocation: 'localStorage', // enable this for IE, as sessionStorage does not work for localhost. | |
| }, $httpProvider); | |
| }; | |
| invoiceFormApp.config(['$routeProvider', '$httpProvider', 'adalAuthenticationServiceProvider', 'applicationConstants', 'configurationServiceProvider', appStart]); |
Also the index.html needed to be updated so that we have a link for the settings page.
| <!doctype html> | |
| <html lang="en" ng-app="itspInvoiceFormApp"> | |
| <head> | |
| <meta name="viewport" content="width=device-width, initial-scale=1"> | |
| <title>iThink SharePoint Invoice System</title> | |
| <link rel="stylesheet" type="text/css" href="/bower_components/bootstrap/dist/css/bootstrap.css" /> | |
| <link rel="stylesheet" type="text/css" href="/app/css/invoiceformapp.css" /> | |
| </head> | |
| <body> | |
| <div> | |
| <nav class="navbar navbar-default"> | |
| <div class="container-fluid"> | |
| <ul class="nav navbar-nav"> | |
| <li><a class="btn primary" href="#">Home</a></li> | |
| <li><a class="btn primary" href="#/invoices/add" title="Create Invoice">New Invoice</a></li> | |
| <li><a class="btn primary" href="#/settings" title="Settings">Settings</a></li> | |
| </ul> | |
| </div> | |
| </nav> | |
| </div> | |
| <div ng-view></div> | |
| </body> | |
| <script src="/bower_components/angular/angular.js"></script> | |
| <script src="/bower_components/angular-route/angular-route.js"></script> | |
| <script src="/bower_components/angular-resource/angular-resource.js"></script> | |
| <script src="/bower_components/jquery/dist/jquery.js"></script> | |
| <script src="/bower_components/bootstrap/dist/js/bootstrap.js"></script> | |
| <script src="/bower_components/adal-angular/dist/adal.min.js"></script> | |
| <script src="/bower_components/adal-angular/dist/adal-angular.min.js"></script> | |
| <script src="/app/controllers/invoiceControllers.js"></script> | |
| <script src="/app/controllers/settingsController.js"></script> | |
| <script src="/app/services/dataModelService.js"></script> | |
| <script src="/app/services/configurationService.js"></script> | |
| <script src="/app/app.js"></script> | |
| </html> |
Phew, that is quite a big change, so lets go and try this out.
I browse to the application and click on the settings button.
Unfortunately, I get an error and looking into the browser developer tools we see the following message:
Cross-Origin Resource Sharing (CORS) issues
So, what is going on?
Well we haven’t allowed the API to be able to process requests from domains that isn’t its own. The way we do that is through CORS configuration within the WebAPI.
To get this to work we need to configure the WebAPI by
- Installing the Microsoft.AspNet.WebApi.Cors NuGet Package (current v5.2.3)
- Not the Microsoft.AspNet.Cors NuGet Package (this does not give you the assembly System.Web.Http.Cors).
- Modify /App_Start/WebApiConfig.cs
| using System; | |
| using System.Collections.Generic; | |
| using System.Linq; | |
| using System.Web.Http; | |
| using System.Web.Cors; | |
| using System.Web.Http.Cors; | |
| namespace Itsp365.InvoiceFormApp.Api | |
| { | |
| public static class WebApiConfig | |
| { | |
| public static void Register(HttpConfiguration config) | |
| { | |
| // Web API configuration and services | |
| var corsConfiguration = new EnableCorsAttribute("http://localhost:8080,http://127.0.0.1:8080,https://itsp365invoiceformappapitest.azurewebsites.net", "*", "*"); | |
| config.EnableCors(corsConfiguration); | |
| // Web API routes | |
| config.MapHttpAttributeRoutes(); | |
| config.Routes.MapHttpRoute( | |
| name: "DefaultApi", | |
| routeTemplate: "api/{controller}/{id}", | |
| defaults: new { id = RouteParameter.Optional } | |
| ); | |
| } | |
| } | |
| } |
Now,its able to call in and get the configuration settings correctly!
Switching on Adal.js
We have proven that we can talk to our MVC Web API endpoint. So that is good news but now I had to get it to authenticate through Azure AD, get a access token and use that when making requests to the API.
Fortunately, Adal.js comes to the rescue here and a lot of the heavy lifting is done for you!
So let’s have a look at this. This bit did take me a while and I will explain why a little later. Though the following people and posts really helped me get to understand how Adal.js handles authentication when authenticating against different endpoints.
- Matt Williams (@zacadebo)
- Andrew Connell and his blog post: Adal JS & Cors with 0365 APIs
First, we need to tell Adal.Js about the endpoints that will require authentication and we need to provide a way to map those endpoint URLs to resource name.
So to do that we configure the endPoints object when setting initialising the Adal library. Currently this is being setup by the following code snippet in app.js :-
| var instance=applicationConstants.instance; | |
| var clientId=applicationConstants.clientId; | |
| var tenantName=applicationConstants.tenantName; | |
| var endPoints={'https://{myurl}.azurewebsites.net/api':'https://{myappuri}.com'}; | |
| var apiUrl = applicationConstants.apiUrl; | |
| configurationServiceProvider.init(apiUrl, tenantName, clientId, endPoints); | |
| adalProvider.init({ | |
| instance: instance, | |
| tenant: tenantName, | |
| clientId: clientId, | |
| endPoints: endPoints, | |
| anonymousEndpoints:{}, | |
| extraQueryParameter: 'nux=1', | |
| cacheLocation: 'localStorage', // enable this for IE, as sessionStorage does not work for localhost. | |
| }, $httpProvider); | |
The important part of this is the endPoint array object. This is an array of objects where you have the URL associated to the application Id Uri.
If you remember that is this section of the application configuration in Azure Ad.
Once we have that value we need to associate the APi Url to the App Uri Id.
| 'endPoints': {'https://{url}.azurewebsites.net/api':'https://ithinksharepoint.com/Itsp365.InvoiceFormApp.Api.Mark2'}, |
This allows Adal.JS to provide the right resource id when requesting an auth token.
Turn on Authentication in our Web API layer
So now we have Angular configured to authenticate against Web API with Adal.js. We just need to switch on authentication for the Web API layer.
This is pretty straightforward and requires the addition of the [Authorize] attribute to our Web API Class or Methods. The change is shown below:
A recompile of code and Publish now allows us to test the changes out.
HTTP 401s and Debugging Azure WebApps
So I thought I had everything setup to allow the Angular application to authenticate against the Web API. Unfortunately I was seeing 401 Unauthorised when using the browser’s development tools.
After quite a lot of trying things out, I was stumped so I tried out debugging the WebAPI code running on Azure. Fortunately, Azure has some pretty cool development debugging tools.
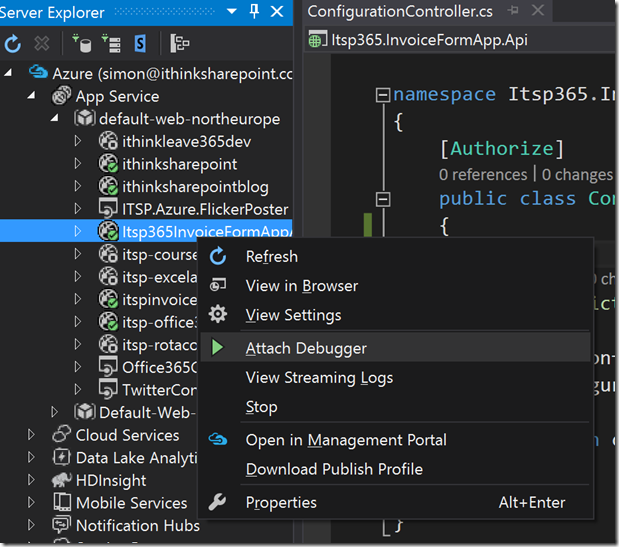
To start debugging the API, I had to fire up Server Explorer. Apparently you should be able to use Cloud Explorer in Visual Studio 2015 but I have not been able to get this to work.
To debug your application do the following:
- View->Server Explorer
- Expand the Azure node in Server Explorer
- Expand the App Service node in Server Explorer
- Expand the resource group
- Right click on the App and choose “Attach debugger”
The debugger takes a few moments to organise itself but eventually it will attach.
Now we can setup our breakpoints and start debugging the application. I put a breakpoint in the startup.cs file on the ConfigureAuth(app) line within the Configuration function.
Even when I had the debugger running and tried to access the application, at no time did the breakpoint get picked up.
So what is going on?
I looked at the Azure configuration for the API application and made the following changes:-
- Added a reply url for the Angular application which is currently being run using http://localhost:8080
- Added an application permission so that the application can read directory data
This had no effect and I was still getting the error.
Examining the Angular Azure AD Application Configuration
Next I thought I better make sure that Angular is sending over an authentication token when making the request to Azure. For more information, watch this brilliant video on OAuth: Deep Dive into the Office 365 App Model: Deep Dive into Security and OAuth in Apps for SharePoint
I used the browser development tools and set a breakpoint in the settingsController.js on line 14 which is where the error is processed.
When the breakpoint is reached then we could look at the response object, fortunately the response object is pretty detailed and it has a config object which provides information about what was sent with the request. We can see here that there is a header object, now this should have an Authentication header with a Bearer token. There is not one, so what is going on? It must be our Adal Angular configuration.
Immediately when I saw this, I thought ah maybe its our endPoint configuration. There is a function as part of the Adal Angular service object, in our code that is adalService. This function is called getResourceForEndPoint(), this function will return back the App Id Uri based on a provided URL. Now interestingly, when this function was called with the following argument:
- adalService.getResourceForEndPoint(“https://itsp365invoiceformappapitest.azurewebsites.net/api”);
This function returned null. This is very strange as our endPoints are configured. After a lot of playing about I realised my error. The configuration of the adalService is performed in app.js.
| adalProvider.init({ | |
| instance: instance, | |
| tenant: tenantName, | |
| clientId: clientId, | |
| endPoints: endPoints, | |
| anonymousEndpoints:{}, | |
| extraQueryParameter: 'nux=1', | |
| cacheLocation: 'localStorage', // enable this for IE, as sessionStorage does not work for localhost. | |
| }, $httpProvider); |
The problem was the object name given for endPoints. The object name should be endpoints. So the updated app.js was changed to the following:
| adalProvider.init({ | |
| instance: instance, | |
| tenant: tenantName, | |
| clientId: clientId, | |
| endpoints: endPoints, | |
| anonymousEndpoints:{}, | |
| extraQueryParameter: 'nux=1', | |
| cacheLocation: 'localStorage', // enable this for IE, as sessionStorage does not work for localhost. | |
| }, $httpProvider); |
Now that we have this change made, I tried to login but got the error that the application could not reply back to the URL http://localhost:8080/app/
The fix was made to the Azure Application for the Angular client app, itsp365.invoiceformapp.client, by adding http://localhost:8080/app to the list of Reply URLs.
Whilst looking at this page, I realised that the client Angular application did not have any permissions to access the API Azure application. So to fix this, I added a new permission, chose the application:
Once this was added then the delegated permissions to access the application was given.
If we had not set this permission we would have seen the following error when trying to access the API application.
“response = “AADSTS65001: The user or administrator has not consented to use the application with ID = ‘{clientid}’”
So, actually these two changes really started to make a difference. Now when I accessed the settings view, we received the following error:
“AADSTS70005: response_type ‘token’ is not enabled for the application ↵Trace ID: 2c370e50-63ff-41e1-8cc1-fe90c8ef7b98 ↵Correlation ID: 0d1dd4db-cc4f-4bc1-b7c6-54812dfc3142 ↵Timestamp: 2016-05-14 21:35:39Z”
This requires the application manifest to be modified to enable something called the oAuth2AllowImplicitFlow.
This setting is changed by browsing to the itsp365.invoiceformapp.client Azure Application:
- scroll to the bottom, click “Manage Manifest”
- Click Download Manifest
- Open up the downloaded file, this will have the filename of {clientid}.json, I use VS Code to do this.
- Find the line below and change the false to true.
![image[27] image[27]](https://ithinksharepoint.files.wordpress.com/2016/05/image27_thumb.png?w=244&h=29)
- Save the file and then back on the Azure Application page choose Manage Manifest and click Upload Manifest
Wait for the manifest to be uploaded and processed.
Now when I made this change I kept getting the error “response_type token is not enabled…”. So I opened up the browsers settings and deleted the site cookies. This deleted the Azure AD authentication cookies and when I next opened up the Angular application I had to login. Now accessing the settings page, it worked!
So if you make changes , either do what I did above or run the browser in incognito mode to force an authentication.
Now the call to the configuration service API was successful!
Quick Refactor of the Application Constants
After I did everything, I was not happy with the way that the applicationConstants were part of the configurationService. This does not make sense so I moved them into their own folder and file. A file was created in /app/common/constants.js
The constants.js file had a new module called “applicationConstantsModule” and this defined the constant, applicationConstant.
You can see the code below:
| 'use strict' | |
| var constantsModule = angular.module('applicationConstantsModule', []); | |
| constantsModule.constant('applicationConstants', { | |
| 'clientId':'{clientguidhere}', | |
| 'tenantName':'ithinksharepoint.com', | |
| 'instance':'https://login.microsoftonline.com/', | |
| 'endpoints': {'https://{apiurlhere}.azurewebsites.net/api':'https://ithinksharepoint.com/Itsp365.InvoiceFormApp.Api.Mark2'}, | |
| 'apiUrl': 'https://{apiurlhere}.azurewebsites.net/api' | |
| }); |
I then had to update the index.html to load the /app/common/constants.js and also tell the invoiceFormApp to load the module, applicationConstantsModule within the app.js file.
With those changes made the refactoring is done.
Source Code
The source code for this blog post can be found in the following GitHub repositories:-
- Angular Client Component – https://github.com/ithinksharepoint/IT365.InvoiceFormApp.Client/commit/42abaa221690de371b4cfd1bd5aa42591e8fd51a
- .NET MVC API Server side Component – https://github.com/ithinksharepoint/Invoicing-Application/commit/6d9a0481ed87acf52cae79af51c8d5ae10438d9a
Conclusion
So now in this episode we have an application which has a basic REST API which is secured by Azure AD. We have made it possible for the Angular client to be able to authenticate against the REST API endpoint.
I hope you found this useful and there are some good resources for troubleshooting.
Next Episode
In the next episode, I will talk about my big mess up where I deleted the Azure AD app by mistake.
Thanks for reading, as always I would be interested in hearing what you think. Are these instructions useful, do they make sense?


